

This DIY custom kitchen drawer organizer was so easy to make and cost less than $10 for the entire project. I am SO THRILLED with how much better my kitchen drawers look!! They drove me crazy when they were a jumbled mess! I was constantly digging through junk and could never find what I was looking for in the tangle of whisks and tongs and spatulas.
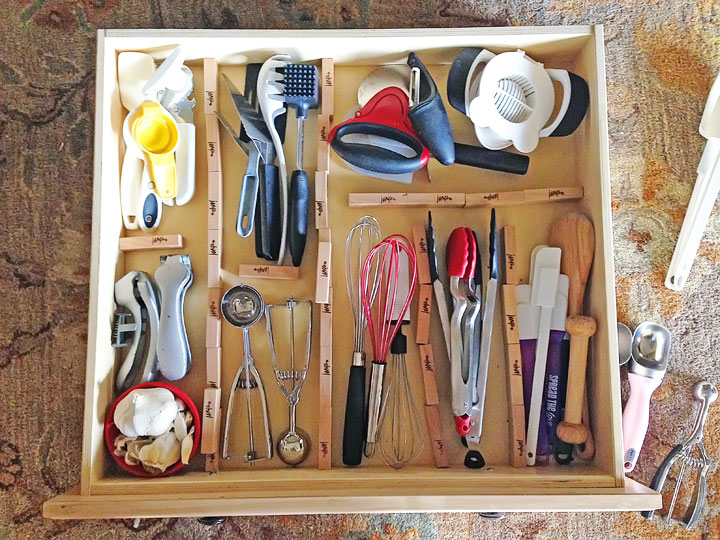
Now with these custom drawer dividers everything is perfectly organized and easy to find. And I’m not a big DIYer, so I’m telling you, if I have the patience to do this, I promise you can do it too!!
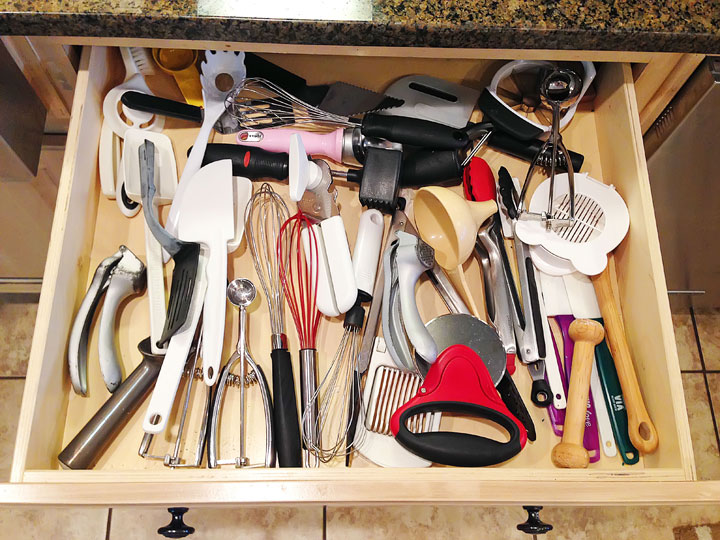
Here’s another look at my kitchen drawers before. This was a great drawer with tons of storage space. But it definitely needed some drawer dividers! With no dividers, everything was just a jumbled mess.
I knew it had potential, and I kept thinking someday I’d get a drawer organizer for it. The problem with pre-made drawer organizers is that the slots are never big enough and never where I want them to be. And custom drawer organizers are expensive and can take a long time to custom order!
I had an idea one afternoon to make my own kitchen drawer organizer and had my brand new drawer dividers the very same day.
First I removed the drawer, took everything out, and sorted everything in the drawer by type: scoops, whisks, spatulas, cutters, etc. Then I placed everything back in the drawer, arranging it like a puzzle so they would all fit.
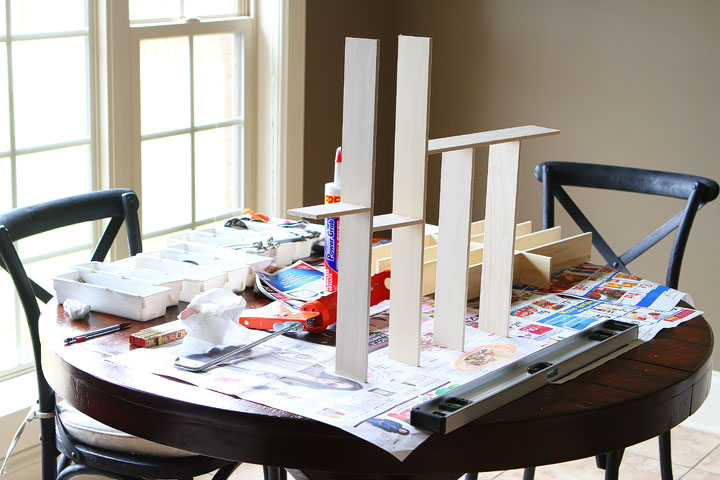
I used Jenga blocks as barriers to give me an idea of where the dividers would go. At first I was going to use masking tape, but Kevin suggested I use Jenga blocks, and I am never one to argue with board games.
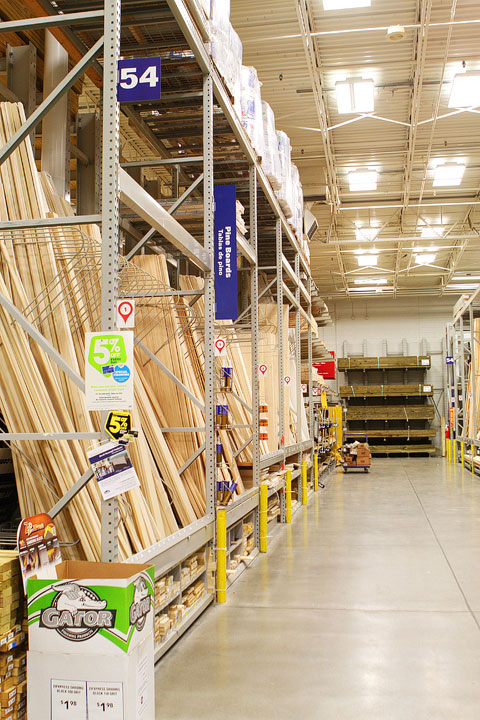
With an idea of how much wood we’d need, we made our way to Lowes.
And headed for the lumber aisle to get supplies to make our new kitchen drawer organizer.
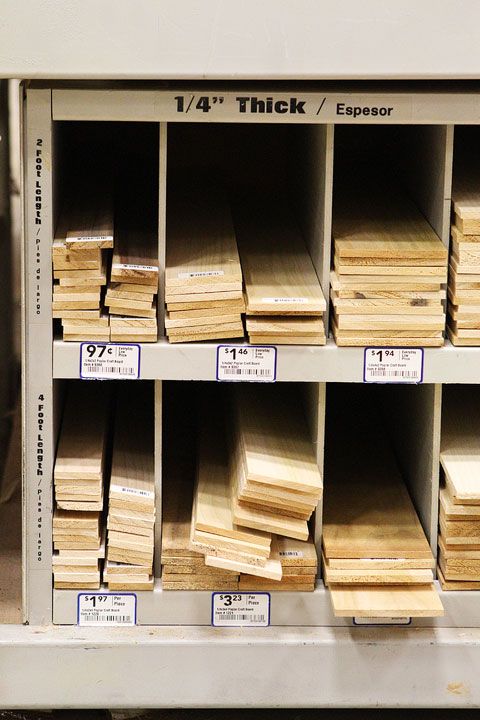
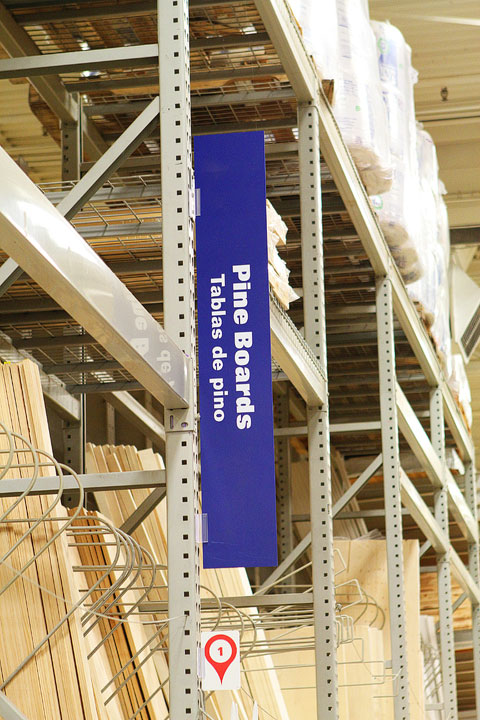
This is what we were looking for — 1/4″ thick craft or hobby board.
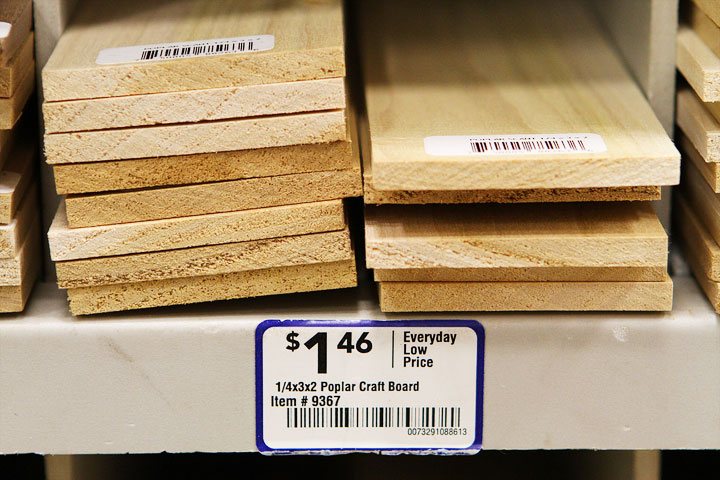
This was exactly what we bought — 1/4 x 3 x 2 Poplar Craft Board.
They also have different types of wood: aspen, pine, red oak, etc, if you’re looking for a different type or color of wood.
For the drawer layout below, we needed 6 pieces of wood for a total of $8.76 before tax.
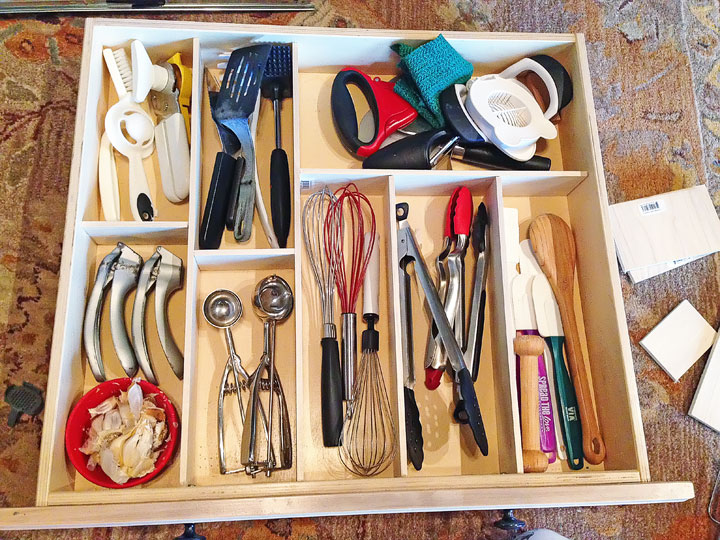
When we got home, Kevin cut the boards to size. He used a skill saw. We’re not big DIYers, so that’s the only kind of saw he had. If you know your measurements, Lowe’s will also cut the boards for you! Then we set the boards back in the drawer to make sure they’d fit.
The photo above is before we glued the boards together or anything. They’re just sitting snugly in the drawer, not attached.
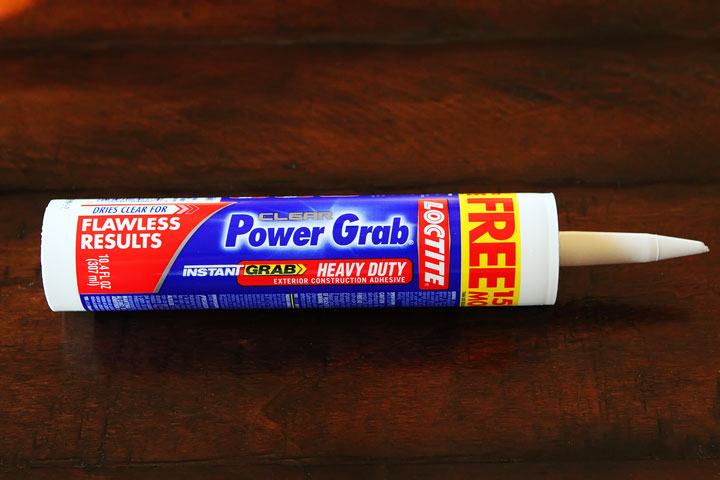
Finally it was time to glue everything together. We used Locite Clear Power Grab Heavy Duty adhesive. LOVED that it dried clear!! When we first put it on, you could definitely see a ton of the glue in the cracks. We smoothed out the glue along the seams (like you would do caulk) and it dried totally clear. You’d never even know it had been there.
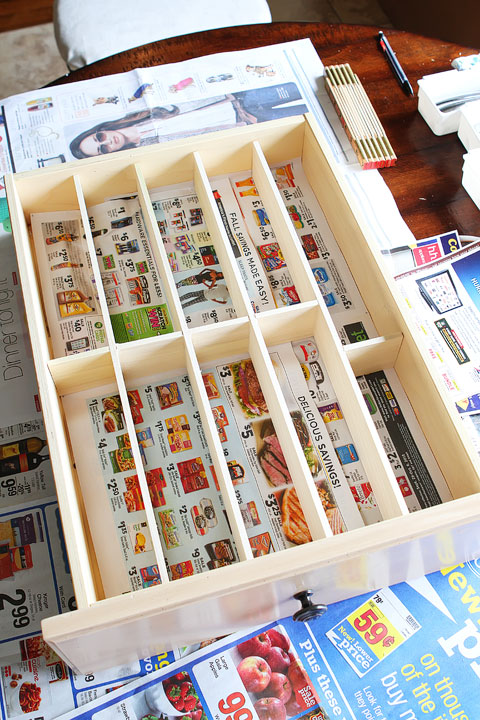
Okay, here’s a sneak peek at another drawer organizer we did. I’m showing you this one because I forgot to take a photo of this step for the other drawer! Anyway, this is just to show you how we glued everything together. We lined the drawer with newspaper so we wouldn’t drip glue on the inside of the drawer, then glued the dividers together, using the drawer as our guide.
We did not glue the boards to the drawer because I wanted the drawer dividers to be removable. I didn’t want to do anything permanent to the drawers.
We glued the boards to each other while the drawer held the boards in place. Using the drawer as a guide helped hold the shape of the dividers and keep the pieces lined up so we knew we were still on track.
Here are the organizers out of the drawers. Totally removable! They fit snugly inside the drawers and don’t move around once inside the drawer. But if we ever wanted to take them out for any reason (like to clean the drawer) they just lift right out.
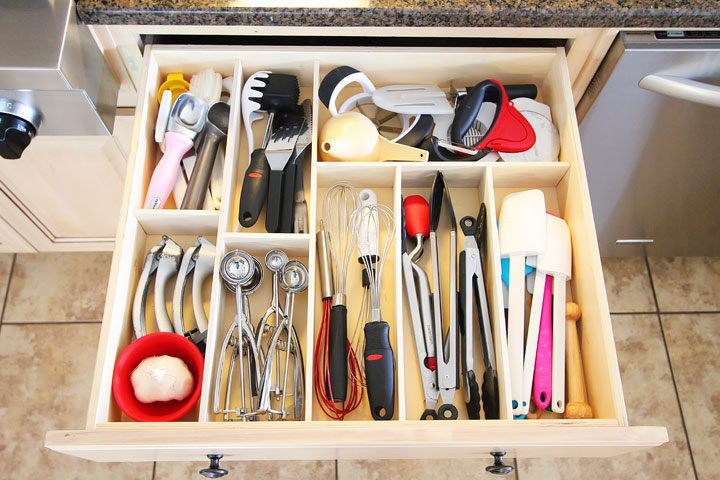
Lastly, we fitted the organizer into the drawer and placed the utensils in their newly organized slots.
Since we had the drawer out anyway, we also installed full extension drawer slides, which are an absolute must for getting the most real estate out of your drawers. We would not have been able to use that back storage slot (with the funnel and pizza cutter) without full extension drawer slides.
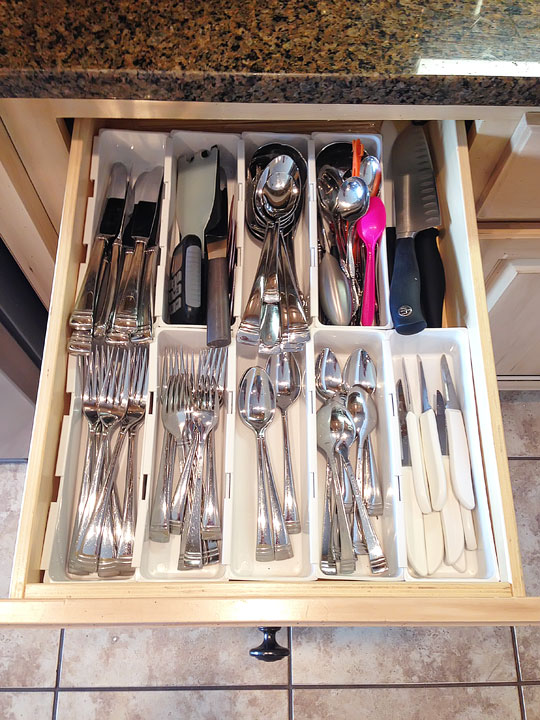
While we were at it, we also organized our cutlery drawer. Here’s what it looked like before. It was okay, but you can see my knives and some of the other utensils were too big and hung over the edge of those cheap plastic trays.
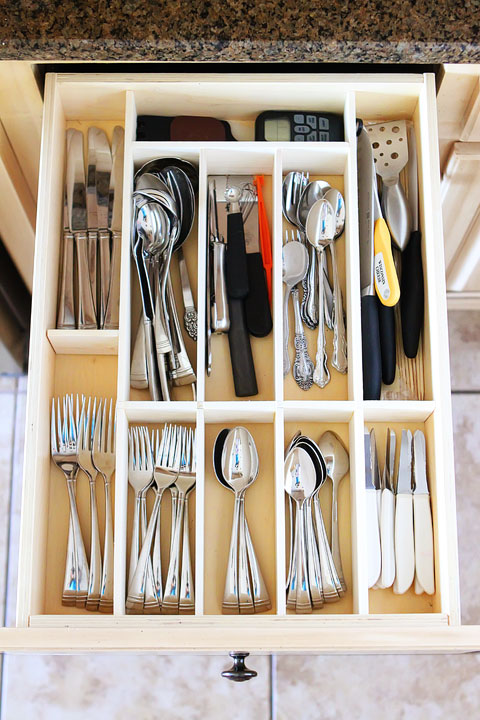
And here’s what the looks like now with our custom kitchen drawer organizer. So much better! We installed the full extension drawer slides here too. You can see it opened up a whole new back storage slot. And now nothing is hanging over the edge.
Make sure you have WD-40 on hand if you are going to install new drawer slides. We had to generously spray the new slides with WD-40 and open and shut the drawer about 100 times to get it opening and closing smoothly again.
Like this post? Share it on Pinterest!
Totally try this on your kitchen drawers!! These kitchen drawer organizer are so easy to make and look professionally made. It’s beautiful and it makes the drawer a thousand times more functional since everything is organized and easy to reach!
Kitchen Drawer Organizer Update
Five year update! Many of you have asked how these drawer organizers are holding up. Five years later we are STILL using these same drawer dividers!


Fantastic DIY project, Amanda! As a professional in organizing, I’m impressed with your practical and cost-effective approach to drawer organization. Using craft boards for custom dividers is a great solution for maximizing drawer space and keeping utensils neatly arranged. It’s inspiring to see how a simple project can significantly impact kitchen functionality and ease of use.
Could you please tell me where you bought the 1/4 x 3 x 2 wood from? I’m having a hard time finding that size.
You just saved me about $600 in custom drawer inserts-thank you!
Thanks for this post–it such a great solution to the ubiquitous problem of not finding draw organizers that make the best use of drawer space. Wood glue is for projects like this and white glue like Elmers (it’s what we used in my first year of high school wood shop before wood glue was a thing) works well with wood also so people can use either of those if they have them. I used plastic wrap underneath instead of newspaper because I didn’t want any risk the glue would seep through and glue everything together. I have a somewhat deep drawer for my flatware and wanted narrow slots to make the best use of space. I used a jigsaw to cut a semi circle out of the middle of the section dividers (leaving ?” connecting all the way across) so fingers could reach into the 1 ¾” wide sections for the forks and spoons. I know not everyone has a jigsaw but they aren’t very expensive and are pretty easy to use. Someone asked about poplar vs. oak. Not only is the poplar cheaper, it is softer so it will be easier to cut if you are using a miter box rather than a power saw.
I wish I could add an image to my comment, because I absolutely live how it turned out. I will be updating all of my kitchen drawers and labeling them.
Thank you!!!
My drawers are HUGE and was in the middle of looking up pricey drawer organizers that would have still left pockets of space – and I found your pin and though, SMART!!! I went to Lowe’s grabbed a bunch of the 4′ long 1/4″x2.5″ boards and the clear Loctite. I wanted to put my spices in one drawer, and without much thinking built the boards where most of them ran horizontal to the front of the drawer. I used dumbells to brace the glued pieces together for a few hours as I built the organizer. As it was drying, I was worried I made a mistake going horizontal, as the force of pulling and pushing the drawer might be too much for the 1/4″ glued pieces as the heavy spice jars slid slightly around. BUT – when super dry, they glue is super strong. Very solid hold. I cut a piece of sticky drawer liner to go under the four rows of spices, so sliding isn’t an issue any more. I did do a mixture of vertical and horizontal for my cooking utensils and it’s SOLID. I’m SOOOO excited to finish my flatware/cutlery drawer and my baking utensil drawer. Such a smart idea, I’m showing them off to everyone and sharing your webpage. Wish I could show a pic. I love it! You saved me so much money – and TIME.
OMG Lindsey, your drawer organizers turned out SO GOOD!!! Thank you so much for emailing me your photos, I added them to your comment so everyone could see how awesome they turned out!! :)
Thank you for this great idea. I feel so much joy being able to do this project for 3 drawers to organize my utensils. I love the result and it’s customized to my needs. It is the perfect Shelter In Place project for the current pandemic. I’ll always remember this moment in history when I look at my beautiful organized drawers.
Thank you for a fabulous idea. We made these for our 3 kitchen utensil drawers and I am just so happy to have a permanent solution to my messy drawers! We used your exact products and the hardest part of the entire project was deciding which direction to make the dividers. It was like solving a puzzle and fun to make them just for my items. Thanks again for a fantastic solution.
Really genius!! Thank you for the road map, recipe, and instructions! Bon apetit!
Popsicle sticks and hot glue was how I made my first drawer organizer. Didn’t look really pretty but it was a good time and worked just as well as a pretty one would.
a good job, nice finish, thank you amanda for ideas
This is just awesome and great post. Keep Posting :)
Thanks for the idea!! I am going to make my own now!!
Hi, I love this! I was wondering if it’s necessary to sand the wood after cutting it?
I didn’t! :)
This project is awesome. Thanks for sharing this DIY kitchen organizer with your site visitors. You might be the only one who is providing the real value to the visitors.
I love it! This is exactly my problem and I’ve been searching for a solution for such a long time. You are right, the dividers are never the right sizes for me. I can’t wait to do this!! Finally!!
One question, did you paint the boards? They just look so nice.
Thank you thank you thank you! Lowe’s here I come!
Susan.
Hi Susan! I did not paint them, but you certainly could! Good luck!! :)
I will be doing this-this weekend. Thank you Kevin and Amanda.
I will let you know how it turns out, hopefully as nice as yours.
Good luck, let me know how it turns out! :)
Do you have a picture of the new full slide out you changed to or the brand name? I really like your idea and would like to do this fo my wife.
I’ve used cardboard cereal boxes to do the same thing. They work for me because when I need to rearrange things I can just cut and tape a new box to fit the new shape. Recently one of our drawers broke and we were able to keep everything together buy just lifting the boxes out while fixing the drawer.
Great job on your project! Just one minor critique.
Don’t use WD-40 for your drawer slides. It’s a solvent and doesn’t lubricate or stay in place well. (It’s a penetrating oil.)
Use general purpose grease, applied with a small brush.
Can’t thank you enough for this post. I did 3 of my drawers this weekend. I’m not handy or strong, and my husband (who is both those things) was incredibly dismissive of this post and therefore didn’t want to help. No worries, I did it all myself — first time using a chop saw. Learned how to use a caulking gun for the glue – kind of fun. My measurements were spot-on, and my drawers look great! So proud of myself. Thank you so much for the excellent step-by-step. (Even my naysaying husband was impressed in the end.) I’d post photos here if there was a way.
Made some today. Super easy, it was my first time using a table saw. Layout with tape, measurements, cuts, and glue. My drawers look 100% better. $20 because I bought oak.
I am so doing this in my drawers!! No matter how neat I get them my hubby never puts anything back where it belongs…so, I was thinking of lining my drawers with clear contact paper and then taking a thin magic marker to trace items where I want them to go. sort of like men have done on the walls in their garages or work bench areas. Since I have a lot of skinny drawers I think that might work!! I too looked to purchase something and one, they were never quite the right size and two, they were sooo expensive! Thank you, thank you for sharing. :-)
I have one of those husband’s too. Great idea. I had a similar idea with putting stickers on the edge of shelves. Hope it works for you. It didn’t for me because he never read them when putting things away. I would say it is very easy to see the stickers and he would say he didn’t notice them. He has ADD which makes him unobservant. I could go on and on about all the ways I have tried to get him to be able to keep things organized.
I love this! Clearing out not used items and organizing to better use my space and enjoy it. I can do this with out assistance from husband. No waiting. So glad I came across this idea. Can’t believe I didn’t think of it. Hats off to you! Thank you!
Reading these comments has baffled me. Where in the universe was this blog written that there are all these women with husbands. Not only that, but husbands who HELP them?
None of you are millennial 34 year olds, right? That must be it.
Still, mind blown.
I read the blog to see where to get the wood, the rest is easy enough. I use my trusty coping saw for everything. A sponge sand block and on occasion a rotary tool comes in handy, too. Thanks for the inspiration and the existential crisis.
Just finished building these for three drawers in our new home. We tried to purchase something, but nothing optimized the drawer space like this. I already had the craft wood in my shop and it took no time to create and build them. I did try gorilla glue on the high use silverware drawer to see if that holds up better. The other two I used the Loctite adhesive. Thanks for the great idea. My wife loves them.
After four years, have you made any changes to your initial design and if not, are they still holding?
I made two of these today–thanks so much for your tutorial. DH thought they’d be complicated/time-consuming, but we did two drawer organizers in two hours, including planning the organization of them.
Maria, we left the items glued about an hour–that’s all it took. We did clamp the pieces because they weren’t as tightly wedged as I’d intended, but they worked out beautifully and I’m thrilled with my new drawer dividers.
I plan to make some of these for the drawers in our new kitchen. The lumber, while nominally 3″ in width, actually is only 2 1/2″ wide. And to facilitate the layout, instead of blocks, I plan to tape together some sheets of graph paper in the bottom of the drawer and use a sharpie to mark the dividers.
The lines of the graph paper will help me keep things straight when it comes time to glue the pieces together.
How long do you have leave the
Glue?
Over nite??
I love this idea. You find out what you need and then customize for that instead of buying containers and trying to make your stuff fit into them. I probably wouldn’t do this because of the wood and cutting (that’s just too DIY for me, lol) but I love it.
Love this and would really like to try it. We have a huge problem with mice (country house) in winter, so how could I cover them with something other than a dish towel?
I went to Michael’s and found platic page covers, clear. In the scrapbook supplies. I was planning on doing this and just cutting those to size and just laying them on top of the dividers. You can see through it and just pick it up if off the divers and put it right back, while protecting your utensils. I figured you can either replace them with fresh or clean them to reuse if nessesary.
Great idea! Thanks for posting step-by-step instructions and photos of supplies and the way you did it! I’m going to try it on my cutlery drawer!
This is brilliant! Exactly what I was looking for… I wanted the dividers to be custom made and removable so I can pull it out for cleaning and to put in different designs of contact paper. I love it!! And you did a wonderful job explaining the entire project the way you did. Very easy to follow. Thanks so much!!!
Awesome! Did this yesterday to two drawers! I should have done it years ago! Thanks!!
This is exactly what we need ! To get a better idea of how to build, what are the dimensions of the drawer inside and how high are the compartments ?
Good job, love this idea.
Excellent demonstration! I have awkward drawers and this is going to be perfect! And I like kitchen gadgets so now I can finally organize them. And best thing yet you have the same cutlery I do and I loathe my current organizer and have never found one I like. Thank you thank you !!
Thank you for your instruction. I have been searching for ways to organize my cutlery drawer because i have tons of chopsticks and having a hard time keeping it together.
I am soo going oto try this. Looks great and easy enough
I love it! I also think I see a lot of pampered chef products in there! Which as a consultant I always love to see!! I might be trying something similar to my drawers soon!
FINALLY! Something I was able to understand and not shy away from because I could never, ever see myself carrying out the instructions successfully! You guys are amazing and I can’t wait to get my Hubby to help me on this one :) He’s more the fix-it person in the household but I really like trying to get our home more organized so I try to be more proactive too. Thank you for giving me the inspiration to try this =D
Three years after you posted this and it’s still helping people! I did this last night after pinning it several weeks ago. The adhesive didn’t work for me but hot glue (surprisingly) worked like a charm! This may sound silly but that drawer makes me SO HAPPY!! Thank you for sharing this idea. I’m looking forward to doing other drawers. :-)
First, I love that you have what look like Pampered Chef products. I love them.
Second, this was so helpful to me. I’m gonna start this project as soon as I get home tonight.
Lastly, I’m a renter so attaching anything to the drawer would be a big no, no. Thank you for sharing that you attached the wood to each piece and not the drawer. I agree that clean-up will be a lot easier too.
With regards to the drawer size & board size you chose, do the cut boards go all the way up for the height of the drawer? I mean if my drawer is 2.5″ tall, would you have that same height for the pieces you cut (2.5″) or a shorter height, say 2″?
Great idea, fifteen min of sawing and gluing and done. You might want to make sure each divider sits to the left or right of the screws in the fronts of drawers.
This is good however i have a question, what construction do you use to make a utensil storage??? Plz get back ASAP
Hi! Your drawers look amazing! I am wondering what the measurements of your drawers are? Would you mind sharing that with us?
Thanks
Shari
Did you have to hold the pieces somehow together when you were gluing it together? Did you glue it while you had the bigger pieces inside the drawer?
thank you
Hi Amanda,
I read this blog to create my own drawer organizers which I now feel I can approach, thanks to your blog. I was even more excited to read about the full extension drawer slides. My drawers already have regular drawer slides and wanted to consider installing the full extension drawer slides. Is it simply to install them? I would love to see another blog from you demonstrating how to install full extension drawer, or could you point to a resource showing how to do just that! Thanks for your terrific solutions!
Thanks for this; what a great solution!
I’ve been waiting to do this for a while, what a great project! I was trying to figure out what to use to template the sections, and realized that folding newspaper to the size of the boards worked perfectly. Now I have a custom, beautiful silverware organizer, thank you!
Can you please provide the interior width of the utensil drawer and the flatware drawer?
Thank you.
Hey Amanda. This is an awesome idea. My husband and I were going to try this last Sunday, but Home Depot didn’t have the right kind of wood. I guess we will have to try Lowes this Sunday.
Thanks for your lovely blog…. Thanks and have a good day
I did this today….all . by . myself! I followed you directions and now my silverware drawer is sooo neat and organized! I used a miter box to cut the wood because I didn’t want to drag out the power tools. Thank you so much for this post/tutorial!
Thanks Jonathan! We have moved in but have not had a chance to do the drawer organizers yet, too busy unpacking and settling in. Just using my plastic ones for now.
FYI for others, Lowes will not cut this wood (plus they only do one free cut) so you have to have some type of saw to cut it yourself. Measure for the fist piece, cut it, mesure for the second, cut it, etc. DO NOT measure them all out and then cut. You need to measure from the cut piece or your measurements may be off.
Thank you for the helpful DYI idea and excellent detailed instructions. We have corner hutches in dining room that nothing short of a custom organizer would work. Wish I could post a picture of it.
Dropbox Public folder!!!
Hi Amanda,
Thank you so much for your response. It sounds really simple! I too have redone my kitchen and will have to do this to better organize my drawers. Any advice on backsplash ideas, my cabinets are oak (light) counter top charcoal with tad of same color of cabinet light latte streaks. Can you recommend a backsplash?
I just showed this to the custom cabinet maker who made my all of my cabinetry in my kitchen and living/dining great room. He thought it was a great idea and recommended using a “back saw” to get nice square ends. My only question is what species of wood were your original dividers? What species of wood have other people used? TIA! :-)
Craft board generally only comes in poplar or oak. Poplar is lighter and oak is darker. Just pick the ones that match your cabinets best. Or paint them!
Amanda, those drawers look great! I am moving into a new home next month and so want to do this! I need to know how you are able to remove the organizer yet keep it snug in the drawer. Are the ends the exact length and width of the drawers or did you leave a little wiggle room? Please feel free to E-mail me. Thanks so much!
I’m not Amanda, but you have to leave a teeny bit of wiggle room. If you find they are too snug, use a little sponge sander (fine grit) to gently remove some length until it slides in easily while remaining snug.
I’m still loving this idea! I just used it to organize my teas! I love how easily customizable it is! Thanks again
https://honeyanddates.com/2015/01/22/diy-tea-organizer/?preview=true&preview_id=2241&preview_nonce=19a20b900e
Thank you, thank you, thank you for showing this WONDERFUL idea! I saw this last week and did a drawer today. Had a few problems, but after a few changes it is sturdy as ever and utilizes a lot more of the volume of space in the drawer. Did I say thank you? 😃
Hi love all of the after pics. Can you by chance tell me the length and of the after wood dimensions. I love this and would like to have lowes possibly cut it for me. Also let me know the drawer dimenstions
Love this idea! I’m surprising my girlfriend by organizing her kitchen and I know she is going to love this! Thank you so much for the idea and showing how to get it done.
Was online searching for an alternative to our outdated plastic utensil insert and found your awesome blog – and now I can’t wait for me and my husband to give these dividers a try. Just a quick question…how wide are your drawers (ours are 20″) ? I was wondering how many inches you allowed for your forks/spoons since we’ll be getting our boards (hopefully) cut at the store.
Easiest way is to use ribbon or string or something to line out your drawer at home (she used jenga blocks). Use those to map it out and measure. Then draw it on a piece of paper and make sure all of the math works out plus any small tweaks you want to make. Then you can just have a list of each cut when you go to the store. It’s really not as many cuts as people think. The big drawer, for example, is only 7 pieces of wood. My utensil drawer is a simpler layout so I did 7 instead of 10 to make four short utensil slots in the bottom and four long utensil slots up top.
I did this to two of my worst offender drawers last night & I’m so happy. Thanks for the great idea!!
Simple–I was was thinking of a 16 (more or less) step way to organize the drawers and I see this! Thank you.
Excellente idée, explications trés claires, c’est absolument adorable d’avoir partagé ça ! Merci, je cours chez mon marchand de bois, et je refais mes tiroirs mais cette fois, beaux et pratiques !
Thanks for the post! Have you built those cabinet drawers? I need some instruction on how to build those so if you did, please point me to the post!
Thanks again,
Sue
Hi Amanda
I will do the same for my vanity drawer.
Thank you for your tutorial.
Just did this in my kitchen and it rocks!!!
This is my next DiY project! I got the materials and will be starting this weekend! Thanks for the great tutorial. :) I linked this to my blog too. Please let me know if you want me to take it down. <3
After I found this idea I went right out & bought the wood – I did the whole project in one day, and I’m SO HAPPY with the results! After gluing, my husband helped me set up clamps to hold the wood in place overnight…hopefully this will keep the glued joints intact for a long time. It seems quite solid.
Thanks so much for the step-by-step instructions…even a novice like me was able to do it!!
I love this idea. My silverware drawer with the plastic holder allows for too much wasted space.
I too am interested in an update. There have been a few organization projects in our house which don’t seem to stay organized. I have a “junk” draw full of stuff which is actually useful but despite my best attempts, never stays in good shape for more than a month. This process looks like it might keep better. I am thinking about varying the compartments to fit my “junk” drawer too but wondering how you have found it working over a longer period of time.
Yes, please give us an update. I thought I would need to route a slot at each connection for more support. Are they holding up with just the glue?
Hi Tammi! The drawers and organizers are holding up great! Check out comment #46 above for photos to see how these organizers are holding up 8 months later.
Hi Christie! Since everything has a place, it’s easy to put everything back in its place so everything stays organized. Check out comment #46 above to see how these organizers are holding up and staying organized 8 months later.
I’m very curious how this project is holding up now, six months later. Will you share an update?
Hi Beth! Here is a 8 month update. The drawers and organizers are holding up great! I just went into the kitchen and snapped these photos with my phone:
Hope this helps!
Thank you so much! That’s awesome!
You have garlic in your drawer. Just sayin’.
But I like the idea and will certainly use it in our new house =)
How are these holding up? I just glued my wood together today and I’m having trouble with the glue. It does not seem to want to hold well! It’s not completely dry but I noticed one section not holding very well. I can redo that part, but wondering if there might be a better glue out there or if maybe i did t f that part well enoigh. Have you had any long term problems with stability?
Hi Gretchen! Check out comment #46 below to see photos and an update of how these organizers are holding up 8 months later.
This is great! Can’t wait to try this in my new kitchen. I am curious though, where did you get your table and chairs in the picture? I’ve been looking for something like this for my home!!
Thank you Brittany! The table is the Benchwright Extending Pedestal Dining Table from Pottery Barn and the chairs are the Madeleine Side Chairs from Restoration Hardware. Hope this helps!
Love this! Thanks for sharing! This will be my new weekend project!
Thanks for sharing this step by step….great idea!
I LOVE THIS IDEA!!! But I have to say I am little disappointed. I went to Home Depot today to get the materials and they wouldn’t cut the boards for me! They said it was too small for them to bother with! We are beginning DIY’ers so do not have the right tools to do this ourselves :(
Old comment, but if someone else finds them in this position, for about $15 you can buy a hand saw and clamping miter box. It’ll hold the wood in place for you. Just line up your marks and cut. Perfectly straight and you could do it on your kitchen counter if you needed (I wouldn’t recommend, but hey…). You probably will have straighter cuts than someone with a skil saw!
Jonathan – thank you so much for your thoughtful response. This will be very helpful to those starting out that find their store won’t assist them!
I LOVED this idea SOOO much, I ran right out and got all the materials. I put dividers in my two largest kitchen drawers and I just LOVE them. Now I have friends and family wanting me to help with theirs :) Thanks for the inspiration.
Karen Piotrowski
CurlsLikeUs.com
Great DIY project – my hubby wants to do this too. Thanks for sharing Amanda!
Love this idea!
I just subscribed to your website and was thrilled to see the drawer organizers. My husband is the DIYer in our house. I have several drawers he is going to make dividers for. Thank you for the great idea. I’m looking forward to your blog!
Omg I have to do this!! I’ll have to make sure I get my measures exactly right, because the store will have to do the cutting for me. I’m excited though, because the cheap little plastic divider I got at Walmart works fine, but it doesn’t fit everything properly and the other items in the drawer keep getting stuck underneath it – it’s a pain in the @$$. We have a tiny kitchen in our apt with tiny drawers, so hopefully I’ll be able to make things fit better. Thanks for the tutorial!!
Alyssa, I felt your pain as I read your comment. I’m wondering; how did your drawer re-org turn out?
What a great tutorial! I definitely need to do this because my drawers are a crazy mess right now!
tous ces organisateurs se trouvent à IKEA je ne suis pas actionnaire mais je vous conseille une visite à Ikea.
MERCI beaucoup pour toutes ces astuces.
I love this! We are going to be renting, and I love that this is something I can do that looks custom but isn’t permanent!
You are my inspiration. I have a few kitchen drawers that are causing me much frustration – and I could not find a standard organizer that would fit everything. I am going to try this project asap!
I love it and I am so totally going to give it a try. My drawers are just messy or the utensils don’t fit the premade. Thanks for sharing!,
Oh my! How flattered I am that you showed my blog some love! Thanks a bunch :) Your drawers look amazing!
Love it! Question though-is it a bad thing that I can distinguish all the Pampered Chef products in your drawer? :-)
Oh my, how I would LOVE to do this to all of my kitchen drawers. Not enough hours in the day with 3 kiddos running around but I’ll add this to my home improvement bucket list :o)
what full extension slides did you use
Just the ones from Lowe’s or Home Depot. They both have them. :)
Looks amazing! One question – and not to sound mean/caddy/snobby, but do you not line your drawers? My OCD mother has ingrained in me that all shelves and drawers must be lined.
To line or not to line… that is the question. Personal preference. I like lining my drawers and being able to take this divider out will make it extremely simple! One piece cut for the whole drawer!
My mom always lined her drawers, too.
To this day I cannot stand drawer liners! Lol, your mom must have been nicer than mine!
I have used drawer liner that looks like steel to cover the exposed black side of my stainless fridge, though. I can accept that.
What a difference! This looks amazing!
Wow….this is great. I will have to do this to all of my drawers. I have so much stuff I can’t find and have to dig for daily so this is my answer to all my disorganized utensils and such. Thanks.
Great idea and sooooo easy! I’m pinning this!
Love this!!! My kitchen tool drawer is a jungle — totally going to take your inspiration and give it a try!
Thank you for the inspiration and tutorial! Kitchen and bathroom drawers at our house will never be the same :)
Great idea!!! I love ideas like this for organizing!
This is such a great idea, and thanks for the step by step instructions! I’m off to Lowe’s.
DO MORE OF THESE! This I LOVE!! I’m going to do this, today!
The after picture just makes me want to say, ahhhh…. My gadget drawers drive me and my husband crazy. I feel that there’s no hope. They’re so narrow. It’s almost impossible to organize them. Thanks for the cool tips!
I literally was at Marshalls on Saturday trying to figure out with type of drawer organizer I wanted to get for our kitchen! I can’t find any that fit perfectly and my drawers are a mess! I can’t wait to do this!
I need this in the WORST way!! I think I found my husband a project for this weekend ;)
Seriously love this. I need to do this (okay the hubs does) ;)
What a great project! I’m storing this away for our future home – so much better than those pre-made plastic dividers that don’t work!
Love a good, organized, utensil drawer! Great project, Amanda!
I need to send this link to Chris! We are in desperate need of a drawer reorg! Love that you did it for utensils too!
We did this in the kitchen at my last house and it was wonderful. I need to do it at my new house. It looks like a great winter project!
This is my next kitchen project! We are slowly getting our kitchen the way we want it and drawer chaos has always been a problem… I’m perpetually looking for the “right” drawer organizer, which I never find, of course! I never thought it would be so straight-forward to make my own! Also, those full-extension runners are amazing. Need to get me some of those! Did you also get those at Lowes? Thank you!
Yes! Either Lowe’s or Home Depot. They both have them! :)
Looks great – thanks for sharing the step by step process.