The holidays may be over, but I’m absolutely loving the gifts I received! From measuring spoons to vintage clocks, check out my current favorite household items!
House & Home Accessories
My mom gave me this Bicycle Wall Clock from World Market for my birthday. I love it! So fun and funky :)

She also gave me this vintage-inspired fan clock for Christmas. I am dying over its cuteness!

I love this eyeliner pencil. It’s exactly what I’m looking for in an eyeliner pencil. First of all, it’s a pencil. I really prefer a pencil I can sharpen to a fine point. I’ve tried a few liquid eyeliners, but I’m just not so good with a brush. Second, this glides on smooth as silk. I hate bearing down on my eye trying to get eyeliner to go on. This is so smooth, you just lightly swipe it across one time, and it’s on. Third, it is BLACK as NIGHT! It is so dark with just a hint of sheen. It looks gorgeous in photos.
Urban Decay 24/7 Glide-On Eye Pencil (Color: Perversion. Found at Ulta / Sephora)

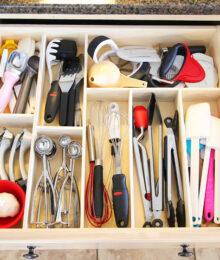
Kevin gave me these bundled-up owl measuring spoons for Christmas! Aren’t they so cute?? :)

Have you seen these in the store? They are SO GOOD. I have to limit myself to a handful a day, as I could easily eat the entire bag in one sitting! I’ve heard you can buy them in big bags at Costco, but then I would be in serious trouble! (Piggie measuring cup from Target!)

And speaking of Target. Oh my goodness. They have some seriously cute stuff right now! How adorable is this chalkboard jar? I am in love with this seafoam blue color right now. And the little mini creamer?? Too cute. They have a ton of stuff in this line, but both of the Targets near my house were totally picked over. I hope they get more in! I found these in their house and home section, one aisle over from the plates and mugs aisle.

And I couldn’t resist these colorful striped straws. :) Too fun! I found these in the party section of Target.
What have you bought for yourself lately? :) Happy Tuesday!


ohhh those clocks are so lovely! i have an iron bicycle like that on my wall from hobby lobby….it does not tell me the time.
Our local Costco has those yummy Brookside chocolates in 100 calorie packs!
I’m obsessed with Target! They are getting really cute stuff lately! I see you have Target Christmas pillows on your couch too!
I saw those chalkboard canisters at Target on Friday as well! I was tempted to get the whole set. I might have to go back tomorrow and get them.
I need them.
What cute photos. That bike clock is pretty awesome … what a neat find. As far as the chocolate is concerned, I totally am with you on the limiting … I love chocolate, and if I dont control myself it could get out of hand :)
Hey Amanda, Just popping by to say “Hi” because I just realized that I’m going to be able to meet you in person at the Build Your Blog Conference. WHAT?! I’m so excited. Yours was one of the first blogs I ever read & some of my favorite recipes came from you & Kevin. So looking forward to seeing you in Utah!
Warmly, Michelle
Hi Amanda!
Yes! The new line in Target is super cute. I was in there last week and picked up the little blackboard jar with the yellow lid. I’m into yellows right now ;0) But the blue one was tempting!
I LOVE the spoons! Im in love..
Dying to see the whole house :) (Or at least a pick of it!)
xo from Canada
Amanda, amazing things! Just so cute. I agree with Marie Anne! :)
Amanda, I’m in love with your house. Can you show us how do you decorate it? Please! It will be wonderful to see and read :)
Thanks for the tip about the Urban Decay eye pencil, I have a Sephora gift card to spend! My 14 y.o. son and I had a bit of a shopping spree at the mall last night, I bought a cute Dora the Explorer book/playset 50% off at Barnes & Noble, a Big Bang Theory Fact or Fiction card game 50% off at the calendar kiosk, and since I saved money, he and I shared a $4 Starbucks Frappuccino :)
You always have such cute stuff!!! Thanks for sharing.
Amanda, love your site. I refer to it often for camera info and love the travel entries. I actually fill has though I’ve been on vacation with you. Keep up the good work. As far as Target I have to limit myself to going there. Too many cute things. My house is only so big.lol My daughter turned me onto to some great popcorn from their dollar section. Problem is she only bought be a few bags so now I have to make a trip. Darn her!
Love everything but epeically the owl measuring spoons. Paulette
Love the clocks!! I always love to find out what you got at Christmas. I remember years ago you used to show us all your awesome goodies!!
LOVE the wall clock! so amazing!
oh, Amanda, do you guys want to have babies? So curious about that!
Oh what fun things you shared! I love these types of posts! On my next Target run I’m looking for that cute creamer! Thanks for sharing!
OMG, that clock is amazing!! It would fit in perfectly with our guest room which has a little bit of bike decor in it. I just bought a couple of pairs of boots for myself (thank you DSW sales!) but haven’t gotten a whole lot on the home decor front. Hoping to make a headboard this weekend…
Also, Target is a dangerous place. Can’t get out of there without spending at least $50!!
I bought myself a kindle fire with my Christmas money. Love your cute gifts. The 2nd clock photo was my favorite. I remember as a kid my parents having a fan like this which they had when my dad was in the military before I was born. I’d love to have it today. Hugs, Becky
I know this is a strange comment, but I love the colour of your walls!
Thanks for the eyeliner tip. I will try it. My birthday is next week!!
I ordered the paper straws in red & white on Amazon.com. Didn’t think to look in the party section. Thanks for that too!
Congrats on Alabama’s (I know you really are an Auburn fan) win!! Wish the Ducks could have played them.
Have a great day!!
I am in love the wall clock!! I may have to see if our World Market has one – thanks for posting it and the eyeliner! Sounds perfect.
Cute stuff! I wanted to tell you that your sausage/pasta dish has become a regular in my dinner rotation. I still haven’t found the Butterball turkey sausage, so am using high fat (15 grams) sausage from Safeway. I didn’t have the right cheese last weekend so used pepper jack cheese. It gave the dish a nice spicy kick. Leftovers for lunch! Still looking for the Butterball. Do you remember where you bought it?
way too cute. love it all.
I adore those Urban Decay 24/7 pencil liners. I have been using them for a couple of years now and haven’t turned back! I haven’t bought anything for myself lately, but I’m contemplating buying a juicer!
That was a FUN post! Almost bought those straws this past weekend for a Sunday school project but figured the boys would destroy them before they even got out of the room. The last fun thing I bought myself was the French baguette candle at B&B Works at your recommendation on this blog! Love it!
Love that candle!! :) So glad you got it!! :)
I shop at Target weekly, so I tend to browse a lot. I haven’t seen that piggie, though. Oh the cuteness.
I noticed all of that kitchen stuff at my Target too. They have it all available online as well! :)
I love your posts, and thanks for sharing your randomness of products! Can’t wait to try the eyeliner, have been looking for a softer one.
We don’t yet have a Target here in Lawton, Oklahoma, but they are in the process of building one so it should be here soon, I have to drive 45 miles to the closest one and I truly LOVE Target! My favorite post of yours was the puppies! I have a toy rat terrier that is my love she is 12 and I truly adore her! Your pics were priceless of the babies opening their presents! Thanks for your wonderful site! BLESSINGS!
I love that fan clock. So cute. I also can not stop snacking on those Brookside Chocolates.
Enjoyed your shopping pics! I love the measuring spoons your got for Christmas..so adorable. I wanted to tell you that I got labels from Staples (Martha Stewart) pack of chalkboard labels that you can stick on jars, cans etc and they are fun. I use them for my craft room. You might like them.
Those sound so fun! :)
Why oh why do we not have a target in our town? I love that chalkboard jar! So cute!!!
Seriously cute things! Where do you buy the eyeliner?
I get it at Ulta :)
I love the chalkboard jars from Target! I so want some of those!!
I adore all things Urban Decay! I swear by their eye shadow primer
Just wanted to say that I LOVE getting your emails… and those two clocks are so stinkin’ cute. Love, love, love them… I have tried those dark chocolate acai berries (bought a huge bag at Costcos – I think that’s where I was) and they are YUMMY! Well now I’m off to do some cleaning ….. Thanks again for your fun emails…keep’em coming…
My old antique fan, has a blown motor, cause it’s like a hundred years old, so I’m definitely going to transform it into a clock. So cute!!!
Target does have some awesome stuff right now…well the past few years they’ve really stepped up their game in the cute dept! I love that fan clock! So cute…it would look perfect in my studio!
The Brookside chocolates are crack!! I accidentally bought a bag. I literally had to put a measuring cup IN the bag to keep from eating them all!
Love the fan clock….so cute! And all the target finds….target IS the best!
Love these types of posts :) That first bicycle clock is so cute!
Those clocks are too cute! And the jars, adorable! Will probably pick one up next time I’m at Target. :) Thanks for sharing!
I am off to Target later. I’m loving that jar and I love the Owl measuring spoons.
I love everything about your shopping trip! :-) Love the gifts from your mom, too! They’re so cute and fit perfectly to your house! :-) And ps, I have a brush handling situation, too. I am better with pencils and they work fine smudged a bit on my eyes!!
Dying to know where Kevin found those cute owl measuring spoons!
Amy
(Your ROLL TIDE friends living in Italy)
Love those chocolates! I’ve only managed to find the Acai berry ones and everyone loves them! Wish they weren’t so expensive though.