If you’ve ever struggled with lighting when it comes to pictures, these photography lighting tips & tricks will save your life! Learn how to find the best lighting for any photograph!
A Lesson in Photography Lighting
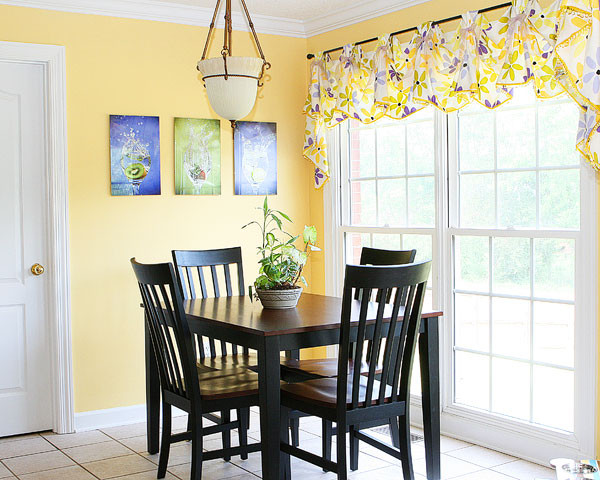
Here’s my usual setup – the kitchen table. This is where I take most of my kitchen and food related photos. I also have windows just like this in the living room, in case I need to take photos that are, uh, not in the kitchen.
Last fall, at the BlogHer Food conference in San Francisco, I was able to take a photography class from extremely lovely and talented White on Rice Couple, Todd and Diane. If you ever get the opportunity to take a class from this incredibly precious couple, go! You’ll love every minute. One of the most important things I learned in the class was this:
“You’re not shooting the subject, you’re shooting the way the light falls on the subject.”
Loved this. With that in mind, they taught us what I’ve nick-named in my head “Photography Around the Clock.” Basically, it’s taking note of where your light source is coming from, and either moving the subject or moving yourself (or both!), trying out different lights, until you find the best one for your subject.
How to Find the Perfect Lighting for Any Photo
So! Here are a few examples of “Photography Around the Clock.”
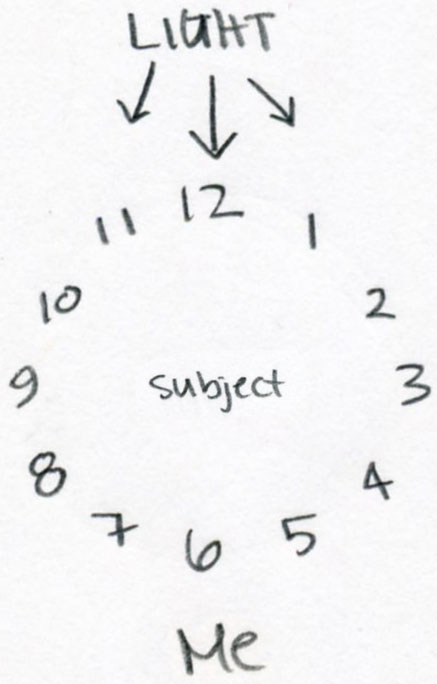
12 o’clock Light
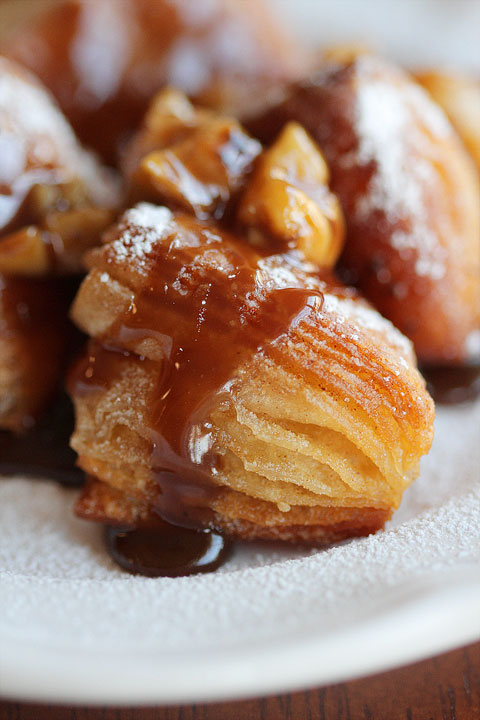
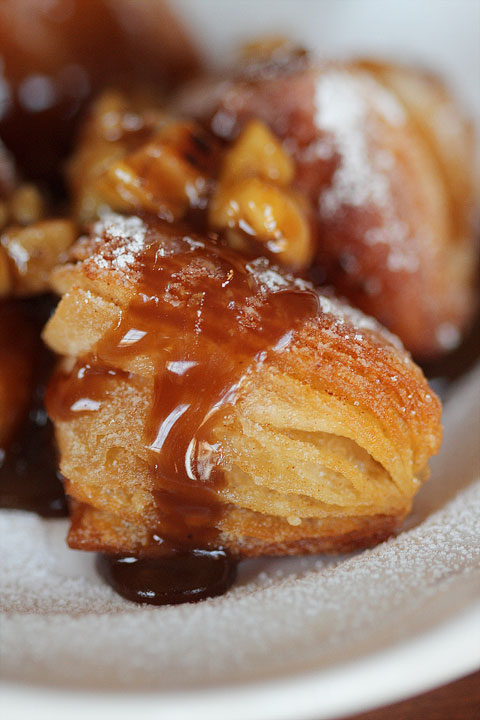
This is 12 o’clock light, when the light is directly behind the subject. Also called “backlighting.” I would’ve never thought it before, but this is one of my favorite lights to shoot!
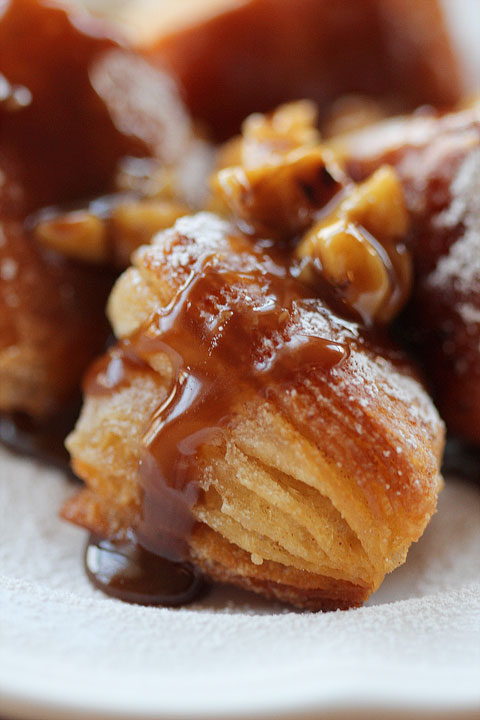
For example, here’s a photo taken in 12 o’clock light. These biscuit beignets were so photogenic, I just couldn’t stop snapping photos of them. Love the way the light is cascading over the beignets here.
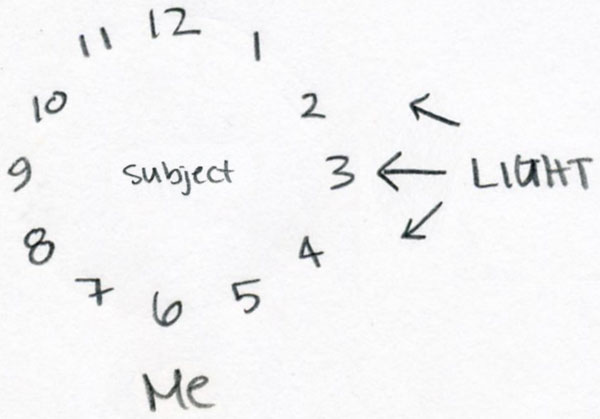
3 o’clock Light
Here the light is coming from the right of the subject.
And here’s the same photo taken in 3 o’clock light.
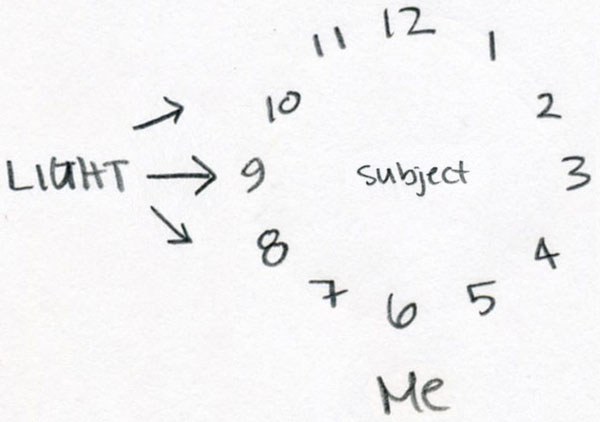
9 o’clock Light
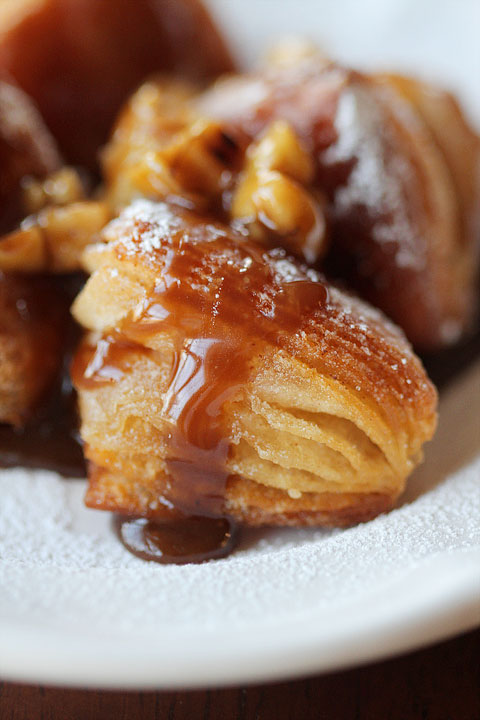
Same thing with 9 o’clock light, only the light is coming from the left of the subject.
And here’s the photo again taken in 9 o’clock light. I kept rotating myself around the table, changing the direction of the light with each move to take these photos.
6 o’clock Light
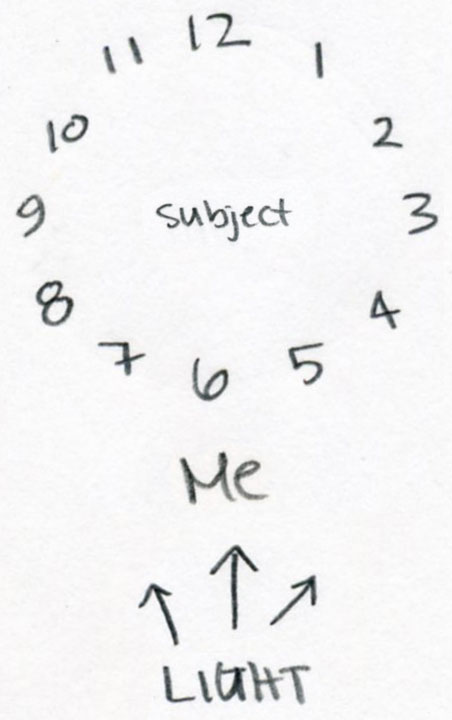
The light is pointing directly at the subject here. If the subject was looking at the sun, or if the camera flash went off, that would be an example of 6 o’clock light.
Here’s a photo taken in 6 o’clock light.
Which one’s your favorite?
For me is a toss up between the first three, but my least favorite is 6 o’clock light. There’s no depth or shadow play, just like when using a flash.
Some of my other favorite lights to shoot in are 10 o’clock, 2 o’clock, and 4 o’clock. I would’ve taken more examples, but… I ate my subject.
Think of the clock next time you’re taking photos, and give some of these unconventional lights a try!



“but i ate my subject..” LOL. you are too funny! thanks for this post. it’s very, very helpful and interesting! my least favorite is the 6 o’clock as well… i really like the first two. :)
Hi Amanda –
I see you have a bright sunny area to photograph your finished product – do you photograph your prep work on that table as well? If not, does the rest of your kitchen also have all that beautiful natural light? I have a dark kitchen and struggle with lighting for my prep, just wondering if you use flash at all? Thanks.
LOL They all look good to me!
What color settings do you use in photoshop? Adobe RBG1998 or SRGB? Also do you perform any color corrections on your photos, or do you just correct color using white balance slider?
I just discovered your website and love it so much. Thanks for all the photography tutorials. They help more than you know! If you ever get a chance, I would love tips on wedding photography. I”ve been voted to take my brother’s wedding pictures in August and I’ve never shot anything else but my children really! I’ve got lots to learn before then=/
Thank you so much for sharing this! It has totally opened my mind up when taking pictures. I can see improvement already and I just read this two days ago! Thank you!
Definitely 9 o’clock for me!
Great light tutorial for photography beginners out there.
This is a fantastic post! I also take photos at my kitchen table, right next to large double French doors. However, I never experiment with lighting in different directions; I always use the same setup. I will definitely be playing around with this in mind now!
Amanda, this is such a great post. Thank you for sharing it. I learned a couple of things, but I do have one question.
When taking the 12 o’clock shot, how do the window details not get blurred out completely? When I take straight towards the light like the 12 o’clock shot, usually that part of the picture is very bright and you really can’t see the window itself. Any tips for that? Thank you so much.
For whatever reason, I have a very hard time w/ the light. I’ve tried to shoot around the clock like that, but I guess the area has to be pretty well lit because I get shadows that are too dark on the non-lit sides of the subject & it looks funny. I need WhiteonRiceCouple to come to my house and teach me how to do this (or YOU!)
I’ll be posting about an award I’ll be giving to some of my fave blogs this week, and yours is one of them. :)
Email me at jessica@proudlifeofachiefswife.com to get your award.
3:00 light made me smile :)!
Such an interesting and informative post, thank you! I am very jealous of all that wonderful natural light you have in your kitchen! I live in an old farmhouse with low ceilings and small-ish windows and have very little good light inside. It makes it very hard to take good indoor photographs, especially in the winter.
This was a terrific tutorial! Thanks!
On another note, do you know the paint color of your kitchen walls. It’s really cheery and just what I’m looking for for my daughter’s nursery.
Thanks again!
Thanks Claire! It’s Sherwin-Williams Jonquil.
Great article! Thank you very much! I like 12 but I also like 9 because you can see the shine on the stick syrup. Makes it look super yummy :D
What a great way to think of lighting! Thank you!!!
Lovely tutorial! I love 12 o’clock light myself…backlighting is my favorite!
I LOVE your tutorials! You make it so easy to understand for everyone, you are such a beautiful photographer! Have a great weekend!!
Hi Amanda ~ Your blogs always bring a smile to my face:) I know you were featuring light on the dessert … which if I had to choose, would be the picture taken @ noon … but the eating area in your kitchen area is just lovely!! It is so bright and sunny – it cant help but bring a smile to one’s face.
I also wanted to finally say congratulations to both Kevin & Miley for their outstanding accomplishment! You have to be so very proud of them. The party you had for them at their next rally was absolutely adorable – and the food looked & sounded delicious!
I did watch the videos of Kevin & the dogs … they were so much fun to watch. I could tell that all worked hard. I do have a question, one of the videos showed your backyard with rally equipment in it for practicing. Where did you get that equipment?
Again, thanks for blogging – reading them always makes my day ~ Penny
I think I may be watching too many crime shows…. Here’s what I read, “You’re not shooting the SUSPECT, you’re shooting the way the light falls on the SUSPECT.”
Anyway, great little lesson on light!! I really need to better use the great features & take better pics w/my DSLR camera. I love her & want to be able to use her to her full advantage!! Thanks!
I have a more important question- WHAT Is that a picture of? it looks amazing! now I’m hungry! And wishing I had a huge kitchen window like that….
Mmm, I like 3 o-clock…
Interesting article. Though I think that without a diagram, if I told someone that I was using 9 o-clock light they would think I meant the time of day. I would rather stick to standard side-light, backlight etc. sort of terms. :)
Hey Amanda,
I just stumbled on your site. I found it through the DST Insider. I love all of the pictures. But probably 12 and 6 best. Thanks for sharing.
That is so cool. Thanks for sharing. I think it’s time to go play with the camera again….
I like the 9:00 position best, you can really see the layers better. This tutorial was great, it has me thinking about my photos more! thanks
June
I totally agree the 6 o’clock lighting is my least favorite, but the funny thing is the area that I stand at me island and cook has 6o’clock lighting. I have to remind myself every time before I take a picture to move to the side.
the wanna be country girl – Caroline
K first of all I came across your blog through my friend Bri’s Blog Collected and I am so glad that I did! Love your site so much! I want to eat everything I see including these biscuit beignets! Oh and your cookie dough cupcakes! Seriously, Yum! I have to agree my favorite lighting is at 12:00. Thanks for the great tips! Love your site!
I am give you an idea if you do never thought so. Here is a idea: If you do want to use portrait photography or pet photography with that Photography Around the Clock will be awesome to use it as not only food. You can move the table if you want too. If you do like that idea as please just Reply me back to me comment. Have a great night.
Amanda…this was a fabulous post!!! Thank you for the clock illustration…that was really helpful! I wish everything was as photographic as your beignets. {drool} And I so wish I had more than my Nikon Cool Pix. (someday) But….your “shooting the light” statement helped in my photography the first time you posted it. I walk in an beautiful old park…and usually take my camera with me…which is why I got the pocket camera…it’s just plain easy. Anyway…that statement changed my thinking….and now some of my photos are really amazing. What a wonderful tip.
Be blessed!
I love your photography tutorials! I just got a Canon Rebel XS and a couple lenses for Christmas and I am trying to learn how to use them! Keep the tutorials coming… I need all the help I can get (as you could see by the pics on my blog of my daughter… my focus is always off! as is the lighting/white balance!). Thanks for the tips!
Maybe I need to see the photos all side by side because I am not seeing much difference between them…
Probably the best “eureka” moment when learning photography is working out that you are capturing light as much as subject.
Great post…I love the 9 o’clock Lighting :o)
This is SO interesting! never thought about this clock thing. And I loved the “You’re not shooting the subject, you’re shooting the way the light falls on the subject.” Genius!
Yesterday I was taking pics of my table setting and my favorite pick is the 3 o clock, with out knowing it. I guess I’m gonna try this exercise more often!
Thank you Amanda!
PS: this is my 3 o clock shot: http://brokenproject.files.wordpress.com/2011/03/lowres_016.jpg
I agree that it is hardt to choose between the first 3, but I think I like 9 o’clock the best.
I am at the beginning of my photograph journey, despite the fact that I actually used to work at a photography studio full time – ran the studio never took any pictures so that makes sense I guess. :) Anyway, I am currently living on the bottom floor of an apartment and it is SO hard to get any light into our place at all! What would you recommend? Do I have any options besides just taking all my subjects outside for photo shoots?
Great post as usual! Thank you.
LOVED this! Thanks Amanda! 12 o’clock gets my vote here although when I photograph people, I’m generally tempted to have them face the light so their eyes pop…I need to think more about that…hmmm. :)
Great idea!! I definitely like 1 & 3 the best. I will have to keep this in mind the next time I am taking photos!
The first one was what grabbed me….made me want to eat that beignet when I first saw it in the post about Savannah. I’m new to DSLR camera, and your tutorial on light is very easy to understand after I reread a few times. Makes so much sense I will make my self a clock. I love to shoot foods, and sunsets. Also new to blogging. have used many of your suggestions to learn more about setting up pages. Thanks AmandaandKEvin…Linda…1atplay
I have been taking photos as an amateur since I was 10 (I’m 54). I believe I am pretty good at it using your basic tools. I think I knew some of these things intuitively, however what a terrific way to explain it!
I love your blog, your photos, your food, your scrapbooking, your house! There is not a thing not to like!
Keep on sharing!
Your valance is gorgeous! Did you make it?
Thanks Meg! :) I used McCall’s #4854 for the pattern and I got the fabric from Fabric.com. It was called “Petal Pusher Lavender”.
Fantastic! Thanks for sharing all your wonderful knowledge with us!
All I could truly think of WAS I want to eat that any time of day!
smiles, alice
Hi Amanda. I stumbled on your website a few days ago when I was looking for scrapbook room organization ideas. I love all of your photography tips. My husband got me a Nikon D3100 for Christmas and I’ve had a Canon EOS Rebel G SLR film camera I’ve been working with for almost 14 years now. I love playing with light and like your clock analogy. I think I may try this with taking pics of the kids too. Can’t wait to play with this tip today.
Number one – I like the lighting on the carmel sauce. Thanks for sharing, as always. Now I need to go find me a beignet to eat:)
my first photography workshop 30 years ago explained light direction this way…I think it’s old school to use a clock, like when you drive you put your hands at 10:00 and 2:00. With digital clocks, I think some people have a hard time with the concept maybe?
So as in comedy, so with photography = timing is everything right? Whether it’s time of day or angle of light like the hours of a clock, or shutter speed!
12 o’clock is the most visually appealing, but I love how with 3 o’clock or 9 o’clock you get the reflection of the windows in the syrup. Crazy that I noticed that, but I love to find a picture in a picture (windows, reflections, etc.). Your photos are amazing!
Thank you, Amanda! I love the simple way you teach your photography! It’s always crystal clear!!
And you have a lovely kitchen too:)
Okay, don’t laugh… But the only reason I’m commenting is to find out about your valance! (Thank you, Becky S. for also wondering!!) Did you make it? Buy it? I LOVE it!
Thanks Koren :) I used McCall’s #4854 for the pattern and I got the fabric from Fabric.com. It was called “Petal Pusher Lavender”.
Thank you for sharing. You reminded me how important natural light really does affect your photography. My favorite is 12 o’clock.
Great info! I definitely like the diagram! It makes sense NOW!!
Awesome tips! Now…..can we have the recipe for your subject? ;) please?
Sure! Just click on the link in the post. If it’s written in orange, you can click on it. :)
Oh gosh, that cracked me up – you ate your subject!
LOVE this idea!! I’m going to give this a go. I really like the one with the backlighting:) I do have a question. I’m confused by this statement: “I kept rotating myself around the table” In your drawings it looks like you are always at the 6 position. What am I missing?
True, but since the light is only coming from one direction (the window) I had to keep moving so the light was changing directions. If I just stayed in one place, so would the light.
I stood at each of the 4 ends of the table for these 4 photos, so the light would be coming from 4 directions. I rotated the plate 90 degrees each time so I would be taking a picture of the “front” of the beignets each time (so all the photos would look similar).
How wonderful, thank you so much!!!!
I love this explanation and I am with you I love the 12’oclock light the best but the others are fun! I am just not a fan of the 6!! Thanks for the tips!
I made it all the way to the end of your lighting examples and then laughed out loud! You ate your subject! Ha ha ha! Thanks for starting my morning out right. I, too, am obsessed with lighting. Your photos were an excellent example, as was the clock idea. Unfortunately, the temptation of your “subject” prevented you from sharing any more lovely photos with us!
Thanks for the tips! Beautiful photos!!
Thank you for the pointers! I just (last week!!) bought a Nikon d5000 and I’m learning all the features. Light is so difficult! I just found your blog a few weeks ago and I’ve spent time every day looking at “older posts!” Thanks for sharing all of your findings and ideas!
Thanks for such a simple and helpful concept. I’ll give it a try!
Hi Amanda! I love seeing the differences right next to each other, so much easier to picture.
I was also wondering about your valance… Did you make that from a pattern or buy it? I love the bounciness of it and the way it falls. I’ve been looking for window treatments that catch my eye and this is my favorite so far, I may have to try to wing it!
Thanks Becky! :) I used McCall’s #4854 for the pattern and I got the fabric from Fabric.com. It was called “Petal Pusher Lavender”.
Oh, awesome! Thanks Amanda :)
I like the first 2. Thanks for sharing this information. I’ve never really thought of lighting this way. Very easy and helpful
This is a helpful way to describe the placement of light. Going to have to play around with this in my own kitchen…thanks!
Amanda,
A novice here, so forgive me – I don’t quite understand what you are saying. As the light changes during the day, are you or the object moving? In your diagrams, you appear to be stationary (at 6pm). What are you changing to capture the best image?
Thanks in advance,
I am all about 12 and 3.
I like the first 2 the best but I’ll be honest, I’m jealous of all of them because we have NO natural light next to a table in our house. I’m considering buying a TV tray to put by the back patio door for the only natural light we have but it’s a North facing window so there’s never good light coming in. Believe it or not, when we move in a few years, that’s actually a criteria now. ;-) If you have any tips for people with cruddy light, that would be awesome! LOL
Honestly, I’m not sure! I do know that I’ve fallen in love with “bokeh” and I achieved that accidentally last Christmas with my point and shoot, but haven’t been able to figure it out again! (Anyone with a measly digital Canon point and shoot have any ideas for me?!?)
I’ve fallen in love with pics of food, I do know that the window sill in my kitchen is the best place to take pics, especially in the afternoon when the sun is coming in!
Check out my desserts:
http://andmyhouse.blogspot.com/2011/03/my-top-10-desserts-of-2010.html
Based on the way my kitch is configured, and the major light source, pretty much the ONLY way I can shoot and have the pics look good would be 12 o clock lighting. 6 would be so ugly/impossible in my kitch and 3 & 9 are moot points b/c of floorplan.
I love your 12 o clock shot!
Oh this is so helpful! I think my favorite is the 3? But I agree – least favorite is the 6!
Wow! This is great! I like them all. But I can tell you my least favorite is the last one where ythe light is coming in at 6. Which is where my light always is. I’m going to fix that. Thanks a bunch!
I am learning by trial and error. This post was very helpful. I have used all of your photography posts as guides. Thanks for posting this.
very helpful… thank you!
that was an eye opener, never thought of indoor light quite like that but i do know when i am outside i love the soft yellow glow about two hours before sunset. the pros love the dawn light when photograhing models outside. we had the privilege of being at the same resort as a model shoot in the 90’s in the carribean and it was hustle bustle very early in the morning. light makes or breaks a photo that is for sure!
loved the first ans the 2nd one…i agree the ones in the evening dont look as good as the rest…
Waiting for more tutorials…and thank you for the link to photoshop actions….they are awesome
I like 1 and 3 best and the least I like is the last one it looks flat to me.
You crack me up Amanda! But I love your photography, it was one of the reasons why I got myself a DSLR camera. Your tips and tutorial are also helpful. Thank you for being an inspiration. =)