The Christmas tree provides an excellent background for some really unique photos – here’s a quick photography tutorial on how to get some great shots before your tree comes down!

How to Take Photos in Font of The Christmas Tree
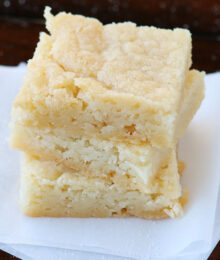
1. The Christmas Tree Classic Bokeh
Canon 85mm 1.8
f/1.8
1/40 sec
1600 ISO
To get those big, beautiful, blurry lights, use your lens with the lowest aperture- For this picture, I used the 85mm 1.8, but the 50mm 1.8 or 50mm 1.4 would also work nicely.
Place your subject as far away from the tree as possible- we moved some furniture around so Howie could be about 8 ft away from the tree. The farther away the subject is, the bigger, and better, the lights will look.
To take the picture, get as close to the subject as possible. You know how you can be so close to the subject that the lens won’t focus? I found that if I got that close, then scooted back just enough so that the lens would focus, the lights looked better. I have no idea why that is- I just preferred the ones that I took like that! :)

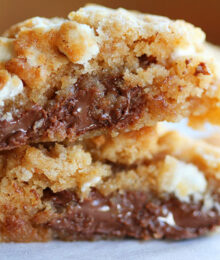
2. The Christmas Tree *Custom* Bokeh
Canon 50mm 1.8
f/1.8
1/15 sec
1600 ISO
Meep!! Little Howie surrounded by Christmas Hearts! :) Custom Bokeh is my favorite new technique. No, I don’t have little heart-shaped Christmas lights on my tree… and I didn’t have to buy any special lenses or filters to get this look, either! All I had to do was use a little tape, scissors and paper- all the stuff I already have in my scrapbook room. And the best part is, you can have custom bokeh in any shape you can cut out. Hearts, stars, mini Christmas trees.. I even tried a snowflake. You want to see something cool? Try this out. The original photo doesn’t change shapes.. Only the lights are affected! Come on, I’ll show you.

Supplies You’ll Need
1. SLR Camera
2. 50mm 1.8 lens
3. Black cardstock
4. Removable adhesive
5. Scissors / decorative shape punches
6. Pencil
7. Tape

1. To begin, take a strip of paper and form a ring around your 50mm lens- tape the paper together so that it fits snugly around the lens.
2. Take the ring off the lens, place it on a piece of black cardstock and trace a circle around the ring.
3. Cut out the circle
4. Cut a square in the middle of the circle. I used an Xacto knife, but you could just use scissors. It doesn’t have to look pretty!

5. So, now you have a ring and a circle with a square cut out of the middle. Tape them together like pictured above to form a “hood”. For the benefit of the picture, I put the tape on the inside so you can’t see it, but you could tape it on the outside instead. It’s easier and it works just as well.

6. Now it’s time to cut out your shapes! You can use scissors or an Xacto knife (or even a die cutting machine) to cut out any shape you can imagine. I had these little punches that made it really easy.
7. Cut out your shape, being sure to leave enough room on the edges so you can attach it to the “hood”. I used removable adhesive so I could easily switch between shapes on the hood.

8. Attach the shape to the hood and put the hood on your lens- when you’re all done, it should look like this.
Of course, I used a heart punch for the picture of Howie. I did have to use a tripod to take the custom bokeh pictures. Using the hood lets in less light, so you have to set your shutter speed slower to compensate- in my case, too slow to hand hold. But you don’t have to have a tripod. You could set your camera on a coffee table, tv tray, chair, bench, ottoman, whatever! Anything steady you can get your hands on.

Canon 85mm 1.8
f/1.8
1/8 sec
800 ISO
I loved how the snowflake punched turned out! Unfortunately by this time my models were thoroughly uncooperative, so I just had to take pictures of the tree. :P
To get this look, focus on something close to the lens, like your hand, with the tree blurry in the background. Then move it out of the way and take the picture.

The size of your cut-out will affect size of your custom bokeh- so play around with different shapes and sizes for all kinds of neat looks.

I even tried punching out the letter “B”. The possibilities are endless! :)
I would LOVE to see your Christmas Tree Bokeh pics!! :) Leave me a link to your pics in the comments- or share with me on Facebook. I would love to leave a comment for ya!
Thanks for looking! :)


what a beautiful idea! I will try it!
I LOVE this tutorial!! I can’t wait to browse the rest of your website :D
Thank you for this great tutorial! I used it to create a stop-motion Christmas video for my university. I used different shaped-bokeh filters in over 5,500 photos to create the video. You can view it here:
https://www.youtube.com/watch?v=DKk31a-YyiM
Thanks again for your helpful instructions!
I am looking for a new camera for Christmas, can you tell me which kind you used?!
Thanks for this! I used it for a photo that helped me get published on The Huffington Post! I wrote about the photo and linked to this post today: http://www.joyweesemoll.com/2012/12/22/christmas-bokeh/
Hello,
I’m a newbie and just bought my first Canon T3I over black friday…… and this blog is wonderful! So I tried this picture out both ways this morning and had to play around w it a little, but at the end was very successful. Here’s what worked for me, I used AF on my 50mm 1.8 canon lens, and I obviously changed my focus to the subject on the left. Both pictures look beautiful with the heart bokeh and with out.
Thank you for sharing all this information!!
1/25-1/40
F 1.8
Iso 1600
OMG, I enjoyed this tutorial SOOOOO much!!!! :D You make it sound so simple!!! (: Thanks for sharing this wonderful information. I’m starting to get into photography because I want to take better pictures of my cards, so I’ve been looking up basic photography tutorials on YouTube and many people use terminology that feels like a foreign language to me, but you explained things so well here. I will definitely be coming back to learn more photography tips from you!!! :D
So great, Thanf you for sharing! You can check my first try on my blog! http://pixies-tips.blogspot.fr/2012/12/christmas-bokeh.html
Hi guys, this is an awesome blog! just came across it the other day and im loving the tips. My smallest aperature lens is is 18-55mm 3.5. I dont know if ill be able to get the bokeh effect, any adjustments for this lens to still get these awesome photos?
Thanks!
I have always wanted to try this ! And I did once I was inspired by your post ! Thanks for the tutorial, I just tried this out & it worked .I’ll be photographing my children in front of the tree once they get home from school! I’ll add the link to the images once I post them ! Thanks
Got it up on my blog! =) http://rookietorockstar.blogspot.com/2012/12/simple-things-sunday.html
I’ve had my dslr for a year and am just now venturing into modes other than the preset ones. I only have the 55mm, so I set the settings to f4.5, 1/10 sec, ISO 1600. I got a totally different look with my kiddos, but I still love it. Not sure if you can see it on my FB page, but here’s the link. I’ll be posting it on my blog soon, so I’ll come back to share. Thank you for giving me courage to adjust settings on manual! =)
https://www.facebook.com/photo.php?fbid=4841284868144&set=a.4841282388082.2190269.1177482775&type=1&theater
I must be doing something wrong – I tried matching all your settings exactly, and all I get is a tiny bit of photo, whatever’s showing through the cut out shape, and my lights aren’t shaped at all.
So much fun and endless possibilities! here is a little creative editing to go along with your trick.
Thanks so much for sharing this, It worked and I love it!
Hi. I am going to attempt this tomorrow night and was wondering what kind of light you had in the room other than the tree lights. Thanks!
Hi my camera only goes to f3.5 is there anyway to achieve the same or similar look? Love the pictures by the way :)
I am DETERMINED to get a custom bokeh pic with my 3 boys (9, 2.5 and 2 months). Of course, I am having some trouble with 3 squirmy little guys. I did some practice/ test runs last night. I got the bokeh shots, but once I threw the kids in front of the camera the results were rather terrible. I am thinking that I might be better off photoshopping the custom bokeh into a photo of the 2 boys….Any suggestions?
*correction….3 boys
I love photography, but never had the time or money to truly get into it, but I wanted to comment on your dog! Love him. I have a Boston, and just love seeing photographs of others.
Hi!
So excited to find this … however, my pics are showing the whole photo in a heart shaped frame … which makes me need to crop it … also, the lights are blurry, but not in a heart shape …. what am I doing wrong?
Did you have all the lights in the room off for this or do want the lights on? I’m trying to take our Christmas photos but I dont know if I should leave my indoor lights on…
love this tutorial! It worked on my 24-70mm f/2.8 as well. I posted test shots on my blog http://simplymui.blogspot.com/2012/11/fun-with-lights-bokeh.html Thank you so much for this fun bit of inspiration.
I just got an early Christmas present yesterday…my first DSLR camera and I’m super excited to try this out. Thanks for the idea.
Would this also work with a 50mm f1.8?
Sorry I do believe I’m being most stupid and feel totally silly for asking but love the bokeh effect so much I have to. How do you take the photo. On the custom filter it looks like you have just cut out little hearts and nothing else. If the entire lens is covered up bar a single heart, how are you seeing any image out of the lens other than a heart shape outline of what the camera is pointed at?
I’m sure there are many people who think I’m a total thicky but I’m prepared to look that way in order to achieve such a beautiful look.
Ps. Howie is a star bar!!! Xxx
This is so cool! I have to try this :)
Hi, I tried to do this and it didnt work. My aperture would only go to 3.5. does that make a difference? Also my camera wouldnt even take a picture with the hood on. Please let me know, i really wanted to do a valentine picture. Thank you!
Hi there. I absolutely love the ides of this tutorial. Bokeh is so beautiful when done right.
I was so intrigued when I saw this tutorial because I have always wanted to make my own bokeh shapes. I went through it and did everything exactly as it says. I even et my camera to the specifications as closely to yours as I could. However, it did not turn out at all like yours. I was wondering if I could email you the picture I took and see if you could tell me what I did wrong.
I would really appreciate it!
Thanks,
Ali
hi Amanda! I just tried this out a couple of nights ago. my pictures didn’t come out quite as well as yours did because I don’t have a lens with as low an aperture, but some of them look pretty nifty. I tried using my dog as a model, but she was thoroughly uncooperative. :]
http://la-fille-americaine.blogspot.com/2011/12/everybodys-waiting-for-man-with-bag.html
(long time blog-stalker, first time commenting!) You have rocked my world with this tutorial! This is amazing! Keep up the amazing blog.
hello! checking in just a few years later to say thanks for a great tutorial! :))
merry christmas~
Thank you so much for the tutorial, linked back to you here!
http://adaywithlilmama.blogspot.com/2011/12/custom-shaped-bokeh.html
Hopped over from The Hollie Rogue, WOW – you are basically brilliant. LOVE this tutorial and can’t wait to try it out. Thanks so much for the inspiration. *New Follower!*
Thank you SO much for sharing this. I made it last night and it’s amazing. I have 5 babies needing Christmas pictures this week and now they get to be spiced up! THANK YOU THANK YOU THANK YOU!!! :)
Beautiful Dog! As my sweet Tessie is sitting at my feet, I have to tell you that I have a soft spot for BT’s
This tutorial is literally AMAZING. Thank you so much! Fabulous pictures & instructions :)
I love doing this type of bokeh work, but I have always used a piece of foam cut to the size of the exit apperture of the lens with the shape cut in the center, your method seems more stable :)
I finally had time to try this out…and I love it! Your pictures are beautiful. I haven’t put a subject in mine yet, but here’s what I have so far http://theoriginofwonder.blogspot.com/2011/05/bokeh-my-first-one.html
Thanks for the great tutorial!
Love your tutorial and very easy to follow directions! The bokah is beautiful and have wondered how to get such lovely lights in my photos. Thank you!
Thanks so much for tutorial!!! I love the snowflakes and I can’t wait to try it out!!!
I am leaving my tree up until I figure this out!!
I have a fuju finepix s700 point and shoot (saving up slowly for a Canon 60D or Ti2)…
I HOPE I get it!
that’s awesome! Can’t wait to try it out:)
Amanda- I had so much fun with this tutorial! I love it! Thanks sooo much!
http://wadeandmelissa.blogspot.com/2010/12/christmas-pictures-brokeh-style.html
Here are some of my results!
Thanks again!
Aha! One of the great mysteries of photography revealed! I could not for the life of me figure this one out. Thanks for a great tutorial! Now all I need is the right camera! Santa Baby?
This was an awesome tutorial..and so fun. I shared it on my blog:
http://cheironbrandon.typepad.com/my_weblog/2010/12/holiday-bokeh-oh-so-fun-.html
HOW WONDERFUL!!!!!!! IT TOTALLY WORKS!!!!!! THANK YOU!!!!
Paulette
oh my gosh, soooo excited I found this~ Thank you for posting!
Thank you so much for this tutorial! I had no idea this was possible. Here you can see some of the pics I took as well as a few tips I figured out (didn’t need a tripod).
Oh! And I used something like photo corners to attach the papers to the front of the paper hood, so I wouldn’t have to worry about storing little sticky pieces.
Holy moly, those pictures are awesome! So creative, fun, unique and personal… Plus the pups make good subjects!
I am very much a beginner, but I had a lot of fun practicing! Next on my list: custom :)
http://www.troyandlindsey.com/2010/12/elf-model.html
http://www.flickr.com/photos/lcsmithsaved/5258981311/
wow, this was fun to try! I haven’t made my custom ones yet, though
WOW! These are great! I am going to try to get a portrait of my girls in this style. I can’t wait to try. What is the best time of day to do this?
Question…I want to get more lights in the background and my subjects smaller but in my pictures for some reason I just have a little bit of lights around the subjects, and they seem HUGE. If I back up more I get too much “junk” in the background and again less lights. Maybe my subjects are too far from the tree? Any other suggestions?
Thanks!
Love this, especially making the shapes–I also discovered that if all you want is the bokeh and/or there’s nothing for you to focus on in the foreground, you can just change your lens to manual focus and turn the focus ring until you get the effect you want before snapping your pic. You may have to experiment with distance to the lights etc. I did this with a panel of lights at the mall so I could use the bokeh for a texture.
Great tutorial!!! Another new fan here! :)
I struggled a bit at first getting this to work.
Documented this on my blog. Maybe will help others! :)
Thanks again!!!
http://www.shemakesstuff.com/2010/12/holiday-bokeh-shapes.html
You always amaze me! Love the photos!
This is awesome! I already took some photos of my tree but now I’m going to have to take some more and try this. Thanks so much!
Very cool. I have always wondered how people do that. Do you think it could work in other settings or just on lights?
Thanks as always for providing us with wonderful information.
That is so cool! I was just looking at custom bokeh’s on photojojo and thinking how cool that would look…and now I find your tutorial on how to make them which is even cooler!
Thanks so much for sharing this. I am definitely going to have to try it out! :)
I am right there with everyone else just AMAZED at the creativity and ingenuity of your photography. Do you ever get near Springfield, MO and want to spend an hour or twenty showing a bunch of us here some of your cool tricks!! SO AWESOME!!
This is too awesome! Now if only I could get my cats to sit still for me to try this.
Awesome! Our photo club did this, but I missed the meeting since the RSVP list filled up. Thanks!
You are genius!! I can’t wai to try this. I am new to photoraphy so I struggle with the whole aperture, f/ shot thing. Thanks for the instructions.
WOW! L-O-V-E this tutorial. Thanks so much for sharing :)
oh wow!! i totally need to try the heart shaped bokeh.. soo pretty!!!!
can’t wait to try this out!! just mad that mu christmas cards are already made!!
Thanks for the excellent tutorial. I have always been intrigued by bokeh, and now having all these special effects in my repertoire, well, I just love it.
I used your information about to take a picture of my Christmas tree this year. I could never get a pictre of the tree with the lights on the tree on. The flash always over powered the lights and it always looked like the treee lights were not on. The picture came out so beautiful. It could be a greeting card photo.
Thanks for your knowledge.
TC
Hey Amanda, I also have the Canon 85mm 1.8 lens that you have, and I was curious if you lens ever got an UNINTENTIONAL blurry look to it? The lens was great and sharp when I first got it, and of course blurry in the background since it is a Macro lens, but here lately when I edit my photos, it seems that I really have to sharpen them (lots!) Any suggestions or thoughts?
I love this tutorial. I’m using a Sony Cybershot 14.1 megapixel camera. I had taken this picture last week, before I found your tutorial.
http://ramblingsofastayathomemom-crystal.blogspot.com/2010/12/photography-challenge.html
I look forward to trying to put a subject in front and see what I come up with.
Yay! I’m so trying this!!
Anxious to try this out tomorrow! My CHRISTmas tree lights go up tomorrow! And yes… how did you get the dog to stay so still? I am going to attempt my dog and 3 children! Loving the site!!!
This idea is very unique. Looks so cute with your dog.
“”I found that if I got that close, then scooted back just enough so that the lens would focus, the lights looked better. I have no idea why that is- I just preferred the ones that I took like that! :)””
Distance away from your subject is also a big factor in creating great depth of field in your images. Regardless of the aperture the closer you are to the subject the more depth of field will be created. Moving the dog farther away from the Tree would also help increase the depth of field and the creaminess of the lights.
Awesome tutorial. I never thought to do this myself, I could have saved hundreds in equipment! lol
Ohhh Love, Thank you!!
Hi Amanda,
Thanks for sharing, we would LOVE to see more photo tutorials!!!
That is such a cute idea! I have a canon T1i and the 18-55 and 55-250 lens would the 18-55 work? How did you get your dog in there too without it looking like he was in a heart?
I’m loving your blog, just ran acrossed it.
Lisa
Lisa,
Any lens and focal length will work. If it doesn’t work at first try increasing the distance between your subject and the lights.
I don’t know have amanda did it, but I presume she cropped the photo so it was no longer heart shaped.
The original photo is not heart-shaped. Only the lights are affected. Try it, you’ll see! :)
http://www.facebook.com/album.php?aid=241829&id=551678315
take a look at the bokeh I’d did earlier on.Kind of failed but anyway, I got the heart-shaped bokeh!
Hi! Thanks for the step-by-step. I goofed it up though, because of the tape, it was hard to tape from the inside! And also, i’ve realized that i need a 50mm lens. I have two: 35-80mm and 18-55mm. They are both Canon, but not quite right, so now, i have a true reason to buy a new one. This is really cool. I used a shape puncher of a musical note. “}
I’m a new reader so late to this post but I just love it, I had no idea it was even possible to make shapes! And just a side note, as soon as I saw the first picture I was like “hey! that was a PW holiday bokeh finalist” LOL!
How cool! I’m *obviously* 6 WHOLE months late but at least I’ll get to wow a bunch of people *this* Christmas! Thanks for sharing…I’ve been on KevinandAmanda.com ALL day! lol!
-Merely Meredith
hi amanda,
i loved your website. it’s inspiring and fun.
i really like to know how you made the fancy comment form with numberings and bullets?
really appreciate it. thanks! :)
Great tip! Thank you Amanda! Can’t wait to try it out! :)
my jaw literally dropped when i saw this!! This is SO COOOOOL!! Thanks for sharing!!!
It’s great, thanx, I’ll try it ^^
Thanks so much for the great tutorial! I can’t wait to try it. I hope that it is ok that I blogged about this post today on my blog.
AH! So pretty! :)
wow~ hi, i am from malaysia, it’s really cool~!!!!
Amanda,
Your custom bokeh is a WONDERFUL idea!! I LOVE it and am just getting ready to give it a try. I’d love to link to you from my blog…but I just don’t think I can do it. There’s just this ONE THING holding me back…
…but knowing we won the National Championship last night made me feel good enough that I could even leave a comment on an AU fan’s site, LOL.
Good Work Amanda!! Now if you’d just come over to the Tide side… ;)
Best Wishes,
Joy
http://joyslife.com/
Here’s a little work I did to my Cricut Expression. I’m sure you’ll hate it! LOL
http://joyslife.com/roll-tide-alabama-cricut-expression/
Wow, I’m super inspired and I don’t even have a fancy camera! :(
Amanda this is great- thanks for sharing! But I’m curious, do you have to take two photos and then merge them?
That is awesome..
great tutorial! thanks!
I SAW YOUR PICTURE ON THE PIONEER WOMAN!! LOVE HER!! LOVE YOUR FONTS!!
Oh my goodness Amanda! That is awesome! You are a genius! I loved the hearts on the tree and was just going to ask you how you did that when I kept reading! Thanks for posting that!!
Hope you’re doing well and that the holidays didn’t kill you with extra weight…unlike some people over here…. (looking away in guilt)
Here are my trys! What fun this was! http://www.flickr.com/photos/sarahmcveyphotography/sets/72157623019151847/
I stumbled upon your blog a couple weeks ago and love all your pictures! And now on this post I see you’re one featured on Pioneer Woman’s blog! Fun! And thanks for sharing some tips, as I’m trying to learn how to use my camera better!
Thank you so much for sharing this! What a fabulous idea!
Hey… those bokeh pics, I have a couple of questions.
I make the hood and everything and that’s fine, but I’m taking a picture of my subject AND the background with lights at the same time and it comes out just like how you have it with Howie?
I’m new to the site and I saw this and I just *had* to ask! I’m a little bit of an aspiring photographer- nothing pro, just a hobby- and I love this.
This was so much fun! I found the key to making the “stars” visible – was the distance of the tree to your subject (Farther the better) AND the distance of your subject to you (Closer the better). Try upping your ISO if you have a fidgety subject (HA! My two yrd, Aurora!), that way you can speed up the shutter speed to compensate. PS. Noiseware + CS3 = score! I’ll be posting some of my trys on my flickr a little later! Check ’em out!
Can you explain the differences between the 85mm lense and the 50mm? I have the 50mm and I like it, but I find it to autofocus really slowly when I’m using the flash indoors. I’m looking for an all purpose lense. Would you recommend the 85mm??
OMG! You rock! lol! Every time I visit your blog, you have some kind of amazing idea!! This is way cool! Thanks for sharing!
This is SO cool! Our tree is already down for this year, but I’m definitely stealing this idea and doing next year! Thanks so much for sharing!
PS – Congrats on being a finalist on PW :)
I never heard of this! Amazing!
Here’s mine!
http://farm3.static.flickr.com/2626/4229703971_ce36ce82fb_b.jpg
http://farm5.static.flickr.com/4052/4230449264_14979e3c6d_b.jpg
So cool to see Howie on the Pioneer Woman’s blog … congrats! Love your pics. : )
Thanks for the great tips!!! Did you see your pic of Howie over at the pioneer woman’s?
Wow! this is fantastic tut. I’ve been trying to get that 50mm 1.4 last week online but there was a problem so now I really need that lens.
Amanda,
I got a 50mm for Christmas!!!
My first attempt!
http://www.flickr.com/photos/45932503@N07/4216648732/
Thank you again!
I loved your tutorial and your cute doggie photos are such a great motivator to try it out. I have more than enough dogs already (four) but it makes me want your dog!
Here’s a link to my attempt -all I could find was a flower punch for these quick shots of my kids in their new Christmas home-made pajamas. Thanks!
What a creative idea, my point and shoot canon is in for repair(really bad time for a camera to break don’t you think?) I hope to get an SLR in Jan. I will have to remember this!
Thanks!
I recently found your blog and love it!
I’m going to follow you on twitter too. I’m @createdbydiane
Awesome! Thanks and Merry Christmas!!
thanks for the tutorial on this. i loved it. my husband and i tried it and after trying to take a pic of just the tree i went back and read the instructions and then we focused on a subject in front of the tree and that worked. LOL if all else fails read the instructions again.so, my husband and i took a pic of each other then also the dog. the dog we put on a coffee table in front of the tree as we have a table tree. the dog did really good. anyway i will post pics somewhere here or at ck magazine.
I tried the photo tutorial, but it didn’t work for me. I am bummed. I so wanted photos like that.
I posted the pictures I took from this tutorial! They are on my blog. Love it. :)
I love the tutorial. Like many others my lowest is f/4.5. I will definitely try it though and see what I can come up with. I’ve also got to put the bug in Santa’s ear so who knows what will happen. :)
Please keep the tutorials comming. you are an amazing photographer.
Thanks for sharing your love of photography with us all.
Okay, I tried it. And got great results without a subject, mediocre ones with a subject. Let me know what you think!
http://laurenm83.blogspot.com/2009/12/rest-of-our-holiday-festivities.html
Hi again:) I had to try this out. My husband made the hood for me, we did not have the punches, so he cut them out freehanded :) Here is the ling to the results: my blog is Hungarian, sorry about this, but I put the credit up as my inspiration :) http://mromvari.blogspot.com/2009/12/fotoalbum-betekinto-karacsonyi-kepek.html
Thank you for this wonderful idea! My subject is dark though. What did I do wrong?
The only punch I have is of a teddy bear. Teddy bear BOKEH! It looks so cute!! I will just have to get brave and cut out other shapes myself. Thanks for the tutorial!
Thank you so much for this cool tutorial. I had a lot of fun trying to recreate your photo. I love taking photos of my pooch, Charlie but she really got a bit sick of the whole process on this occassion. Never mind, I’m pretty happy with the results and am looking forward to my next doggy photo shoot. Once again, thank you very much!
oh dear… have to apologize for the dumb grammar errors.. i’m OCD about it.. so i have to correct myself.. “you never cease to AMAZE me.” :P :]
p.s. merry christmas! :D
ahhh.. you never cease to amazing me. thanks for posting this! gotta try it as soon as possible. :]
I just bought a kit from http://www.bokehmasterskit.com/ because I just don’t have all the stuff I need to make it myself, but your tutorial was great!
Do you know if it will work with greater than f 1.8
Thanks!
Oh I love this and i love that I can make it myself!! I’m hoping Santa bring me a new Canon to replace my Nikon D40!
Thanks! I can’t wait to try this! Happy Holidays!
great tip! I’ve been a pro photog for 20+ years; I own all kinds of screens, etc. but never thought to do this .. so fun! I love learning new things… thanks!
do you ever post pix on flickr? these bokeh pix would be such a hit!!
And I always figured it was a photoshop trick! I will be trying this tonight! Thanks for sharing!
Thanks so much for doing and sharng this!!!!!!!!!!!!!!!
Love it!!!!!!!!!
I think you are the coolest chic ever! Where you come up with these ideas is beyond me! :) Thanks for getting the creative juices flowing and for being a source of inspiration! I’m totally giving this a try. :) Thanks and Happy Holidays to you and your family!
This was super cool! I love it! I am going to try and see how this works for myself! It could end up disasterous though. lol
Thanks for sharing!
Deidre
Wow! Wow! Wow! Merry Christmas Amanda!
WOW! I love this and must try it soon!!!
thanks for a lovely idea with good instructions – i will have to give it a try :) so as a few of the people commented before – do you just shoot through the star shape and howie is perfectly still and the lights come out in stars? have a great day :)
Betty Bake
Thank you SOooooo… much Amanda!! I LOVE this technique . I will have to try this! Thanks so much for sharing your expertise! I luv your blog!!!
Wow that is awesome. You’re so Creative!
Wow, how neat is that? Thanks for sharing!
That is amazing!! I did not know you could do that, I am definitely going to have to do that
This is a great idea! I will certainly try it this week!
what an amazing creative idea??? Thank you so much for this fabulous tip:) Merry Christmas!
Those look awesome! I love the heart one the best!
I always wondered how people did that…
thanks for sharing :)
Lovely pictures! Very clever
NO WAY!!!! Had no idea what a bokeh was! This is really awesome. You must have read my big whiny comments on your facebook post about Christmas tree pics ;)
I will take a whack at it, even though, like many of the others I have only a 4.5 aperture…we’ll see what happens!
This is awesome! Thanks for sharing!
I LOVE THE TUTORIAL ABOUT THE BLACK PAPER AND THE LITTLE CUT OUTS, THANKS SO MUCH, you kids are so clever, Been a photographer for 35 years, even had a pro studio in the ’90s and never, ever, thought of this one…oh, we had some tricks of the trade, but hadn’t seen this one and thanks, I am trying it for fun…heyoka lynn
Love this! I got a similar effect with my point and shoot. I held up pair of cheap glasses that make lights look like snowflakes in front of the lens to take a picture of the multi-colored lights in my son’s room. It worked beautifully. But this? This is awesome!
I’m toooo amazed to say anything. Love the pics but thinking the heart shaped one would be cute for valentine cards. Merry Christmas week.
Very cute tutorial – a “must try” for sure!!!
Amanda, you find always ways to be more “utopic” for me (just kidding, you know!!!!). Loved the ideia, I’m not sute I’ll be able to do it but I’LL TRY!!!!!!!!!!!!!!!
Thank you so much!!!!! Happy Xmas!!
Cool! I’ll have to give this a try. Thanks!!!
Very Cool and fun tip! Thanks for sharing it Amanda. The lowest f/# I have is 3.5. I may play with it to see what happens otherwise I’ll keep tip this in case Santa brings me a new lens : )
WOW, fantastic photos, great tutorial, thank you!!!
For those, who ask how is Howie so crystal clear… it is not a long exposure photo. The shutter is not open for a long time, 1/40 is a 40th of a second, quicker then a blink. That is why Howie is so clear. When U use huge aperture (low f-number), lots of light goes into the camera so U don’t need too much time to make the shot. That is why the dog is not blurry
This is so cool!! You are truly imaginative! I’m going to work up the courage to try. Thanks
THANK YOU!!! I so appreciate you sharing this wonderful information. I can hardly wait to try it out. Makes me want to keep Christmas lights up in the house all year long! Have a fantastic holiday with your family and give your sweet little dog a hug from me!
XO Nancy
Even though I have no motivation to actually DO that, it was WAY cool to see the pictures and seeing how you did it!!! Thanks for sharing!! (I’m crossing fingers for FONTS for 2010?:)
That is so neat! Great tip for the little shapes. What kind of other lighting did you have in the room? Also you don’t use the flash, right?
You’re just about the smartest Christmas cookie ever. Thank you much for this. I’ll be making mine this week :)
That’s a really cool tutorial…thanks for sharing! I’m hoping I get a new camera for the new year! :) Crossing my fingers!!
You definitely have a new fan! Just had your blog passed along to me this morning! Look for an explosion of new followers! Can’t wait to try this technique.
Hmmm…now I need that lens…lowest aperture I have is f 2.8. Wonder how that will work? I may try anyway. Love these pics!
Jessica,
2.8 will work! did you figure it out? You just need to get as close to your subject as possible. If it doesn’t come out then move your subject farther away from the back ground. Aperture (1.8 v 2.8 etc) is not the only factor in Depth of field.
You must be the most creative and imaginative person on this planet. Where do you come up with all this? You had me fooled though when I saw the hearts on the tree :) Howie is adorable and you are one major talent. Merry Christmas.
Awesome effect! Thank you for sharing how you made the custom bokehs!
Definitely giving this a try later on this week! I’d seen this before but your tutorial is really great for breaking it down–thank you!
Thanks so much for the bokeh tut. I can’t wait to try later today.
Thanks for the tutorial. I can’t wait to try these out! :)
I’m wondering also, how you got Howie so crystal clear and how to get many of blurry hearts if you have only ONE on your lens???
thanks for the tip, I’ll try it!!
The heart that she made changes the shape of the bokeh, which is the out of focus circles (or hearts in this case) from lights. Bokeh is usually shaped in circles, but with the little hood she made it changes all of the Bokeh, so it will all look like hearts, or snowflakes, butterflies, whatever you like. The little hood just alters the shape of circles, so you only need one shape to make many. I hope that makes sense.
Also, Howie is clear because of the aperture Amanda used. If you’re not familiar with aperture, this is what makes the picture more focused, depending on how wide it is. Amanda changed her aperture to focus on Howie, but to have the background out of focus.
Hope I helped
WOW! Could you make me long for a “good” camera any more? Any pointers for those of use using point and click digitals?
So, then do you just take the picture of your subject “through” the little shape hood that you cut out? And the subject will come out lighted and clear and just the Christmas tree lights will be a different shape? Like your first two pictures? Did you use any special lighting to light up your subject? Since the shutter has to stay open so long, how did you get Howie so crystal clear (I would figure he would move too much). Thanks!