I’ve been using both Lightroom and Photoshop for a while, and I have to say that Lightroom is the photo editor I’d reccomend. Check out my favorite ways to edit using Lightroom!
How I Edit Photos
I currently use both Photoshop CS5 and Adobe Lightroom 3 to edit, size and save all the photos here at Kevin & Amanda. I love Photoshop through and through, but Lightroom has some pretty awesome features that can definitely rival Photoshop’s near and dear place in my heart. Lightroom is brimming with easy-to-use tools and sliders to lighten, brighten, enhance, and correct just about any photo you can throw its way. Below are a few of my favorite features to use in Lightroom, some “before and afters” of photos edited only in Lightroom, and the step-by-step adjustments I made to get them there. With its multitude of features, straightforward user interface, and much more reasonable price tag, I’m convinced that Lightroom could easily be the only photo editor you need. Come see what I mean.
Organizing Photos
Let’s get the boring stuff out of the way first, then onto the cool tools! I use Lightroom to get all my photos off my memory card and onto the computer. I then weed through and discard the photos I don’t want, and organize and arrange the remaining photos.
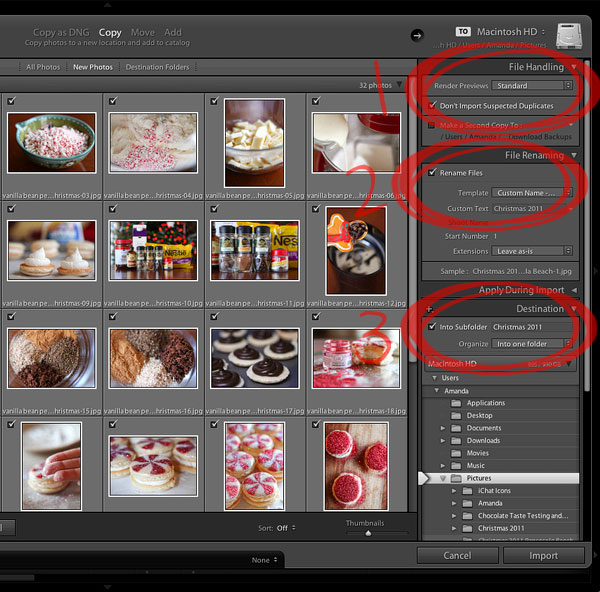
Things to Note When Importing Photos:
- Make sure Render Previews: Standard is selected.
- Optional: Rename your photos to something descriptive, with a lot of key words so you can search for them later if you’re looking for a particular photo. (Example: Christmas 2011 Pensacola Beach)
- Here’s how I organize my photos. I put them in the Pictures folder on my computer, and then each event goes into its own subfolder. (Example: Christmas 2011)
Now you’re ready to import. After all the photos have been imported, while under the Library tab in Lightroom, I scroll through each photo and use the 1-5 number keys to “star” my favorite photos — that is, the ones I like and want to keep. I delete the rest. (To delete, select Edit > Select by Rating > None to select the “unstarred” photos then hit the Delete key to Delete from Disk.)
Then I simply drag and drop the remaining photos to arrange them in the order I want them to appear, if they aren’t already in order.
Now that we’ve got the house cleaning out of the way, let’s edit our first photo!
Cropping & Straightening
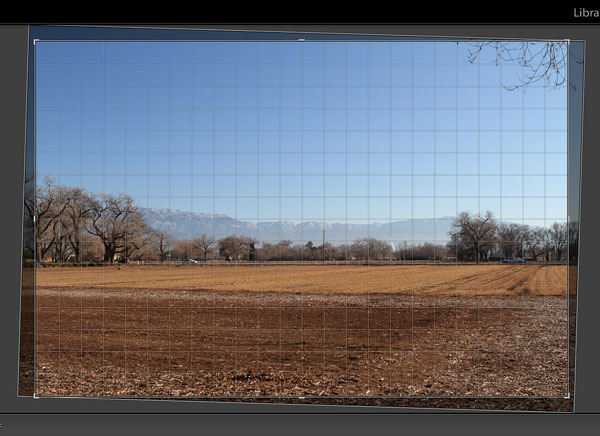
My first step is to go through and crop and straighten the photos that need it. Hands down, this is a thousand times easier to do in Lightroom than Photoshop.

Just press the “R” key to bring up the Crop and & Straighten window. The plentiful grid lines that appear are extremely helpful. There’s usually always one close to something in the photo you can use to line it up and straighten it out.
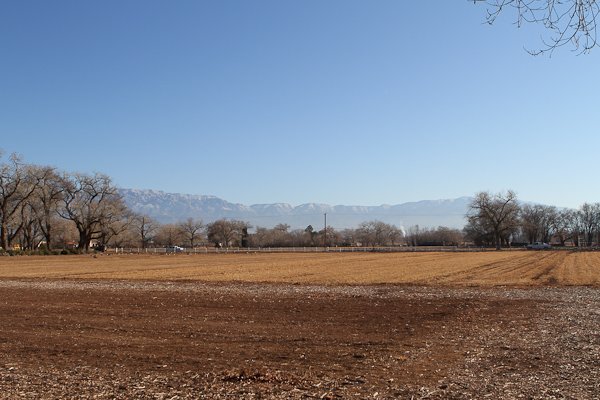
For example, the fence in the above photo. Press “R” again to apply the crop.
Much better! Now’s when the magic really starts to happen.
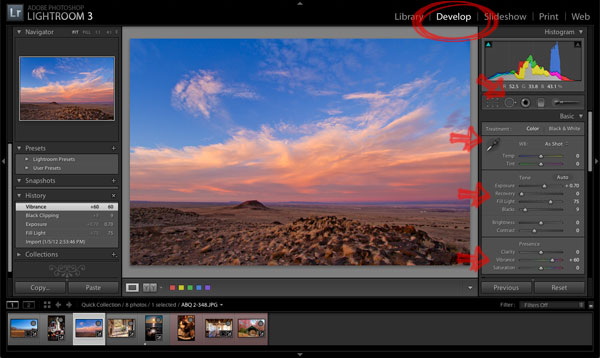
Under the Develop tab in Lightroom, you’ll find a multitude of tools and sliders to enhance your photo.
Vibrance & Saturation
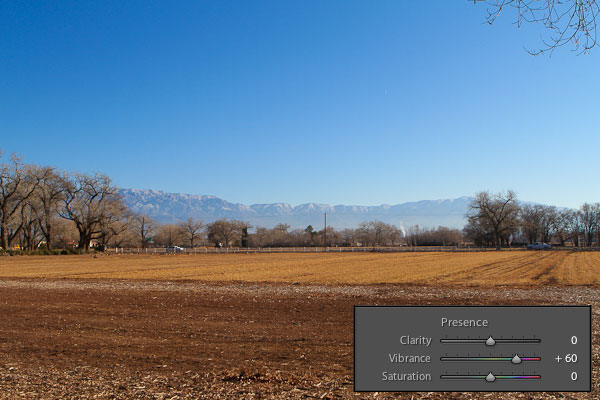
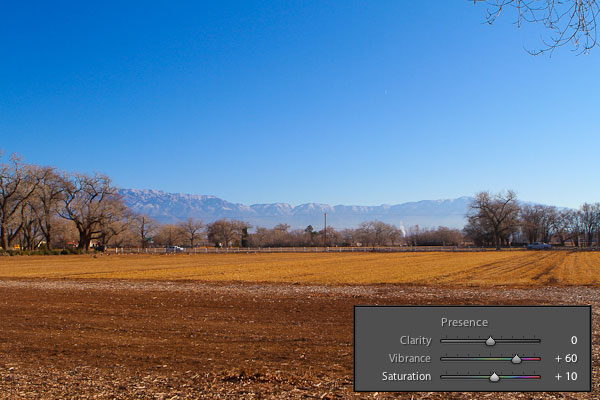
Let’s start with Vibrance and Saturation. These two can really make the colors of a photo come to life. Vibrance enhances blues. If there’s a sky in your photo, add some Vibrance. You won’t regret it.
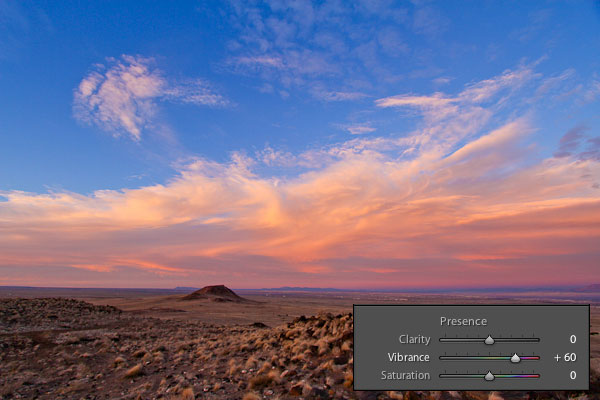
Sky = Vibrance. In this photo I bumped the Vibrance up to 60. As you can see, it enhanced the blues in the photo while mostly leaving the other colors as is.
Saturation enhances yellows and reds. I use Saturation more sparingly than Vibrance. It’s easy to overdo. Here I only increased the Saturation to 10. This enhanced the colors in the dirt and field while mostly leaving the sky alone.
Now here’s the before and after. Move your mouse on and off this photo to see the changes we made.
(Note: If you’re reading this post in a feed reader or email, you’ll have to click over to Kevin & Amanda to see this feature in action)
White Balance
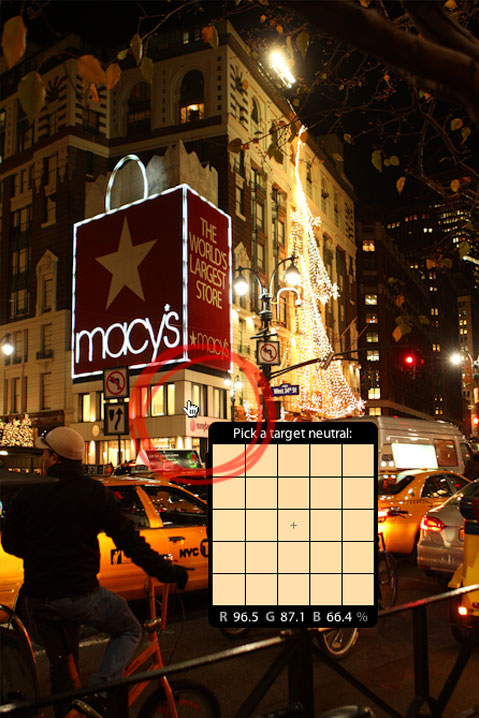
This is one of my favorite tools to use in Lightroom. If the color in your photo just isn’t quite right, simply click on a point in the photo that should be white to balance out the entire photo.

This is another one I always do in Lightroom instead of Photoshop. If Photoshop has a white balance tool that’s even anywhere remotely this easy to use, I’m completely missing it.
In the Develop tab of Lightroom, under the Treatment heading, you’ll see a White Balance Dropper you can use to click on a point on your photo that should be white. At this point, the whites in your photo will probably be either too blue or too yellow. As you can see in the above photo, some points are more yellow than others. For the most accurate white balance results, select the point in the photo that is the most white.
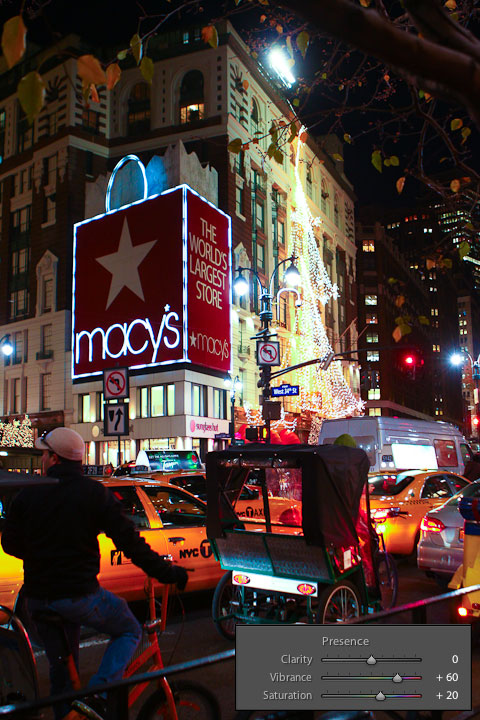
Yay! The building is white again. But the colors have lost some of their vibrancy. It’s kinda dull.
So let’s add a little Vibrance and Saturation to this photo. Huge difference. The vivid colors just bring this photo to life. I’ll admit, I don’t always use Lightroom to add Vibrance and Saturation. I’ll sometimes rely on Photoshop actions to do that for me. But with results this gorgeous, why bother with a whole other program??
Don’t worry, Photoshop. I still love you…
Let’s see the before & after. Move your mouse on and off this photo to see the changes we made.
Fill Light
I’ve recently developed a deep appreciation for Fill Light. You know that completely dreadful lighting in the middle of the day with super bright lighting and tragically harsh shadows? No matter what settings you use, usually either the shadows are way too dark, or the lighter parts are way too bright. I love to take photos in perfect lighting, but that doesn’t always happen. Fill Light & Recovery can help.
Fill Light will lighten the areas of photos that are dark with shadows. Recovery helps bring back definition to the lighter (too bright) areas for an overall even tone. (I’ll show you an example of Recovery in the next photo. )
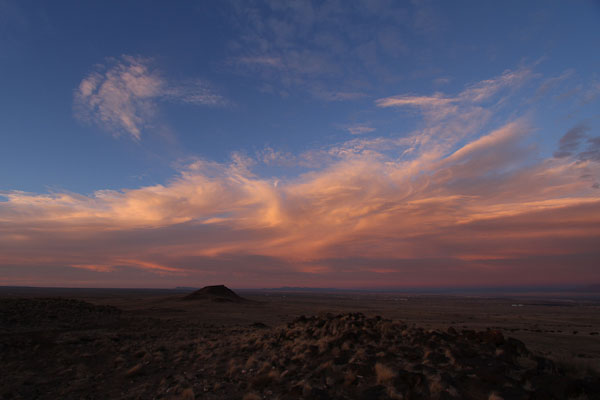
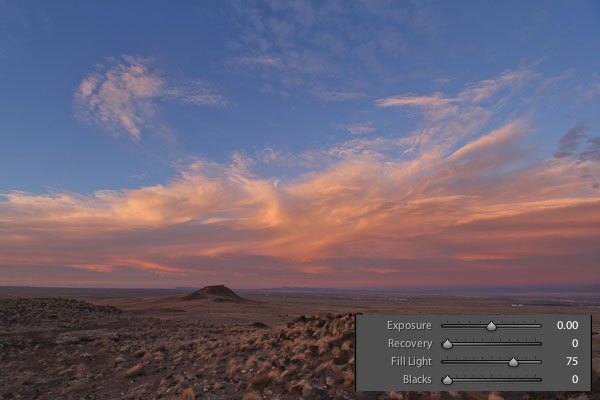
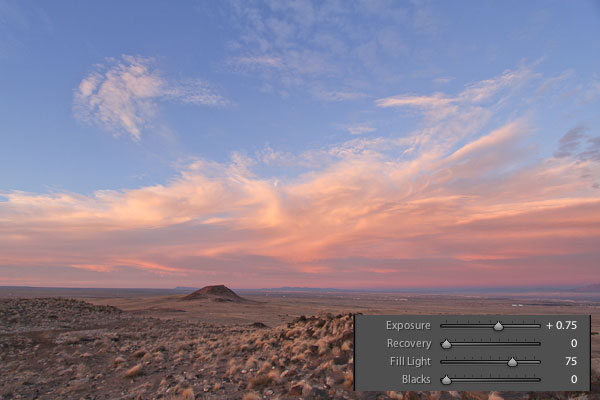
Let’s start with this photo. Not great to start out with but believe it or not, this dud of a shot turned out to be one of the most dramatic photos in the entire volcano series. I obviously exposed for the sky and clouds (well, maybe a little under exposed, to be perfectly honest) causing the ground to turn out too dark.
Fortunately, by just adding a little Fill Light, we can easily even out the entire tone of the photo. If we’d just upped the Exposure, the sky would’ve ended up too bright before the ground got light enough. Have I mentioned how much I love this feature?
However, now that the photo is evened out, it could still use a little Exposure boost.
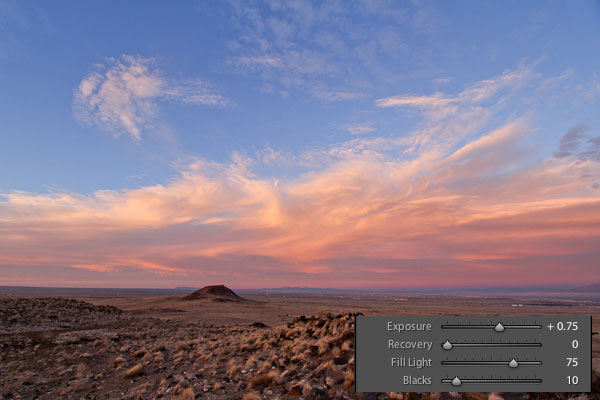
That’s better. Now the photo is certainly brighter, but it also got a little flat. There’s no pop. No pizzazz. Increasing the Exposure can do that to a photo.
Therefore, whenever I crank up the Exposure, I usually increase the Blacks as well. Blacks darkens the shadows in the photo for rich contrast and depth. Ahh. Life is restored.
And since Sky = Vibrance…
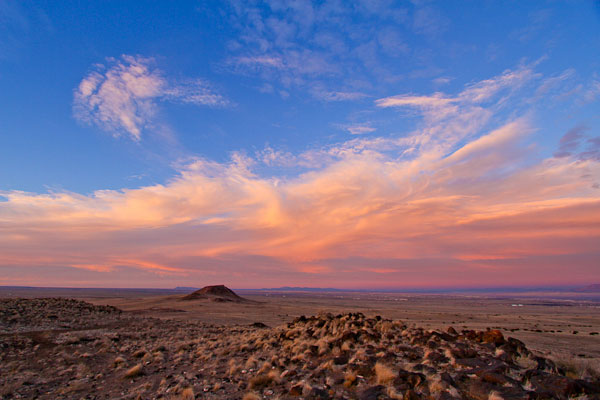
This is where the magic really happens, folks.
Isn’t this a dramatic before & after? Thanks to Fill Light I was able to salvage what normally would’ve been a tragic outtake.
Recovery
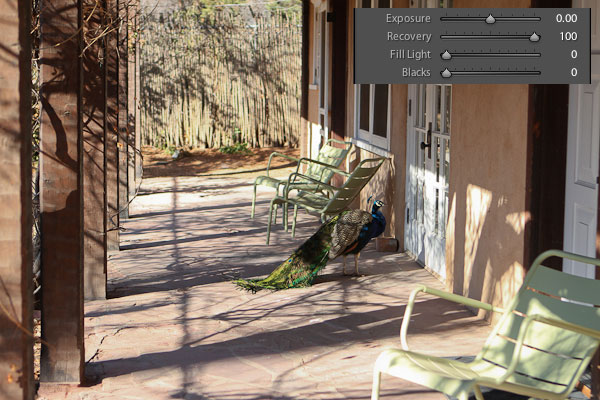
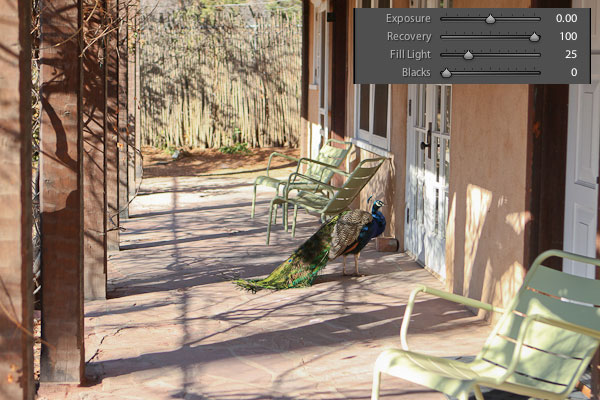
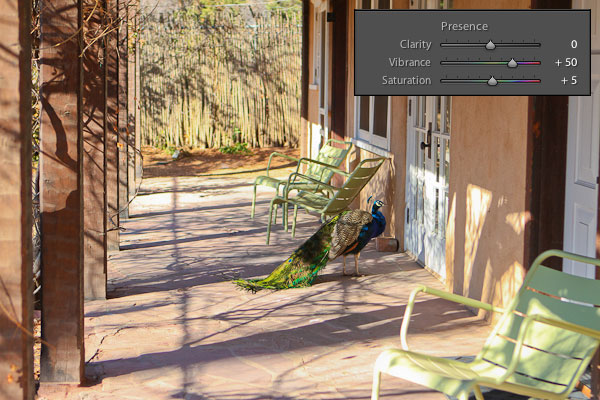
Now let’s see what Fill Light and Recovery can do when working together. You’ve seen that Fill Light lightens the areas of photos that are dark with shadows. Now let’s see how Recovery can help bring back definition to the lighter, over-exposed areas for an overall even tone.

Yikes! Atrocious lighting here. Just ghastly. But it’s not as if I could say, “Ah, excuse me Mr. Peacock, would you mind stepping into this shade for me? That’s right, now tiiiilt.. Look at me… Got it! Thanks!”
Not really.
The first thing I did was correct the over-exposed areas in the photo by adjusting the Recovery.
Next I used Fill Light to brighten the shadows to even out the lighting in the photo.
Now all this photo needs is a little Vibrance and Saturation to go from flop to fab!
It may not be flawless lighting, but it’s a lot better than what we started out with, right?? I always look for nice, soft lighting, but unfortunately, sometimes harsh lighting can’t be helped. Thanks to Fill Light & Recovery, now I don’t stress out about it as much.
Noise Reduction
This is a new feature in Lightroom 3. It’s another tool that can fix a bad lighting situation. If you’ve got terribly dim lighting, are forced to bump up your ISO, then end up with an abundance of unpleasant grain in your photo, Noise Reduction can take care of that for you.
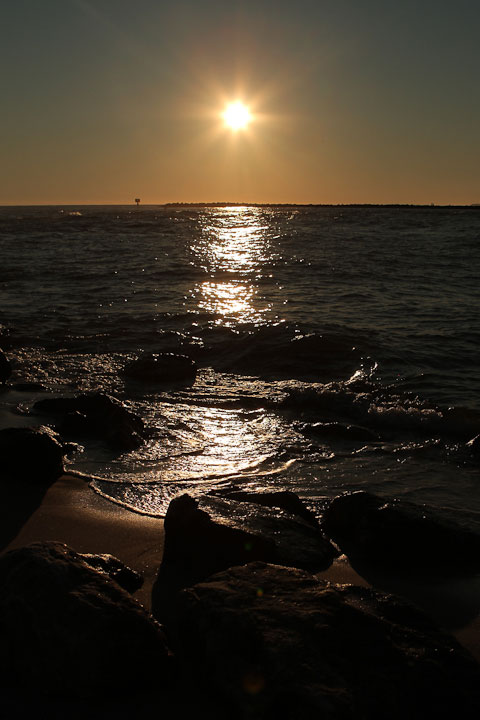
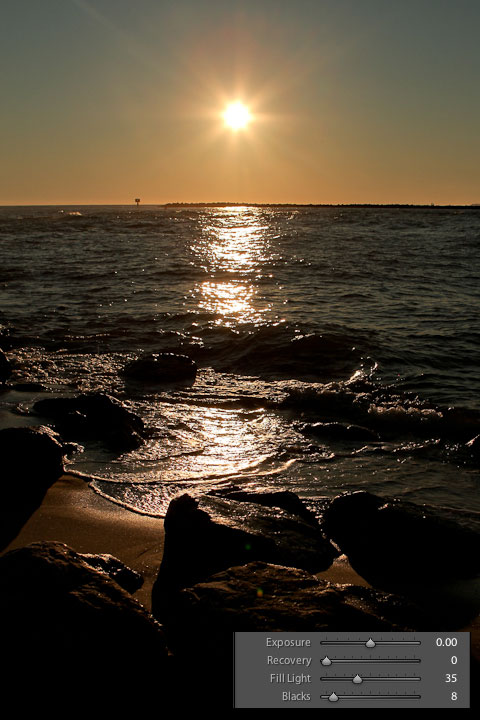
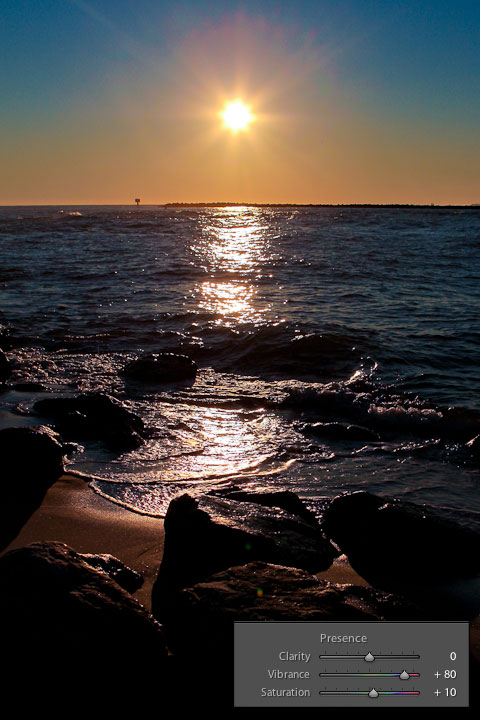
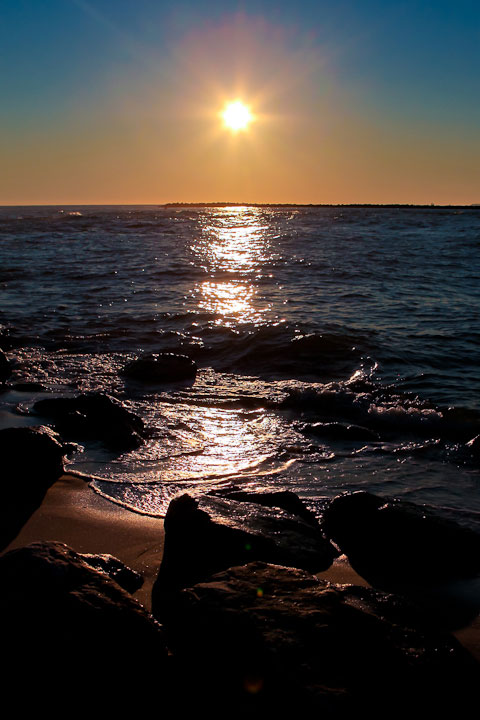
Let’s start out with this photo. A not-too-remarkable beach sunset. We’ll to work our way up to the Noise Reduction in this photo.
I started out by adjusting the Fill Light and Blacks.
Next I manually adjusted the White Balance. Since there was nothing really white to click on with the White Balance Dropper, I manually dragged the Temp & Tint sliders.
It needed a lot more blue, so I decreased the Temp. It was also a little too green for my liking, so I increased the tint. Now this is all very subjective, so just drag and play until you like what you see.
This may look a little blue now, but Vibrance and Saturation, always warms the photo up a bit.
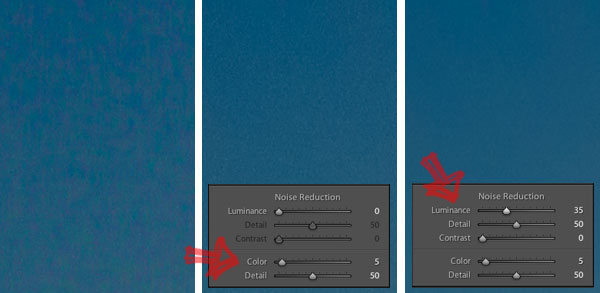
Now the photo is gorgeous with color, but if you look closely at the sky, you can see a little noise and grain has appeared. Now let’s put Lightroom’s Noise Reduction to work.
Color. First, start by moving the color slider to the right just until all the random colors in the photo disappear. If it starts effecting the overall color of the photo, move it back to the left until you find the right balance.
Luminance. Then adjust the luminance slider to smooth and soften the remaining grain, being careful not to render the full image too blurry.
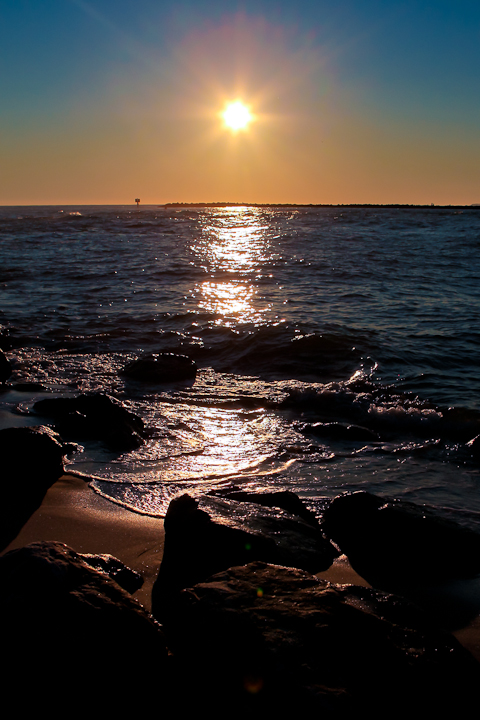
Here’s the result. Much better than the photo above! This subtle feature makes a huge difference in the overall appearance of the photo.
Cloning
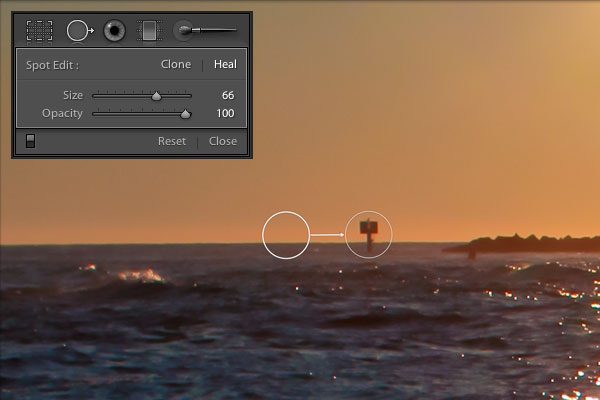
Now if you’ll indulge me just one final feature. See that sign off in the horizon in the sunset photo above? It’s kinda distracting. Let’s get rid of it. In Lightroom.
Simply adjust the brush to the size of your imperfection, click on it, then drag the brush to an area of the photo you want to duplicate in the original spot. That’s it.
Here’s our final before and after of the beach sunset.
Oh! One more cool feature to mention. Batch Editing. If you’ve got multiple photos that all need the same correction, you can batch edit the lot of them by clicking CTRL-C while under the Develop tab in Lightroom. Select the settings you want to copy, then highlight the photo or photos you’d like to apply those settings to. Click CTRL-V to apply. Done! Quick and easy.
Try Lightroom free for 30 days and see if you love it as much as I do.
Happy Editing!










In the battle of the professional photo editing software Adobe Lightroom and Photoshop are top listed. Once Adobe Photoshop was at the top of buzz in the photography industry but nowadays Lightroom comes head to head on the battlefield. But I agree with you when it comes to user-friendliness Lightroom is perfect. Alongside these two software, what do you prefer for professional photo editing?
have you, or can you, update this tutorial for Lightroom cc? I’m just learning and some of these options are either changed or no longer available….
In my humble opinion, Adobe Lightroom probably has the best smudge tool for any app on mobile. Adobe is a leader in this field and it’s no surprise that their app is lean and powerful. Thanks a lot for sharing such a superclass tutorial. Please keep posting more updates on your site. I will certainly dig it and personally suggest to my friends. I’m sure they’ll be benefited from this website.
For an image to turn red you need to click on the “show selected mask overlay” button. Which will be on the line beneath your photo. By moving the clarity and sharpness to the left this is what gives you the “blur” effect. There isn’t an actual “blur” button. I hope that helps as I’m a Lightroom 5 novice too
Hi Kevin & Amanda
Thanks for the tutorial. I’ve only just started using Lightroom to enhance my photography, this walk through has been very helpful.
A great post! Really good information on how to use the lightroom software for photo editing. If the post has some how to videos then it would be a one stop solution for many enthusiasts like me.
Great tutorial!! I found your stuff on pintrest and it has been so helpful! I just bought a new laptop and have been thinking of getting a new photo editing software. Thanks for the tips!
Sometimes I try to edit pictures for my wife’s blog. I am not verse in Photoshop and I will try Lightroom. It seems to be a lot easier. And thanks for your tutorials I am here saving them right now.
Hey Kevin and Amanda, thanks for the tips, great page and I am learning Lightroom 5 now so this is perfect for a newbie user. Call me greedy but I want to know something else… can you tell me how you made a ‘before and after’ mouse rollover? that’s a great feature on this webpage… I should work it out myself perhaps but since you seem so generous here with LR tips just thought I’d ask… Thanks again
As an award winning professional photographer, I only use LR, not photoshop. LR offers everything you need for the most amazing and quick results.
Thank You so much, i’m a wedding album designer, this is so useful to me, got an newe ideas from this lesson
I have been doing photography for about 5 years and this post really speaks to me, thank you.
WOW!!!!! Amazingg post.
The tutorial wasreally helpful for a begginer with absolutely no clue about post production. At first I was afraid that lightroom might be too basic a software and that I would have to spend months learning photoshop, but your post made me realize that Lr is all I need! The pictures. Alongside werre super helpful. If you could make a more detailed tutorial giving fixes to basic problems using lightroom, it would be amazing. Thank you sosososooso much
Hi! I’m so glad I found this!! My question is about Lightroom 4. Where do I find the fill light and recovery at? I just got it and am still learning to use it. Any help would great! Thank you!!
What photo storage cloud do you use/ recommend ?
This has given me something to think about, as I am too scared of Photoshop to attempt it, maybe this might be a better program for me? I love that renaming option!!
FYI, wanted to give you a head’s up, since you installed that new Pinterest button over your images, the hover before/after feature for this post no longer works. Not sure if you did that on other posts, too.
I have a couple of things to comment on… first – I love the way that you teach! I re-did a couple lighthouse photos that I had taken and wow! I love them so much more!! On a another note… I was reading another comment on LR about a gal who has a friend who was shooting a wedding and uploaded them in to LR and then when she returned the photos were gone. Well, I’m pretty sure that I am a jinx magnet lately! Because believe it or not a couple days after reading this I went to work in LR and everything was gone. History, catalogs, files, everything! I don’t understand how or why but my program is cleaned up now! My files were okay but I lost everything that I had been working on. Oh and did I mention I love how your personality shines through! You are certainly a good read! Thanks again!
I cannot tell you how much this is helping me. I have never used any editing software before; I have always just found it too complicated. I finally broke down and got Lightroom. I have a nice camera finally and want to be able to get professional quality pictures. You really brought it all together for me. By explaining what features do and showing us… I cannot thank you enough. You’re a wonderful photographer!
Thanks so much for sharing in detail! I work with LR and I don’t work with PS. I am honestly a bit intimidated by PS because it’s quite complex. I do like to work in LR and have a lot to learn in it yet. So your details have helped me quite a bit tonight. Thanks again for sharing and I look forward to reading more from you!
Thanks for the great tutorials. I like the pic of the Los Poblanos peacock too (one of my favorite places)!
LOVE LOVE LOVE this!!! I have been using Lightroom for awhile now but this info is EXACTLY what i needed!! Thank you sooo much! :)
You obviously have plenty of similar feedback, but does it ever get old to be patted on the back? I’m a total newb, and bought both a canon dslr and lightroom last year on black Friday. I use my camera all the time, but my dvd player on my old computer didn’t work, got a new one a few months ago, and was too nervous to open LR thinking I should’ve purchased photoshop. Nope, think I’ll stick and learn. Thanks!
Great tutorial. As of right now, you can buy Lightroom 4 Upgrade for $79.00 from Adobe, regular price is $150.00. Photoshop Elements 11 can also be bought as upgrade for $79.00, regular price is $99.00. (Be sure to read the ‘upgrade’ rules.)
I just bought Photoshop Elements 11 for $49.00 at Amazon.com .
I feel Photoshop Elements is just as good as LightRoom for editing photos, but I’ve been using Photoshop Elements since it was called Photoshop LE. LightRoom is a photo organizer/editor. Photoshop Elements is a photo/graphics editor. You can do more in PSE than you can in LR. They are alike and, at the same time, different programs.
Look up LightRoom tutorials on YouTube. You’ll find more there than you think.
The HELP feature for Adobe products is extensive……….. dive in.
Great post! I shared it with my fans on my Facebook page because I think it is so helpful. Thanks for the great info.
Amanda….love the lightroom tutorial, thanks. I have a question. When you export/copy a picture/portrait that will be used to hang in your home…..do you use any special or different settings in Lightroom?
Just bought Lightroom 3 (4 is already out) OEM for $29.95 with free shipping, only because of your review. I haven’t read all of your comments, but I loved your article and I couldn’t pass up this deal. I have Creative Suite 3, kind of old, but still a great program. I don’t need the latest of ANY program, just a somewhat current version and I am excited to try this one out. My Thanksgiving present to me, and I don’t think I would have bought it if not for this post. I have followed you, Amanda, for years and I trust you and that is probably something you hear all the time! I am a bit older than your average follower, but I can see that you are a straight arrow and I love all your posts, your voice and pretty much most of whatever you do! Thanks for always shooting straight and being a really great woman, girl and blogger.
P.S. Check out my facebook page, I could use your input, Amanda. https://www.facebook.com/cherylannshipman I am just starting out (in business) and I know you have defined your focus and marketing and I was wondering if you had any advice for just little old me? When did you define your focus (did it change somewhere down the line, when, and how did you handle it?) How do you keep the public at bay? How much do you share and when? You seem to have it defined well, as in, how much to give and how much to keep private. You seem so open, but I know you have an idea of where you’re going. I would appreciate your advice…I am focused, I know what I want to do, but I want to do it without exposing myself without boundaries. Thanks, Amanda, for being the best role model I have discovered (EVER) and consistently loved since finding you and your blog.
Thanks a lot. Love ya!
I have NEVER, NEVER written a comment on any kind of blog, tutorial, or anything for that matter. I just wanted to tell you how wonderful your tutorial was!! I have tried the trial of LR as well as many other software programs in the past. My problem is I never know where to start! I have bought books ect but it is always just too much information and confusing. I am a very visual learner and your tutorial was PERFECT! Most visual tutorials don’t include the written steps to go along with the visuals and vice versa…again yours was perfect!
I REALLY REALLY hope you continue with your tutorials…you know you really could create your own series of them! I would pay for them :)
Thank You Again,
Tracy Hibbs
I agree! Amanda’s tutorials are spot on. Not fancy, not elaborate, but just what you need to get started! And I just love that she is willing to share her expertise in the simplest of manners, because that is exactly what she knows we need!
All your photography and editing tutorials are fantastic! Any chance you will have a lightroom 4 tutorial in the future?
And I can’t do all that with the GIMP?
Amanda,
I know that you did this tut a while ago, but maybe you still can help me? Or if someone else would kindly help me? I read that “saving” your photo after editting it is very different than any other program. Can someone help me figure out how to save my “changes” (editting) to my hard drive? Thank you!
Thank you for posting this, Amanda! I’ve been frustrated with Photoshop for the type of product photos that I need and so I’ve downloaded the Lightroom trial at your suggestion. It does just what I need and had such an easy learning curve (especially compared to PS). Again, I really appreciate your post because without it, I would have never tried Lr. Take care!
Awesome tutorial. I recently started using Lightroom and still have a ton to learn but this post does a great job of explaining what to do and when.
Hi Amanda, I am new to photography and I am trying to find a starter photoshop. Now I see you like the lightroom3, what do you think about lightroom4?
This post is incredible! I am totally putting Lightroom on my wishlist and bookmarking this page- Thanks for all the great information!
Thank heavens for this post – finally a user friendly, quick, fun (and gorgeous!) tutorial for Lightroom 4! I have just one question – I’m having trouble finding the fill light feature (seems like it shouldn’t be that hard to locate) I keep thinking it should be under the “basic” section of the editing tool bar.
PS: Bostons are proof that we are meant to lead joyful lives! :)
I use the white dropper in PS levels to help balance the white. I’m not sure if that is how you’re supposed to use it, but it seems to work that way.
I started using Lightroom last night – LOVE it! I used your tutorial and then started playing with it – there are like 50 presets that give awesome Photoshop like actions!! Also LOVE the easy integration with Photoshop!
Thanks again!!!
Stephanie @ All Artful
I have yet to try lightroom but a friend of mine who photographed our wedding loves it! She says it makes editing so easy… esp considering you can do batch items in it. The only warning I have for anyone who might read this comment (considering the article was posted over a month ago) is that you really need to back your photos up. Lightroom can accidentally erase your photos from the directory of your computer. My friend who did our wedding had the program crash and the photos were gone from the program. When she went to bring the originals back in, they were gone as well. As I haven’t played with lightroom, I don’t know if there is a setting to import and not work on the originals or if it always works and saves to the files you import. Either way she had to buy a recovery program to recovery the files from the hard drive as the directory listings of our photos were gone. She found most of them but others were lost. So if you plan on editing with lightroom, save all the originals to a separate disk somewhere just in case lightroom crashes and takes your photo directory with it. =)
Great introduction to Lightroom Amanda! However you got something wrong. Vibrancy doesn’t just effect blue colors, though it may look like that. Vibrance is designed to find the colors in the picture that are dull, and brings the saturation up only on those colors. Any colors that it deems already saturated, it will try to ignore. It also specifically tries to protect skin tone colors, which is why the browns from the earth in that picture stayed the same, as they are the same color as skin tones. It’s a great tool to use especially with portraits.
The saturation slider actually just takes the entire photo and ups the saturation overall. So all colors, even blue will become more saturated.
Thank you! Yes, that helps. I had deleted a bunch and then all the sudden it wasn’t working and I wasn’t sure why, but now I know. You just saved me some tears and frustration! You look marvelous too!!
LOVE LOVE LOVE THIS POST!!!
Question about deleting multiple images:
In Library, I select all the unstarred ones in EDIT and then hit delete, and it only deletes one. Might you know why? (I have done exactly as you have described…I am puzzled!)
Hi Vanessa! For some reason you have to be on the grid view screen, where you can see all the small thumbnails in order for them all to delete. If you can only see one big picture, that’s the only one that will delete. Hope this helps! :)
WOW – great article, Amanda. You just convinced me to buy it.
Thanks so much!!!!
Awesome post! How does LR measure up to PSE? I have only used PS and PSE and I love it. I am curious though was the difference between LR and PSE might be, since PSE is so much more user friendly than straight up PS.
Having used Paintshop Pro for many, many years, I finally got PS and am learning how to use that, and now, after reading this post I feel like I need Lightroom in my life!
Thanks for a well explained tuturial!
I don’t have lightroom but I have just put it on my wish list. I really enjoy reading your photography posts because you do such a fantastic job explaining things in a way I think everyone understands. Not only are you a very talented photographer but a talented teacher as well.
Thanks!
I have always wanted more than Picasa to edit my photos but I never knew what program would be best for me. Lightroom looks really cool, but is it really THAT expensive? I am not a professional and I only have a digital camera. I use my pictures for scrapbooking and that is all. What would you recommend for me?? My hope is to get a really good camera but that won’t be for awhile :)
Thanks so much for posting this! I just recently added LR to my editing software, and was slowly trying to figure some of these things out without getting overwhelmed- which is really easy to do! These tips are great and will REALLY help editing! Do you use any presets in LR and if so- which are your favorites?
Ok, I’m certainly not the first nor the last to comment here, but thank you so much!!
I came on your blog, because I search inspirational food photos to miniaturize and now I discovered a new wonderful photo editing program! I’m going to try it out :)
Thanks a bunch! You just made my day ^^
Great post! I have PSE and LR3 but have been intimidated by the buttons. Haha… Will try to learn how to use it this year!
I am just starting with Lightroom and your tips are some of the best I have seen on the web, including the Adobe tutorials. Thanks for simplifying the process for me! Looking forward to applying your tips!
Hi, thanks for the tutorial. Been having LR for a while now, but never really use it much because it confused me in some weird way, so I stick to PS to edit my pictures. But your tutorial really help me a lot to understand the magic that LR have..
I have been in a love hate relationship with my PSE. I am not sure if I could handle doing another program…even though it looks really cool! It seems easier to use than PSE!
I also don’t think my computer can handle more photo editing software! Yikes!
Thank you for sharing your tips in this post, Amanda!!! I learned so much. I use LR3, but because I taught myself (out of desperation), there were a few tricks I never learned/realized. It’s interesting to see how [differently] other photographers edit their photos. I rely heavily on exposure/contrast/clarity, but it seems like you use fill light/recovery for similar effects…? I’ll have to try those out.
I got Elements 10 on sale a couple months ago, but it’s still sitting in the box. Now I’m not sure I even need to open it. If you ever feel like writing another photo editing post like this… :)
Just when I think you can’t possibly get more helpful, there you go again. Thank you, Amanda! I have been debating which of these to buy, and I think Lightroom might be perfect for a beginner like me.
Damn girl, you should get a commission from Lightroom! I think I’ve said it before, but I love your posts. They are so informative and fun. Where on earth do you learn all this stuff? Cooking, photography, fonts and technology stuff…. very cool. I’m going to go now and put Lightroom on my birthday wish list!!!
Hi Amanda,
Thanks for a great post! Note that Lightroom 4 Beta is now available! It’s got some amazing features which even include built in Blurb Book options!!
Watch the videos here:
http://tv.adobe.com/show/whats-new-in-lightroom-4-beta
Learn more here:
http://labs.adobe.com/technologies/lightroom4/
Download LR4 Beta here:
http://www.adobe.com/cfusion/entitlement/index.cfm?e=labs_lightroom4
Thanks for your great blog. I’ve been a fan for awhile…keep it up.
Cheers,
Samantha
Thank you! You have opened my eyes to Lightroom! I have had it for well over a year but only used it for presets which are great, but tend to make photos look too edited. I am in the process of making a Blurb Book with hundreds of photos to be to be just slightly improved and it has already saved me so much time in Lightroom. I usually i would do this in Photoshop which can be dreadfully slow! And i am loving the fill light tool!
Wow! What a great tutorial. I might just have to buy me a copy of this Lightroom! Love what you can do with these photos!!
What a wonderful tutorial! I was like so many of your other readers about a year ago…heard so many good things that I bought LR, but it just wasn’t making sense to me. Then I found some really helpful videos online and it all became much clearer. I do most of my editing in LR3 and just downloaded the LR4 public beta last night which seems even better!
Thank you SO much for this post! I am so overwhelmed using Photoshop sometimes that I was worried that this would be similar. It’s not, and I LOVE it! I downloaded the free trial, but I will definitely be purchasing it within the next couple of weeks!
You are AMAZING! Your posts are SO helpful to us beginner photographers/bloggers. They are so clear and descriptive and your photographs are gorgeous. Thank you!!
WOW…..the difference is truly amazing. You make things seem so easy to learn. I really appreciate your tutorials. Hugs, Becky & TJ ^..^
I was introduced to lightroom about a year ago and I absolutely love how it helps you edit things a great deal quicker than PS. Great explination on most of the big features. I hope those starting into photography find this super helpful! I know I did :-)
Thanks for sharing this. I have always really disliked editing {used photoshop for clients photo’s} but it looks like I should have used lightroom. I never did heavy edits or ran actions..just some fixes and s curves, so lightroom would have been the place for me. Do you shoot RAW?
Amanda, this was incredibly helpful! Thank you so much!
What a fantastic post. I have Photoshop and think I’ll stick with it for a while since I got it not too long ago but I love your tutorial on Lightroom. There are tons of Photoshop tutorials out there and it’s great to see one for something else. It helps show some features of another program and can help decide if I should purchase the program. So THANK YOU!
Love, love this tutorial. I agree that it is so clear and easy to understand.
I am still working on my camera skills and many of my SOOC shots are just plain lacking and blah. I tend not to focus on the settings and just the photo subject. So, now I am going to fire up Lightroom, which I bought a year ago and was clueless about the capabilities, and start playing!
Amazing post! Thank you for sharing! I just recently started using Lightroom and this is a great help! :)
This was a great tutorial! Thanks for all of the detail. I’ve used Photoshop for the past two years to do all of my editing. I only started using Lightroom after I went on vacation last year. I had to make small edits to over 300 photos! I knew that would take forever in Photoshop, so I learned Lightroom. Now I use it to bulk organize and make initial edits. I still go back into Photoshop to do the fine tuning.
Great tutorial! Thanks very much!
This is the way all tutorials should be presented. It was easy to follow and understand. Please do more!
I have photoshop CS5 also but I have been using a $20 program called camera bag 2 (you can get the beta version free!!) that has a lot of the features you mentioned here like the sliders and straightening, ect. You can’t edit things out of the picture with it so I still have to use photoshop for that but I like it a lot. My husband made fun of me for buying another editing program when we have the fancy master collection of PS. I told him the other one is just simpler;)
I think I speak for everyone when I say THANK YOU for taking the time to share. You share, because you care. That is something you don’t see in many people these days. Thank you so very much for your help. This really helped. I have been stuck in Photoshop CS (yeah the old version), and I am now going to try lightroom. Thanks!!!
If only I had this last month. I downloaded the free 30day trial,but I didn’t have a clue what I was doing so I gave up and went back to elements
Hi Amanda – love your blog and while I think parts of your tutorial are great, I kind of disagree with some of it, particularly with the whole removal of the sign in the last picture. While I agree and accept that many professional photographers use this type of software to enhance and touch up photos, I think removing things from photos, in contradiction to the natural state is…well, personally, I don’t agree with it! Maybe I’m just an antiquarian and I love the fact that photography was originally used as a way to capture things as is. While I am not against technological advances, I think photography loses some of it’s credibility when everything is enhanced. Anyway, end of my two cents. I do adore your blog and find your posts very entertaining and yes, find your photos great too :)
Thanks,
For sharing this.
Your tutorials are Amazing! thank you for sharing your tips! I have both programs but just slowly experimenting n learning, your photos are stunning.
Awesome tutorial! Thanks for the tips!
Thanks for sharing ! :)
Wow! Thanks for this! I use LR but just mess around with things not really knowing what I’m doing. I just slide bars until it looks ok to me. So helpful!
This was unbelievable helpful. You have such a great, clear writing style. I’ll be experimenting with these tricks tonight. Thanks thanks thanks!
Thank you for this post. I just bought Lightroom but have not taken it out of the box.
Hi… I just found your blog on pinterest and I am soo impressed! I can’t wait to read what you have written every day! Thanks so much!
I’ve thought about investing in LR for awhile… you make me want to even more! Awesome tutorial, Amanda – love the before & afters!
I’ve never used LR, but I’ve heard great things about it, so thanks for this!
I recently took a class on Adobe Bridge & how easy it is to use it to organize your images & graphics across the Adobe Suite. The point of me telling you this is that, inside of Bridge, is a tool called Camera Raw. (Under File > Open in Camera Raw) And that is where you’ll find the white balance tool, as well as applying clarity, vibrance, etc, etc, etc to your images. After you make your adjustments, you can then double-click the image to open it in PS to do any additional editing, like running actions and whatnot. :)
Thanks! This was great!
Amanda,
I can’t thank you enough. I have had Lightroom for about a year now and have never used it. Now I know some things I can do with it! You are AWESOME!
Thanks for the tutorial! I have downloaded the trial version and can’t wait to play with it a bit.
Great tutorial!! Thank you so much. I have been playing with LR3 and your tips truly will help, can’t wait to try them.
I’ve been so frustrated by PS lately, especially on a Mac. This makes a lot of sense. Going to do the trial version, thanks for all the tips!
Awesome tutorial. Thank you! I’ve always wondered what sharpening technique you use. All your photos are so tack sharp and gorgeous. How about a sharpening tutorial?!
Great tutorial…I will be trying the fill light and recovery with my next photos!
Thank you!
What a fabulously helpful and informative article. Thank you so much for sharing. I am really impressed and am looking forward to using my newly acquired Lightroom now! :) xx
Wow, thanks for writing such an informative post on Lightroom. I have been thinking of trying it, so this is so timely.
How much is lightroom?
I love, love, love lightroom. I started way back with LR1, then got LR2 and now have LR3. (And I am feeling proud because I knew most of this stuff, but your explanations are great!)
Fab tutorial. The screenshots and explanations of how the different alterations will affect the image or color is wonderful. I am a long-time user of Photoshop and am starting to try Lightroom instead for my photos. One thing I find with tutorials for both is they tell you the HOW but don’t always explain the WHY. Without the latter, how will I understand what I’m doing and be able to put the knowledge to future problem solving, eh? Thanks so much for the great tutorial and tips that include the why of it!!
Thanks so much! This is a great help- I just received Lightroom for Christmas and didn’t know where to start.
What a wonderful and helpful tutorial! Thanks for sharing it with us.
Amanda, you are a FABULOUS tutor!! I don’t have LR yet, but this tutorial sure makes me want to try it out. I love how simple and easy you make it to understand the steps. Thank YOU for this great tutorial!
Thanks for the quick tutorial for Lightroom! I am a very basic Photshop user and this seems so much simpler to use.
Thank you- I learned more from this post then I did in my Lightroom class in college!
Thank for the tips!!
Have the program, haven’t use yet..
omg!!! I am so going out and getting Lightroom RIGHT NOW!!!
Hi Amanda –
I share your love for LR! I was looking for an editing program that wasn’t too costly and LR was perfect. I had a lot of people recommend it to me, and I couldn’t be happier. It is all that I use and it is enough to tweak my photos “just right”. Thanks for the explanation on noise reduction. I haven’t used that one too much, but your tutorial is very helpful.
I enjoy reading your blog!
TammyR
Calera, AL
each program has its own feature, i love both lightroom n photoshop, but mostly i use photoshop to edit my photography pics :)
check the results of my photos here: http://www.msendy.deviantart.com
I LOVE Lightroom!! It has so many features and it’s so easy to use!! My camera is in the shop, I’m missing it! Thank you for all of the tips! :)
Wow – I always love your photos – thanks for demonstrating how Lightroom helps you with making them really pop.
Many thanks I’ve long wondered about the use of lightroom. Wanted to know but afraid to ask! Now I have to find out about the current pricing….again, I’m afraid to ask!
Thank you Amanda! This was a fabulous article. I am just starting out with LR this year to edit my photos, and I pinned this article, but I just may print it out to keep it handy! I love that you simplify stuff because I don’t want to spend hours retouching my photos, but I want to spend enough time to get that “wow” factor! :)
GREAT POST! Thank you so much for this information. I’ve been using picnik for the most part to do my editing. I’ve been wanting to step my editing game up but couldn’t figure out which to purchase between Cs5, lightroom, and elements. Like what is the difference between them all? Do/Have you used elements ? How does it compar to lightroom?
Happy New Year!
wow! thanks for the tips. The before/afters are amazing.
This is just the post I needed!! Thank you so much for taking the time to explain how to use it’s best features! I have both LR and PS CS5 and I don’t have a clue how to use PS either of them at all! This really did help! Now, Could you help a beginner out with the world of presets and actions on both of the programs? I just have no clue!
You must be a mind reader! I bought the LR Student/Teacher edition a few months back and have noy used it yet and I was just second guessing myself thinking I should have bought PS instead but thanks to your lessons, I’m happy I have LR. Now I just have to put your lessons into actions! Thank you so much for posting these lessons.
Very informative,thnks
Hi Amanda – i LOOOOVE LR3 as well. the one thing I didn’t know that you mentioned, was on import, to select “render previews: standard.” what does that do?
Amanda great post. I actually just bought both lightroom and CS5 a couple of weeks ago. This post may have me learning lightroom sooner than I would have.
Very informative, thanks Amanda!
Thanks for the great LR tutorial. I really like all the detailed instructions and the before-after rollover. Amazing results!
LR, where have you been all my life?! Awesome tutorial, thanks :)
This is an EXTREMELY helpful tutorial Amanda – thanks so much!! Now for this notive…how about one for Photoshop :-O
Love your website!!!!
I must say I will keep my photoshop. I had neck fusion surgery on the 27th of December and I’m in PS deprivation.
Thanks so much for posting this. I sometimes feel a little lost in LR. These tips really help!
I am in the market for something and just didn’t want to shell out the money for photoshop – thank you so much. I am going to get the trial and see what I think!
Amanda, thank you so much for taking the time to write this wonderful tutorial. I have LR and these tips will be so helpful. Well done!
Great tutorial. Thanks for the tips!
Thank you!! I’ve got about ten more days on my free trial, and although I want to fall in loooove with LR, I just wasn’t feelin’ it! This helped so very, very much!
Because of a prior post when you wrote about LR, I purchased the software. I haven’t loaded it yet, but am even more excited about the photo editing possibilities after seeing this post. Thank you, THANK YOU!!! I am loading my new LR software tonight. I am an avid PSE user, which I may still use. But I think LR may become my new best friend. Please continue to post about LR as I am new to the product and know nothing about it. Again, thanks — and please keep up the awesome tutorials!
I have to say the thought of trying out another editing program makes me want to pull a blanket over my head. I did a trial on LR and the layout was just overwhelming for me but I think it was more because I was taught on Photoshop. One day I may branch out! :-)
I love lightroom!! I learned a bunch from your post…didnt know about recovery. Thanks!!
I love Lightroom too! What presets do you like to use?
What a faaaaaaaaabulous blog post/tutorial! I am absolutely convinced In need LR now! Hopefully I can get it some day soon when I am working again!
Thank you for always inspiring me!
Candi
Thanks so much for this great tutorial. I received LR3 for Christmas and have yet to break it out of it’s box. Just the thought of it “maybe” being difficult to use was making me very apprehensive. You definitely gave me the push I needed to install this software.
I use LR3 for 100% of my editing. I have PS on my computer but whenver I try to use it, I become so overwhelmed by the way it’s laid out and actions and layers and the whole thing, really, and I quickly close it as fast as I opened it and revert back to my trusty LR.
I adore!! this post and all the tips and tricks you gave. I found myself nodding in agreement, i.e. that saturation will make things red/yellow quickly, won’t regret adding vibrance and so many other things…
And other things were features I never use, i.e. white balance. I circumvent that tool by playing with others but now that I know it’s that easy, I’m sold!
Your photos are always so gorgeous and it’s fun to see what you started with and what you ended up with…all thanks to LR. And if you can do all this without another program, amen!
Awesome tutorial! I too use Lightroom 3 for at least 90% of my editing and can easily say that it saves me tons of time. I still prefer Photoshop for retouching faces and intricate detail work, but most of the images I create for our blog never even see Photoshop. It really is amazing how the fill light and recovery tool can give new life to an image. I also love being able to set presets for my exports. Being able to export the images to the exact size that I want for the blog or for print, with or without a copyright image … So many ways to save time and be more productive :)
Amanda, this is truly a timely post. I purchased LR3 while it was on sale at Amazon. I also purchased Scott Kelby’s book. I was having a hard time making heads or tails of it all. I was beginning to regret my purchase and reverted back to picnik because it was just easier. Now I’m feeling a little more confident. Thank you, thank you for posting this.
Thank you for photoshop. Ä°ts so useful:) Also pics so cute:)