Follow these easy tips to learn how to take professional-looking photographs. This Camera Settings Cheat Sheet will have you taking great photos in no time!
How To Take Professional Pictures With Your DSLR Camera
I recently added a feature to this blog where you can click on a photo and see the settings I used to shoot that photo. I’m thrilled to be able to easily share this information, but I also wanted to let you guys in on two very important secrets.
1. I don’t always use the right settings.
I make mistakes. Often! Or I get lucky. Sometimes I forget to change settings from photo to photo. Sometimes I quickly point and shoot. Either way, my settings are by no means perfect, and sometimes I cringe at the thought that someone might attempt to take a similar photo using those settings. Ack!
2. Your mileage may vary.
Even if my settings were perfect and you were to go back to the exact same spot, at the exact same time, in the exact same light, and use the exact same settings… the photo would most likely not turn out exactly the same. Maybe not even close.
How To Replicate A Photo With Your Camera Settings
With that in mind, I wanted to share with you guys how you can look at a photo and replicate it. Not by knowing which exact settings were used, but which setting was the most important for that photo. Once you’ve got that one setting in place, you simply adjust the other settings to make sure the photo looks good. It doesn’t really matter what the exact numbers are. Just that they made the photo bright enough. Or sharp enough.
So how can you look at a photo and know which setting was the most important, without knowing any of the settings? In most photos you take, either the aperture or the shutter speed will be the most important setting. That’s why most cameras have Aperture Priority and Shutter Speed Priority shooting modes. But here’s the thing. It all depends what you, the viewer and the photographer, want to get out of the photo. Is it a portrait? Do you want a beautifully blurred background? Is it a scenery shot? Do you want everything sharp and in focus? Is it an action shot? Do you need to be able to “freeze” action in the photo?
I’ve rounded up a few of my favorite types of photos to shoot, the ones you’re most likely to see around here. Below I’ll show you which setting was the most important for each one and walk you through my thought process for taking the photo. (Careful! My mind’s a scary place.) So that next time, even though you might not use the exact same settings, you’ll still be able to take a photo and get exactly what you want out of it.

Canon 85mm 1.8
f/1.8
1/40 sec
1600 ISO
How To Set Up Your Camera For Bokeh Photography
What did I want out of this photo? Bokeh. I wanted the lights on the Christmas tree blurred in the background. So for this photo, the most important setting was aperture. I put the camera in Manual and set the aperture as low as it would go, 1.8. To replicate this photo, start by setting your aperture as low as it will go, then bump down the shutter speed – this will allow your camera to let in more light – until the photo is bright enough for your liking.
Tip: Make sure your shutter speed doesn’t get too much below 50 (it’s 40 here). If it does, your photo might suffer from blurriness caused by camera shake. If you’ve bumped it down to 50 and your photo isn’t bright enough, tried bumping up your ISO to allow in more light.
For a quick review of aperture, shutter speed, exposure, and ISO, check out part one of this tutorial: A Quick Guide to Understanding Your DSLR Camera.

Canon 100mm f/2.8 Macro
f/4
1/125 sec
ISO 2000
Choosing The Best Aperture For Your Photo
What did I want out of this photo? Bokeh, again. But this time, bumping the aperture all the way down to 2.8 (as low as this lens will go) was too much bokeh. Try bumping up your aperture to 3.2, 4.0 or even 5.6 to see how it changes the look of your photo. Here’s a good example of the difference it can make: A Quick Comparison of Aperture & Bokeh.
For this photo, I had plenty of light, so I just put my camera in Aperture Priority mode and shot. I didn’t need to manually fiddle with the shutter speed and and ISO to allow in more light. I did, however, bump my exposure control up to +2/3 to make it nice and bright. Again, check the DSLR Quick Guide for a review on that.
Tip: If your camera has Auto ISO mode, use it!

Canon 24-70mm f/2.8
f/8
1/32 sec (I used a tripod)
ISO 125
How to Set Aperture For Scenery Photos
Again, aperture is the most important setting in this photo. What I wanted out of this photo was for everything to be in focus. If you want everything in focus for a scenery shot, try setting your aperture between 8 and 11. This will cause your camera to allow in less light, making your photo darker, so you may need to lower your shutter speed to compensate. In this case, I had to lower it to 32 and use a tripod so my hands wouldn’t shake and cause the photo to be blurry.
Tip: A low ISO is always preferred for scenery photos, as a higher ISO can cause them to be grainy. In this case, I could’ve bumped up my ISO which would have allowed me to set my shutter speed fast enough to to hand hold the camera, but I preferred to keep my ISO low at 125 and use a tripod.

Canon 24-70mm f/2.8
f/8
1/1600 sec
ISO 100
Setting Aperture For Landscape Photos
Believe it or not, for this photo, aperture was the most important setting. I wanted to make sure to get the beach and the horizon in focus. I put my camera in Aperture Priority and set my aperture to 8. From there, you can play with the exposure control to adjust the lighting. At 0, you’ll get a darker sunset, like the photo above. If you bump it up a few stops, you’ll get a brighter sunset, like this:

Canon 24-70mm f/2.8
f/8
1/125 sec
ISO 100
As you can see, all it did was lower my shutter speed to allow in more light.
Which one do you prefer?

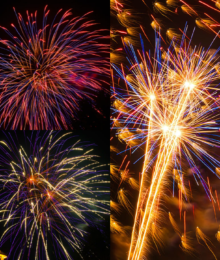
Canon 24-70mm f/2.8
f/22
6.0 sec
ISO 3200
Setting Aperture For Nighttime Photography
One more aperture photo here. For this nighttime photo that has a ton of detail, I set my aperture as high as it will go, 22. I wanted to make sure I could get every last detail in focus. Because it was so dark, and my aperture was so high (allowing in the least amount of light as possible) I had to set my shutter speed extremely low, 6 seconds. That means you press the button, and six seconds later it’s done taking the photo. I definitely used a tripod for this shot. I also used the self-timer, so my hand wouldn’t shake the camera as I was pushing the button.
Remember what I said about not always having perfect settings? Can you see which setting I messed up on here? ISO. I should’ve lowered my ISO. My photo turned out a little grainy because I left it all the way up at 3200. However, if I’d remembered to lower it I would’ve had to set my shutter speed even slower. Who knows how long it wouldn’t taken to take the photo!
Fortunately, noise is pretty easily cleaned up in Photoshop using a plugin like DeNoise.

Canon 70-200mm f/4L
f/5
1/500 sec
ISO 100
How To Set Camera Shutter Speed
When you want to stop action in mid-air, shutter speed is your most important setting. For crisp action shots, I like to set my shutter speed no lower than 500. Any lower than that and you’re going to get blurriness. For this photo, I put my camera in Shutter Priority, set my shutter speed to 1/500, and since it was cloudy, I bumped my exposure control up to +1. This is my favorite setup for action shots. If it were sunny and the photos were turning out too bright, I would’ve put the exposure control back down at 0.

Canon 24-70mm f/2.8
f/22
1/4 sec
ISO 100
How To Set Shutter Speed For Waterfall Pictures
This is my go-to setup for dreamy waterfall photos. The shutter speed is the most important setting here. It needs to be at least 1/4 sec or slower to blur the flow of the water. I usually shoot waterfalls in manual mode, and here’s why. Setting the shutter speed that slow allows in a lot of light. And since I’m usually taking photos of waterfalls during the day, when there’s sun, I have to bump up the aperture as high as it will go to compensate. My aperture is not up that high because I want everything in focus, although it is a nice bonus. It’s up that high because if it were any lower, like 2.8 or even 8 or 11, the photo would be completely white and blown out from too much light. My ISO is at 100 because while I do always prefer a low ISO for scenery, if it were any higher, again, it would allow in too much light and cause the photo to be too bright.

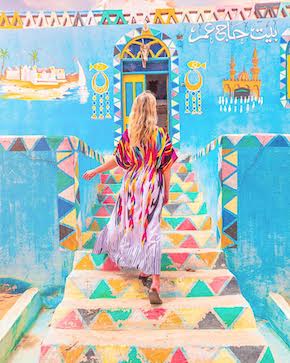
Canon 24-70mm f/2.8
f/2.8
1/100 sec
ISO 200
How To Use Your Camera’s Exposure Setting For Silhouette Photos
Sometimes it’s not what your settings are, but simply where you point the camera. For silhouette photos, point your camera at the brightest part of the sky. Press the shutter button halfway down to “get a light reading”. This will tell your camera that you’re taking a picture of the bright sky, and to adjust the settings accordingly. With the shutter button still pressed halfway down, reframe the photo so that the subject you want to silhouette is in the viewfinder and take the picture. If you can still see too much detail in your subject, bump down your exposure control to get a darker image and try again.
Check out my settings here. Ideally, I would’ve used a higher aperture, in the 8-11 range, to ensure that both the palm tree and the horizon were in focus. I forgot. However, doing that would’ve allowed in less light. I would’ve had to bump up my ISO to compensate, and that might have caused graininess in the photo. Something to think about.
Fortunately, everything’s in focus here. Tip: If your subject is out of focus, check your aperture and consider using a higher one. Bokeh, when you didn’t mean for it to be there, is just plain blurriness.

Loving your Pictures and Love the fact that you are letting everyone know the settings that you used taking them, Also you have explained it nice and clear and easy to understand, Explaining WHY you chose what settings. Love the fact also that you said that you weren’t to keen at first to share in case someone goes to the same spot and recreates your picture by doing it better – Then Flipped it because there will Never be the Exact same Picture because of the Change of light or a cloud – Everything changes in Seconds when outside taking pictures. Thank you very much for sharing.
Thanks I’m diffidently bookmarking this one.
Hello,
First – amazing photos *.* :) and second- please tell me how you’re making do clear pictures? Every time I take a photo looks awesome on the cam screen but when I look at it on the laptop screen is not that clear. and looks kinda blurry ( very little) its just not with perfect quality. My camera is Nikon D7000 and the lens is AF-S Nikkor 18-105mm. Can you give me advice for better lens?
Best regards,
Teddy :)
Kindred Post:  How to Fix a Orotund Cut-Verboten Monogram for a Coronal
A BIG thank you for this helpful tutorial !!
Great blog and tips. I have a question. I shot the chicago skyline at night with light trails of the CTA as te leading lines. The trails and the foreground are crisp and clear. But the skyline is a little grainy, not bad, but want it to be more crispier. Any thoughts on why? I have a Cannon T5, used an ISO of 1o0, F11, Sutter speed 15 secs, was using a tripod. I went into light room and tried to play with it, it did help. But I think I am missing something while composing the shot. Any help will be much appreciated.
I really love your blog. Thank you
I’m looking for exact settings for my cam and you made my day. Thank U.
I’m a college student and I really want to do better in my picture taking skills. This blog helps me out A LOT, thank you.
hi. great tips explained so clearly and easy to understand. Im going to make a small flip book to carry in my camera bag with all these examples of settings so i can play with them wihen im out and about thanks so much.Great starting point for me
Hi Kevin and Amanda ,I never received a e-mail from you ,maybe my computer connections,I have a Canon 7d a 70-200-f2.8,IS and 24-105 f.4 is,Iam doing a wedding in June ,the bride and bridesmaid want a budoir shoot during the day there house gets a lot of lighting,use manual mode no flash iso 400 F5.6 400 shutter speed is this okay or Iam off,at 70 years old I guess Ive forgot a lot,if you couls get me on the right track,it would be grateful.Thank You,P.S You are the best for helping people like me some photographers wont even give you the right Time of day,Thanks Ton D
Hi Kevin And Amanda,you guys are special people,Ive have been trying to get help for me and some photographers dont feel like helping other photographersmy name is Tony De Costa,Iam a seasoned photographer for over 38 years,Iam 70 years old,and I need help with f-stops iso shutterspeeds,what do I mean outside weddings,sunsets sunny, cloudy,I have alittle dementure,so I forget a lot,I have beena equestrian photographer for a long time from the Olympics to world equestrian games and more,but with cell phones around,business is slow,so I want to do weddings families ,birthdays and more ,but I have a rough time,if there is any way you can help I would feel grateful,Amanda,we have something in common.I love my canon 7d,I have a 70-200.2.8 is,and a 24-105 f.4 that is my work horse .I love this lense,you guys are awesome photographers,and you make a nice couple ,keep yp the good work,please don’t mind my typing,I don’t do so well,Thank You so much for reading my e-mail.Tony De Costa
Thanks so much for sharing. Awesome Photos :)
Hi.. First of all, Thanks a lot.. I learnt so much from u.. Btw I have a question that maybe u could answer for me.. When I took a normal single shot photo the shutter open up twice.. And there was a short pause in between.. It causes the photo to be blurry.. Is there something wrong with the setting or could it be faulty? It would be great if u could help me.. Thanks again :)
This is great information and great photos! I have been racking the internet looking for tips on how to take evening photos indoors, do you have any advice?
EXCELLENT !!!!! You do not normally see great pictures along with explanations of how they were taken online. I always wonder why people post these horrible pictures with their so called “expert” advice. The pictures they post pretty much shows they really don’t know. You not only explained in very easy to understand terms the settings, but you also posted great pictures taken with those specific settings. I created a PDF of this page and put in on my iPad as a quick GREAT reference guide. THANK YOU !!!!!
Those are some great photos. I am headed for Reno, Tahoe and Carson City this week mainly just to take photos. This is going to be a good place to put all my Cokin filters to use. Mainly the grad ND’s and polarizers.
This post has helped me tremendously and I thank you so very much. I love your work.
Thank you so much for the tutorial, I just bought my first DSLR camera and I am learning a lot from your blog. Thank You!!!
oh, P.S I have 2 Boston Terriers :-)
Wow!! awesome photos~~ I love taking photos of wildlife.. i have a lot of good shots but all have been on sport.. auto settings etc.. i am now learning to use manual setting.. hope I can get as good as you.
This is the first post that I read and OMG I’m amazed. I have bought a 60D two weeks ago and since then I’ve been reading and reading all day and night long, but what everything I read lacked was this very same explanation: where do I start from?
Now, after your post, I can learn all over again cause thanks to you it’ll all make sense :D
wow. the picture about waterfall is look so good. I really hope I can take such a beautiful picture like that.
Never knew of Topaz plugins, thanks so much for sharing!
This was so helpful! I’ve always played with those settings but I’ve kinda always just winged it. This was very helpful and I might start to actually know what I’m doing!
Thank you so much for this post! It’s helped me understand my camera and what settings I need to use more than any tutorial out there. Thank you, thank you!
Hey Amanda,
Thanks so much for this guide! I cant’ wait to try it out!
Yep, I love this blog post too =) so much so that I copied it and printed it out so I could take it with me when I practice / go on holidays. Thanks Amanda!
I love this blog post!!! Thanks for the help and breaking down the settings with visual examples!!! Oftentimes, its difficult to align your thinking with the look you are going for and you did it in such an easy and understandable manner! Very helpful, bookmarking this site!
This has been the most helpful blog I’ve ever read. i continue to reread it so I can learn something new. I’m not a professional photographer, but enjoy taking nice pictures. I have Nikon 1 J1, and I’m still learning how to use it to its full potential. Thank you so much!
I am learning so much about photography from your blog…..more than I learned in an 8 week course! You have a way of breaking it down so it all makes sense. Now that I understand more of the how’s/why’s, I will have more confidence while learning to get out of auto mode with my Nikon D7000. Until I found your blog, I was beginning to think that it was much more camera than I will ever use. Now I get it! Thank you! Please keep the tutorials coming!
How do I adjust exposure control on a Nikon j1 camera?
Thank you so much for sharing your knowledge. I am a true amateur; Santa just brought me my first DSLR. This is all Greek to me! This helps soooo much!
This was helpful since I am looking to learn more about taking pictures with my new rebel camera. Is there somewhere I can join so if I have questions or need help I can look things up or ask questions?
Thanks Lorraine
Thank you! Needing some help in the food photo area. This helped a lot!
Hi Amanda
What is your take on using P, C1 or C2?
You stated the following in your Feb 14, 2011 BLOG Question?? I understand you needed a slow shutter speed BUT how did you determine 6 seconds to be exact??
One more aperture photo here. For this nighttime photo that has a ton of detail, I set my aperture as high as it will go, 22. I wanted to make sure I could get every last detail in focus. Because it was so dark, and my aperture was so high (allowing in the least amount of light as possible) I had to set my shutter speed extremely low, 6 seconds. That means you press the button, and six seconds later it’s done taking the photo. I definitely used a tripod for this shot. I also used the self-timer, so my hand wouldn’t shake the camera as I was pushing the button.
I ABSOLUTELY love and appreciate this … thank you SO much. This gave me so much more information than my camera’s manual .. I can’t wait to put all this information to use!!!
I want you to know how much you have helped me. I took a photo class and bought the lenses and camera she recommended spending tons of money and haven’t been thrilled so went back to my nice Canon G11 or G12 point and shoot which always gives nice pics but not the bokeh I want. After seeing your link on Pinterest on how to use your DSL I read a couple of your posts and got out my 85 mm 1.2 lens yesterday. Love, love, love the bokeh I got with it. Thank you. Thank you. Thank you. I am forwarding these posts to a friend who is also learning!!!
Dear Jacquelin
I’m trying to take bokeh photo by my Canon G11.
Just wonder if you take bokeh with your G11/G12 or you use 85mmm 1.2 lens.
Is it possible to attach a lens to G11 camera.
Cheers,
Reza
I just wanted to say thank you! I am still very new to photography and your blog has helped me so much already =] Thanks again for sharing, your photos are beautiful!
Just saw your blog today and shared it with a parents group that we have on FB called Paparazzi Parents. I know everyone will really appreciate all the info you shared. I know I will!
Someone just shared your blog with me today and I already feel like I’ve learned so much! Thanks for posting and keep up the beautiful work!
Learning more from your pages than the manual for my 350D. Great stuff.
I know I’m a little late to learning about your amazing blog, but you are such a great resource! I’m learning so much! Thank you again and again.
Hello Amanda! Great tutorial. My question is this, I have two dogs and find it impossible to get a nice action shot of them indoors, the picture tuns out almost black if I try and freeze motion, unless I use flash whichtotally distracts them, any words of wisdom? Using Nikon d90.and a.fixed 50mm lens/f1.4 iso adjusting does not seem to work for me
I just came across your site today. Thanks to Tidy Mom. I love this post. Thank you!
Hi Amanda – I read about putting your settings on HIGh resolution. Can this be done with a point and shoot camera ? Probably because I am unsure of what exactly the resolution means ??
Also, I am one of those people that the Manual’s scare and so I don’t go near them hardly.
Love to hear your answers.
I am wondering how you can recall the info about your camera settings on each shot? There must be some sort of automated way of getting this data? I can see it on my camera screen for each shot, but that isn’t very helpful when looking at a lot of photos on your computer and trying to compare and see what works. Thanks!
Love your tips and your sense of humor.
You’ve sealed the deal for me… I’m totally going to get the 24-70 2.8 lens. Love the photos you’ve taken with it, Amanda.
Such a great and useful tutorial! Extremely helpful!
Amanda, When you up your ISO to 1600 or higher, how do you keep your photos from becoming “noisey”? It seems everytime I go higher than 800 my photos are SO noisey and grainy and sometimes my noiseware won’t help other than make them fuzzy when I print….. Any help or suggestions?
Kristen
Hi Kristen! I think a lot of it has to do with the camera. When I had my XTi, mine was the same way. But with the 7D I can shoot at 3200 without experiencing too much noticeable grain.
Thank you, thank you, thank you. I have read how-to’s, manuals and tutorials and I’ve just struggled getting off of my auto-no-flash setting. It’s just a safe setting and I know I can use it and not miss the shot.
I’ve kept your post un-read in my google reader for 2 weeks now and it finally helped make sense of what I needed to be doing. I’ll keep it unread for another 2 weeks, 2 months after that and 2 years after that.
Amanda thank you so much for being so generous with your photography knowledge. For those like myself who are really trying to learn and create wonderful photos like you, this type of information is so helpful. I’ve saved it and have already read it 3 times.
Thank you so much for sharing all your tips on photography, I really enjoy seeing your photos & all the tips you share.
Take care
Leonie
PS Your little dogs are just gorgeous & you get some great shots of them!
I just found your blog on the bloggie awards site. Congrats on your nomination! Love this post! Thanks for the info, I’ve got it bookmarked!
Thank you for this post it was very helpful.
I just stumbled onto your blog after searching for the Pea Missy Cursive font (I loved it on another blog and had to ask about it!) SO glad I found this post. I got my first SLR a month or two ago and really haven’t had the time to learn about it yet – it’s killing me. This is going to be so helpful, thank you!
Incredible photos, Amanda! I love the one of the city skyline – truly postcard perfect. All of them are fabulous — nice to showcase your talent!
Amanda, I am so grateful that you post these wonderful tutorials… I am still waiting for a ‘nice’ camera to come into my life, but when I’ve been fortunate to play with someone else’s, your blog is the first place I turn to get myself started. Thank you for making it easy to understand!
I love your blog!! This post is very helpful, I have a canon rebel and it’s my first SLR camera and I’m trying to get used to learning the settings. Thanks for the post, very helpful =)
Thanks, Amanda! While I’m pretty confident in my manual understanding, this was still good for me to read through. I tried to even guess your settings before I looked. It was a good review for me. Now could you just add what focus mode you use? That’s all I was left wondering. And BEAUTIFUL photos! I loved all of them! Nice work!
Hi Christina! I shoot in One-Shot for everything unless I’m taking action photos of the dogs, then I switch over to AI-Servo.
Thank you for all the time you put into teaching your blog visitors! Your photos are inspiring!
WOW…great article! I’ve learned more here than I have in the past 2 years trying to shoot on my own! Your descriptions puts everything into place and so much more makes sense now!
I feel like I am still getting to know my camera every time I use it! (I currently use a Nikon D90)
Can I ask, do you usually have your camera on manual or auto focus?
Alright so, I owe you guys a big thank you because you guys are one of the reasons I started blogging. I’ve been using your tips and free fonts on my blog and so far its been so satisfying. I’ve linked you on my blog as a thank you and I’ve been telling everyone about how awesome you are. Please keep up da good work. I’ll be coming here often =)
XOXO
Rifga
Thanks so much for the great tips and helpful information. I’m still learning how to use my camera. Sometimes I surprise myself and the pictures come out awesome without much effort on my part. ;) Love to learn more though, so keep the tips coming. Thank you.
Hi there
I recently started reading your entries on photography tips and they are super helpful. We bought a DSLR camera a few months back and we enjoy playing around with it although we still have lots to learn! I have a question. In terms of allowing more light into the picture, what is the difference if we chose to lower the shutter speed versus increasing the exposure control? Can we use either option interchangeably? Thanks and looking forward to more of your posts!
Thanks so much for this tutorial. It is sooooo helpful.
Thank you for the great post. Perfect timing too, I just attended one of Val Westover’s photo classes in San Diego yesterday and this is like reading it all over again. I feel like I finally get it…very exciting. Thank you! I love that your pictures show the details on how you took them, that really helps!
love the shot of your dog in the snow! classic!
Beautiful pictures, Amanda.
Such an awesome post! LOVE crawling into that mind of yours! ;) Ok, so when are you coming over so I can play with that 24-70 lens again? :D
Very helpful post, Amanda! I am bookmarking this one.
This is an awesome post; I was able to understand everything – and I’ve tried elsewhere to understand aperture, etc. You spoke in ‘my’ language – thanks!
Excellent tutorial. And I’ve been a professional photographer for 40 years.
Super blog – very enjoyable.
Thank you so much for such a clear explanation of the basics! I just got my first dSLR for Christmas, and I’m slowly learning all of the little details that go into taking good shots! This was definitely helpful.
Oh, and Happy Valentine’s Day!! :)
Amanda, thanks for being such an amazing person and sharing your knowledge in a fun, non-intimidating way. I read your blog so often, and re-read, and re-read… and then read it again! Cheers and Happy Valentines to you, Kevin and the doggies!
YOU ROCK! :0) just in case you didn’t already know that! Love your blog..
Thank you SO very much!! I am so grateful for your posts on photography {and all the others because they’re just awesome!}. Thanks for taking the time to explain in english ;o)!
Oh, and HAPPY VALENTINE’S DAY :o)
I LOVE this post – so helpful! Thanks for sharing!!
Thanks, these are my favorite posts, next to Free Font Fridays :)
One question if you have time, I am of the understanding the higher the aperture number the more depth of field?? So on my Nikon, 55-200mm, 1:4-5.6 lens, the 5.6 setting would have more of the background out of focus, true?
We are going to the snow next weekend, I hope to get LOTS of practice! Your timing is perfect!
Thanks again!!
Very nice post, thanks for sharing. I just ordered my first non-kit lens for my DSLR and I’m just now learning how to use manual mode. It’s quite complicated at first!!
Your photo of the San Diego skyline makes me want to take a trip there, just for that visual. It’s fantastic!
Thank you Amanda, for all of the photography lessons. I have been trying to learn everything on my own because with work and a family I don’t have time to take a photography class and thanks to bloggers like yourself, I have learned a lot. I edit my photos using PW’s fresh color thanks to you!
Ditto to all of the previous comments. I so enjoy your blog. Thank you for all of your photo tips. I’ve learned a lot just from seeing the photos, your settings, and your description. You could easily publish a photography book.
It is honestly nice to know that sometimes you just get lucky! That means there is hope for me. I currently only have the kit lens with my camera so i am unable to do many of the pictures I want. I love bokeh but my lens is not the right one. I was hoping to get the 50mm soon!
Please continue to do these photography posts! they really help a stuggling mom like me! Also if you have any more Photoshop tips that you are willing to share that would be great! I refer to your other posts regularly!
Thanks for an informative post. As always your blog inspires me to take out my camera and go places!
Laura’s Last Post: Dining In: Sweet Cornbread
Amanda, you’re absolutely amazing and have been a wealth of information to me! I can’t seem to grasp the concept of aperture and shutter speed, and whenever I want to ‘practice’ using my manual settings on my camera, I ALWAYS refer to your posts and the information you provide.
Thank you for taking the time that you do to provide this valuable information! If you ever need another Grandma, I’d love to apply for the position!
Paula
Amanda-I’m fairly new to your blog and am completely delighted! I love how you live life with gusto, learn along the way, and are willing to share with us what your’e learning. Thanks SOOOO much for what you share-timely, informative, playful, fun, inspirational, and delightful info. LOVE it!
what a fantastic post! i loooove that you are so generous with your time and talents and so carefully share them here. thank you!!!
Oh my god!! You know how happy I am that you got this feature up!! Yay!! :D I’m definitely gonna use both it and this tutorial to help make me a better photographer! Thanks a million! :)
FABULOUS Amanda!
So helpful! Thank you!
What I’m doing today: Reading through ALL of your photography posts. This is another brilliant one. Thanks, Amanda!
Amanda,
You are an Angel. You just placed in an e-mail what I have spent a lot of time learning in classes. Only recently have I learned about the exposure settings on my camera. Maybe I knew about them but did not use them. Thanks for this great lesson. Worth printing.
Thanks You, Thank You, Thank You!!!
Thank you, thank you, thank you for posting these pictures and information about your settings!! There have been countless times I’ve wondered which lens you used when you took a certain picture, in addition to the shutter speed and aperture. This is SO helpful. Oh I have *such* a list of new lenses that I want lol.
what a great tutorial Amanda! You are such a talented photographer!! Can’t wait to see you at our next adventure :) Talk soon!
Great tips! Thanks for sharing!
I just got a new camera – -and am learning or trying to learn how to use it – – so this really helps me! I’m looking forward to a few more “lessons/tips”!
I love your photos very much especially your food photos.Thank you very much for your instructions. Mónika from Hungary.
Love your photos, they are fab!! Just wanted you to know that we too have a Boston Terrrier named Sissy Bouche that we’ve had for 11 years. She doesn’t think she’s a dog, she rules the house and our hearts, she sleeps with us (she gets a bath every night). The vet said it was ok and anyway if the water’s running, she just jumps in. Sometimes I have to postpone my bath, because she’s decided she wants hers first. LOL!! Then, I have to clean the tub, etc….
I haved enjoyed following your site. Thanks ~
We’ve had an SLR for two years, but both of us really just play around with it to get good shots. I have been wanting to learn more about the how-to’s and why’s, so this post will be perfect for reference. =) Thanks!
Now those are some beautiful picutres. I have a habit of just cutting off heads. So you have made me rethink about taking pictures and reading all the directions first on my Fuji. Thanks Paulette
Thanks so much for sharing these great photo tips! I used to be very into photography (before kids) and even had my own darkroom. You have inspired me to get a digital SLR so I can get back into this. :) Sally
this was really good amanda, thank you for taking the time and showing us. i must say the night photo of the skyline is simply breathtaking. those colors are heavenly!
Amanda…I could (and will) re-read this post about 10 times and will learn something new every time!
I have been reading your blog for a few months, and remember the post you mentioned you started documenting what lens and settings you use…and i have been clicking open SO MANY of your photos in your posts in order to check and see. And I have been learning.
But this post, all written out and explained…is sooo helpful. Wow, thank you.
And it convinces me that before month’s end, i AM and WILL be buying the Canon 24-70 lens :)
Bookmarked!! Wonderful and informational post! Thank you!
Your pictures are amazing!
And thank you for an interesting blog!