This easy tutorial will show you how to resize and save your photos in Photoshop so they are sharp, crisp, and perfectly sized for your blog!
How to Save and Size your Images for Blogging
If you’ve ever posted photos on your blog or Facebook, you may have noticed they are not as crisp and clear as the original image.
This is especially frustrating if you’ve spent time editing the photo, only to have it not show up as well in the image you are sharing with everyone!
In my last photoshop tutorial, I showed you how I edit my photos. I almost always do these two steps:
1. Sharpen
2. Run an action (usually Fresh & Colorful from the Pioneer Woman actions)
But if I’m going to be sharing these images here on the blog (or Facebook or email) there’s one more thing I do to get them ready.
1. Determine How Big Your Photos Should Be
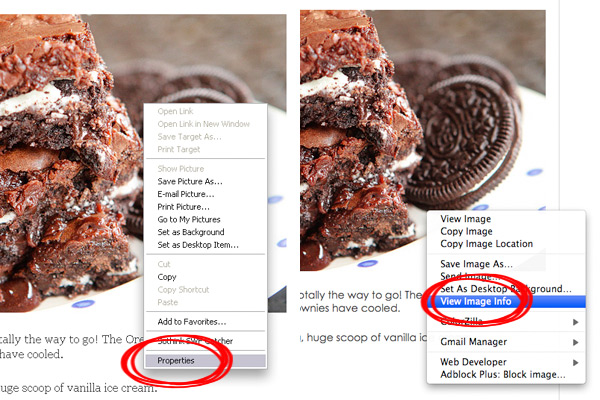
Left: Internet Explorer. Right: Firefox.
Most blogs are between 400 and 600 px wide. This blog is 600 px. To determine the width of your blog, right-click on a photo that’s already on your blog. From the menu that pops up, click on Properties (if using Internet Explorer) or View Image Info (if using Firefox).
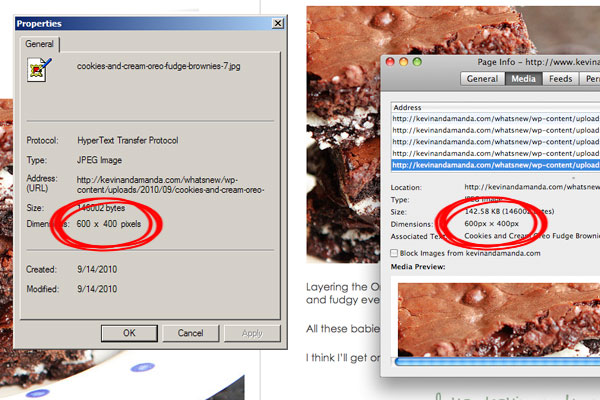
Left: Internet Explorer. Right: Firefox.
Look at the Dimensions. The number on the left is how wide the image is. This image of my Cookies ‘N Cream Oreo Fudge Brownies is 600 px wide. That means we’ll want to resize our images for this blog to 600 px wide.
2. Resize
Open the image in Photoshop and edit to your liking. For this image, I did a sharpen, Fresh & Colorful, then ran the Topaz Adjust Color Blast filter. Love that filter for fall pics! :)
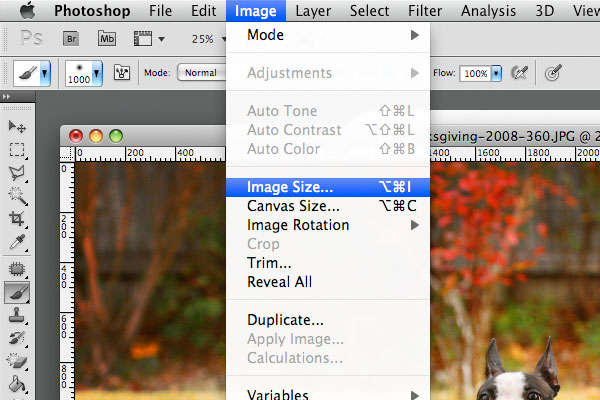
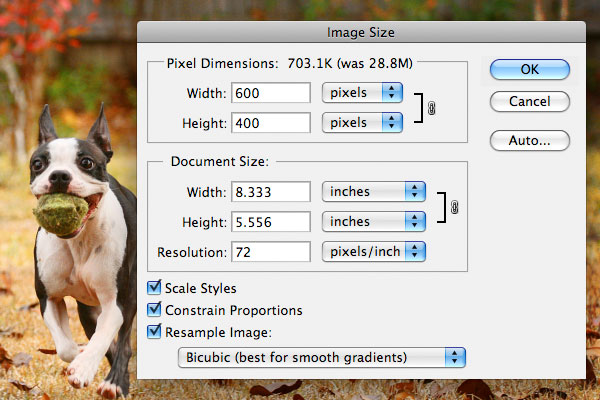
When you’re done editing, click on Image > Image Size…
Change the width to 600 (or whatever your size is) and click OK.
Great! Now it’s the right size, but it’s not quite as sharp as the original image…
3. Sharpen
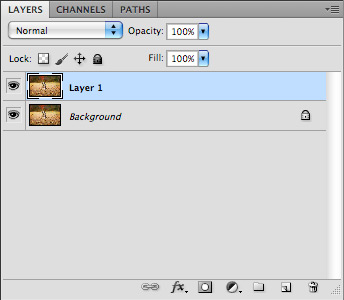
First click CTRL-J to create a duplicate layer.
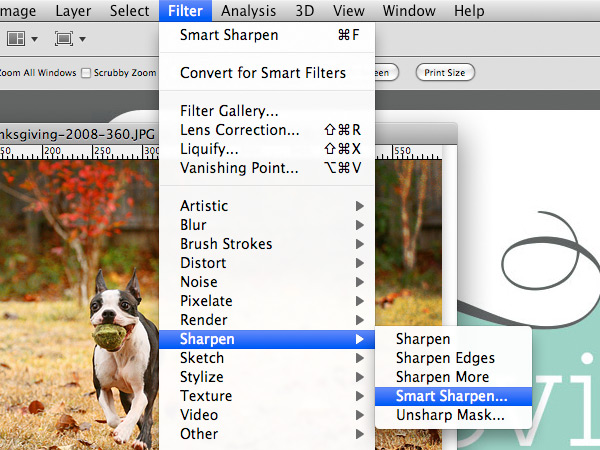
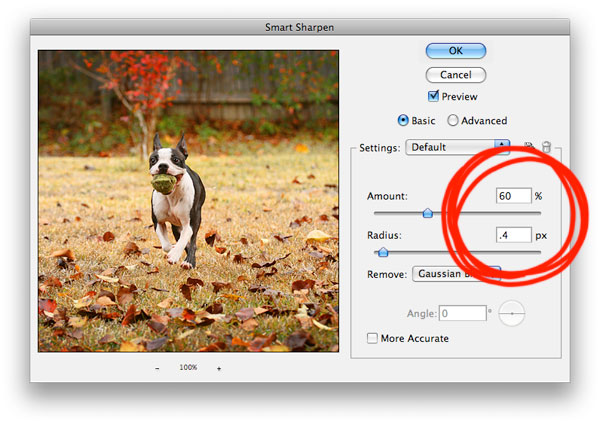
Then click on Filter > Smart Sharpen…
Change to these settings:
Amount: 60%
Radius: 0.4
And click OK.
Perfect! If it looks too sharp, you can always adjust the opacity until it looks right. (Another reason to always make a duplicate layer.)
4. Save
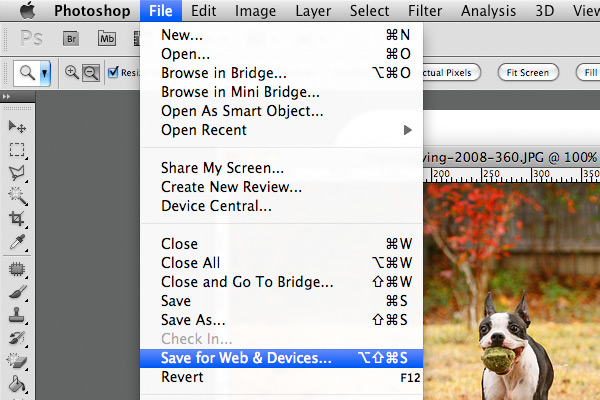
Now we’re ready to save. Click on File > Save for Web & Devices…
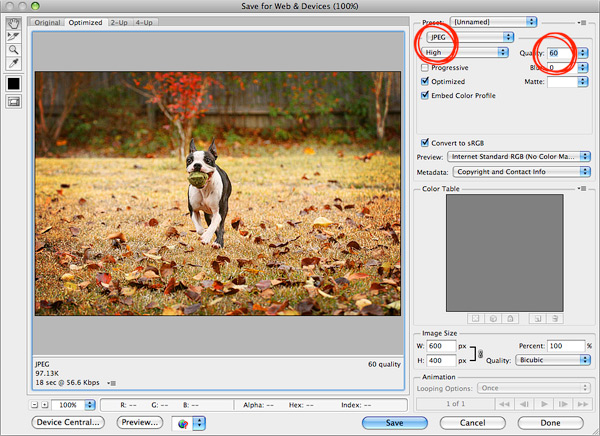
From the screen that pops up, make sure you are saving as a JPEG and that the quality is around 60. That’s a high enough quality for the picture to still look good, but not so huge that it will take forever to load on your page! :)
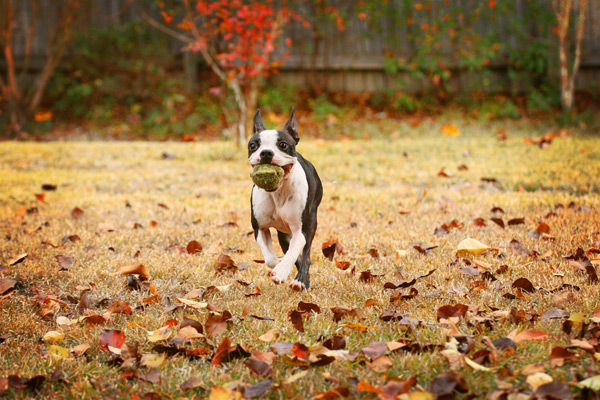
Here’s the before….
And then after we sharpened:
Or roll your mouse over the image below to see the before and after!
It’s subtle. Look at the eyes…
Note: You’ll need to be here on the blog for this to work, not reading from the email or RSS feed.
That’s all there is to it! :)
BTW, If you haven’t seen these already, be sure to check out:
How I Take Pictures
How I Edit Pictures
Have a great day! :)




I’m always following your blog and content; I think Adobe Photoshop is the best way to size your photos.
Awesome site! How has it taken me so long to find this? :) Great info- Thanks
Thanks for this Amanda! You’re so amazing!!! I really like this post!!! Thanks for sharing this kind of information!
Thanks for the info. Another reason to save for the web is this:
Metadata is removed to reduce the file size for faster page loading, when you’re using Photoshop or Photoshop Elements’ save the file using SAVE FOR WEB option. In many cases you’ll want to remove metadata so as not do disclose things like the location of where the picture was taken.
I try to leave the image width unset to begin with. My site’s columns shrink based on a visitor’s screen size, and a couple weeks ago I finally figured out how to make images do it too. Check out my home page (http://www.fossfolks.com) to see it. So far, I’ve only implemented it in excerpts. In short though…
My images are simple like this:
No floating, positioning, nothing. I should probably put in alt text, but one thing at a time, right?
They’re in a div called left-excerpt
Then in the stylesheet, I’ve got:
#left_excerpt img { width: 30%; height: auto; width: auto\9; /* ie8 */ float:left; position:relative;}
You can make it as much % of the div as you want though.
You probably don’t want to upload images that are huge (like 3200px wide); they’ll still resize, people on slower connections will curse your name.
Hope this helps.
Love these tutorials! Yall make it easy…THANK YOU!
Thank you for your informative videos and tips. I appreciate it. I was wondering if you knew the best way to upload videos to a WordPress website? It takes a great deal of time to upload to Youtube and then inserting it into WordPress. Was wondering if you knew a better and/or faster way to accomplish this task. Thank you!
If somebody does not have photoshop let me recommend the tool I am using. It is free and super-easy to work with. Also availible for most of the operating systems. Hope will help:)
http://rawimaging.org/projects/image-resizer
VERY VER HELPFUL!!!! Answered my question THANKS!
very helpful. thank you!
Does anyone know how to do this on a Mac (I use Safari for my browser and blogspot)?
Hi Amanda,
I wasn’t sure where to post this question :/
I recently ordered a collection of graphics online and they all came in gif format. These collections were made several years ago and so she’s not really that active any more and is not very good…actually, downright lousy….at answering my emails.
I don’t have a problem with the embellishments and such (at least so far) but it’s the background paper! Like one says that the dimensions are 4026 x 3600, but when I go to try to resize, it looks really blurred. What do I have to do in order to make it work for digital scrapbooking?
I appreciate any help or tips that you can give me. BTW, your tutorials have been very helpful…I so, SO appreciate them! I’m learning the one about the scrapbook background and am using gimp software. :)
Thanks,
Velma
O M G…I have loved looking at everything!!! I REALLY want to upload my handwriting and then be able to download it again! How do I do that?
Thanks, to easy and useful
i love this post. i love all your graphics and tips. it was great having lunch with you today!! have a safe flight back!
Wow! So informative, yet simple and easy to understand. You rock!
Thanks alot Amanda!! You’re so great at telling tutorials!! :D
Thanks for the great info! Do you take these steps for each photo? Or did you make an action for this process?
Thank you for the GREAT tutorial. I’ve been teaching myself photoshop and I can’t wait to try this!
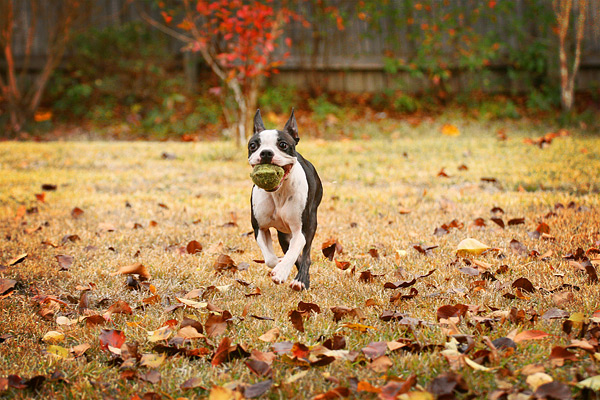
Dang, I love that picture of the dog running with the ball in its mouth! Just had to say that none of the photo editing stuff makes much sense to me, but I sure did enjoy seeing that dog bolting through the yard on retrieve! Thanks.
Can you next tutorial be on how you do the mouse roll-over trick?
http://shechosethebetterpart.blogspot.com/2010/09/teaching-old-dog-new-tricks.html
I used the edit tutorial and the resizing tutorial.
thanks so much!
Amanda, Thanks so much for this info! I have a question related to this…I want to use a photo I edited in PS using your tutorial :) for a wrapped canvas from Canvas People dot com. I’d like to get an 11×14 size canvas. How can I use this to make sure my picture is sized right before I upload and order from a vendor?
When going through the steps in this tutorial, I saw the option for “canvas” in a drop down choice and it reminded me of this.
Thanks,
w
Thanks so much for this tutorial :) I had a play with it and posted my results here: http://www.twobecomefour.com/2010/09/just-look-at-those-eyes-now.html
Awesome job on the tutorial!
~Kelly
Thanks, Amanda! Your tutorials ALWAYS rock!! I loves these kind of posts too:)
Awesome tutorial, thank you! I am finally at the point where I am ready to invest in a DSLR, and new photoshop tips are always great :o)
Thank you so much for the tutorial…Seriously, have you ever thought about writing a book? Even if you did it on your own and sold it here on the website? I know I’d purchase one in a minute. I’ve wondered how to get my pictures to look better on my blog and now I know. THANK YOU!!!
Thank you so much for this tutorial! I just do PW’s sharpen and define and than the bright and colorful but always wondered why my photos weren’t coming out as clear as yours. This is so helpful. I was starting to feel bad again about not being in the Canon or Nikon club (but the Olympus Club), but this boosts my self esteem back up ; )
Jennie Pie
“Capturing Sweet in the East”
P.S. Amanda, you should really check out my latest blog post about the Seoul fabric market…you would love the accessories! Let me know if you need me to send you something :)
So helpful…I figured out some of the resizing on my own but the sharpening and other info was great! Wish I would have found this a few months ago…I might still have hair! Haha
I too have been wondering WHY my photos didn’t look as good on my blog! Thank you for the tutorial!
And Wow – when you roll over the pic you can really tell by his eyes – what a difference!
What version of Photoshop are you using? I’m curious… :)
Great! Next tutorial: how to do the sweet roll-over!
And I’ll echo all the previous comments: your tutorials are so user friendly! Thanks!
I love your tutorials! You make me feel so much smarter after I read them! And you make it so simple to understand too! I’ll search a tutorial on another site and for the most part I’ll figure out what they are talking about and if not, I’m one of those who’s darned determined to do all I can to find out what they are saying before giving up, but I know that there are some people who can get totally lost and frustrated that the steps aren’t better set for them to understand.
But holy moly I LOVE the picture you took of your dog! The colors! The motion! The rustic look of the fence and trees! The color of the ball! I love it!
Everything you take a picture of, I want to frame it and hang it on my wall (yes, even that Oreo brownie thankyouverymuch). :P
thanks for this tutorial!!
Hey Amanda
this may seem like a very “basic” question, but how do you actually ‘get’ the photos on the Blog? I am now attempting to design my blog and nothing is ‘sticking’. cant get any of the free backgrounds to stay and I cant figure out how to get my pics from Photobucket, where i have them loaded, to the blog. FOR pics on the web, i read you need the url for the pic. where do you get that???
kelly
Thank you Amanda! Your tutorials are wonderful!
Now you need to do another tutorial to show us how you made the picture change when the mouse went over it!!??? That is AWESOME!!
Also, I’ve been blog stalking you for quite a while now, just thought you should know. :)
thanks so much!
Thanks so much for these awesome tutorials! I am new to posting on your blog but I just love reading it! One of my favorites! Your tutorials are so easy and so informative! Thanks so much!!
My eyes were instantly drawn to the eyes in that last photo! Yes, the sharpen definitely makes a difference! Only question, I don’t have Photoshop, do you know if I can do these tricks in Picasa?
Again, thanks for such awesome photo tips. Your pics are always stunning.
Do you read my mind Amanda or my blog?I have been toying with this very problem this week.I did a trial blog with resized pictures.I couldn’t work out from the PSE class,I have just taken how to find the size of the pictures for my blog.So thankyou for explaining that.I’ve now noticed the edge has been cut of all my horizontal pictures for ages.LOL
Just thought I’d let you know… I get your email and the picture does change in my email. Great tutorial!
THANK YOU! I swear I have learned more from your blog in a week than I have in the last 2 years on my own! Your tutorials are super simple to follow. Thanks for sharing your knowledge! I appreciate it more than you will know.
Casey
Amanda, this has been driving me nuts about my own blog for years. THANK YOU. THANK YOU TO INFINITY!!!
This is great Amanda! I love your tutorials. Thanks so much for sharing your knowledge with all of us.
I just recently came across your blog! I have learned so much! Your step by step tutorials are awesome!! Thank you for taking the time to pass your knowledge to us!
Take care,
Frances
Thank you for your tutorials! They are always so helpful & easy to understand, you’re awesome! :)
Thanks for the sharpening tips. Seriously, it’s so helpful. I love your little nuggets of information. It’s not overwhelming and they are “do-able”. Thanks again. :) {have a great day}
Thanks for the awesome tutorial! I find photography & PS tutorials to be super helpful. Have a great Wednesday!
Again, thank you so much for taking the time to publish these tutorials.
This was so helpful. Thank you. ~Ann
Hi Amanda! I’m a newer reader to your blog and I just love it! Especially these tutorials. You have helped me a great deal! My blog and I thank you :)
Amanda I absolutely love when you do a tutorial!! I have a question though – I have a Nikon D60 and my night pictures are much to be desired! What settings should I use? Thank you again for all of your great tutorials they are so helpful and easy to understand!!
I just love your blog, and your tutorials have inspired me to do more photography and blogging!! Thank you so much! And keep the tutorials coming! I definitely need them!
Lovely tutorial! Actually, just a lovely blog altogether! And I have been to POSH in Blue Ridge! My Daughter is a nurse and she goes into Blue Ridge all the time! Those shops are addictive!
Love your blog! those “babies” are precious! I want two that look just like yours! Great Tutorial today! Thanks Amanda!
Wow, thanks so much Amanda! I really enjoy your blog for the fun of peeking into your life through some great photography! These how to tips have been wonderful. I now have hope for doing the same on my upcoming blog.
Live well!
– Nicole
this is wonderful Amanda! Now, I just need a decent camera to use to take those pics!! :-) Love your blog!
I could read your photo tutorials every day! Love them.
wow! thanks so much!! i thought making my pics smaller and lower resolution was doing the job…but your tips and expertise are greatly appreiciated and i realize now i was doing it all wrong! thanks so much!! i am new to your blog…but am so happy i found you!!
Love this tutorial!! You always have easy instructions, thank you ;)
Thanks for a great tutorial, Amanda!
I have limited knowledge about PS and I really appreciate you taking the time to make this post.
I hope PSE 4 has these same options for me. I read your post and thought- I can totally do this too!!
Thanks for another great tutorial. I’m saving these until I get my camera.
Oh, and I can’t get the picture to change and I’m on the blog??
I love your tutorials, they are so easy to follow and understand. I took an 8 week college course on Photoshop and still don’t feel comfortable using it. Thanks!
thank you Amanda…i love your easy to follow tutorials! btw, i got your button on my page, thanks again!