Need a few tips for photo editing? Check out How I Edit My Photos! Find the best editing tips and tricks to perfect your favorite pictures!
How I Edit My Photos
This is part one in a series of tutorials which will cover the very basics of Photoshop. It’s perfect for the beginner Photoshop user- and written in plain English, so it’s simple enough even for someone who has never used Photoshop before! :)
This tutorial, Part 1: Layers, will show you how to give your photos unique, customized enhancements by using actions- but most importantly, how to get the most out of your actions by editing the individual layers generated by those actions.
Photo Editing with Layers
Start by opening an original, full sized photo (straight from the camera) in Photoshop. I’m using this beautiful photo my friend Cynthia took of her daughter Abby.
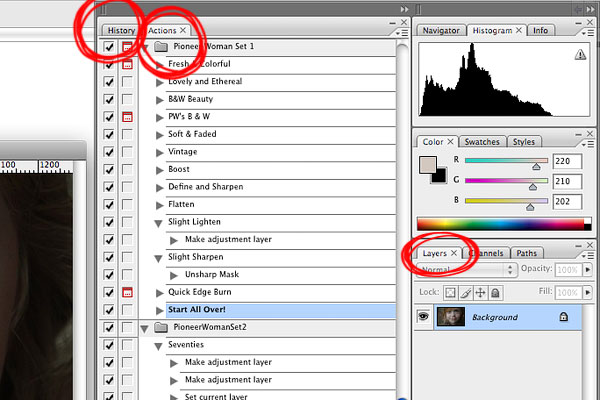
The first thing you want to do is make sure you have a few windows open in Photoshop- you’ll need Layers, Actions, and History. They are probably already opened by default and located on the right side of your screen- but if you don’t see them, just look at the top of the screen and click on Window and then Layers, Actions, and/or History.
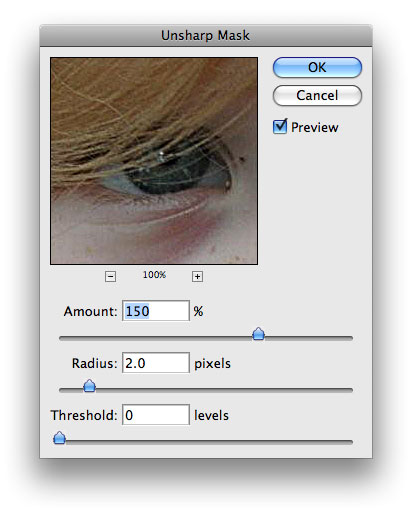
Now, the first thing I think any photo needs, especially if it’s a photo from a DSLR, is a good sharpening. We are going to jump right in and make our first new layer. Click CTRL-J (*If you are using a Mac, substitute CMD instead of CTRL in this tutorial) to create a duplicate layer- it’ll appear as Layer 1 in your Layers Palette. Then, at the top of your screen, click on Filter > Sharpen > Unsharp Mask.
Change the settings to:
Amount: 150%
Radius: 2
Threshold: 0
And click OK.
Now, for this image, the full amount of sharpening was a little too much. See how it’s looking a little grainy? (It’s kind of hard to convey, since these images have been resized for web, but I’ll do the best I can :)).
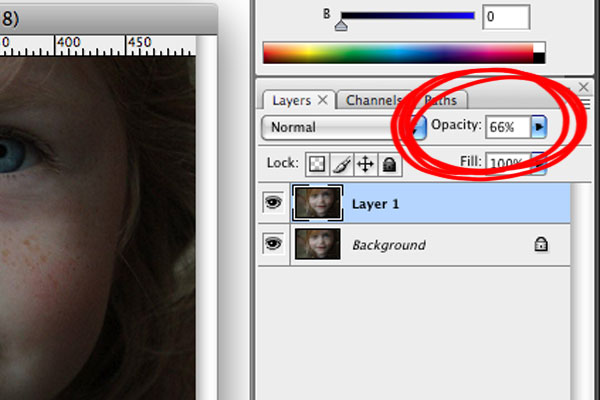
But luckily, since you had the foresight to create a new layer, you can easily adjust the amount of sharpening just by changing the Opacity of the sharpened layer, Layer 1.
Just click on where it says 100% and change that to any number- or you can click on the blue drop down arrow and use the slider. I changed mine here to 66%.
Just right. Her eyes are nice and crisp, but her hair isn’t too crunchy-looking. Some photos will need the full amount of sharpening- no shame there at all. Some will only need 50%, some less. It’s totally up to the photo, and you- the photographer! :) And what you think looks best.
When your photo is just right, look at the top of the screen and click Layer > Flatten Image. That merges all your layers to one single layer, just like it was at the beginning. You only want to do this when you’re sure you’re done tweaking. :)
Now, let’s start with our first action. For this tutorial, we will be using the free actions from The Pioneer Woman. You can download sets 1 and 2 here: The Pioneer Woman Actions. Follow her 4 short, easy steps to download, install and play your first action.
*UPDATE* You can now download The Pioneer Woman actions for Photoshop Elements!
This is what the Abby’s photo looked like after I played the action Fresh & Colorful. Not exactly the look I’m going for, but it definitely has potential. Fresh & Colorful is one of my favorite, go-to actions- but I always tweak it before saving the final image.
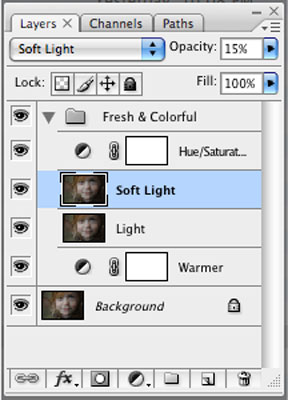
First let’s start with the Soft Light layer– click on the Soft Light layer in the Layers palette and adjust the opacity to 15%.
For some more color, click on the Hue/Saturation layer and adjust the opacity to 85%.
Finally, for just a little more brightening, click on the Light layer and adjust the opacity to 50%.
And that gives us this. Beautiful. Bright. Fresh & Colorful lives up to its name. :)
Now every photo is different-50% on the Light layer may be too bright- or too dark- for the next photo. 85% on the Hue/Saturation layer may be wayyyyyyyyyyy too saturated. That’s what’s great about layers. You don’t have to do the exact same thing for every single photo, because no two photos are exactly alike. I do almost always at least set the Soft Light layer back to 33% or less though- even if I leave the other two layers alone.
Now what else can we do? I think this photo could be a little warmer… in the Layers palette, click on the Background layer. Now play a new action, from set 2 of The Pioneer Woman actions, called Warmer. When the Warmer layer is at 100%, it’s a little too warm- but change the opacity to 44% and we have this:
Ahhh- Perfect. We’ve lightly highlighted her sweet rosy cheeks, those gorgeous red curls, and her stunning blue eyes- without making it look too fake and over processed.
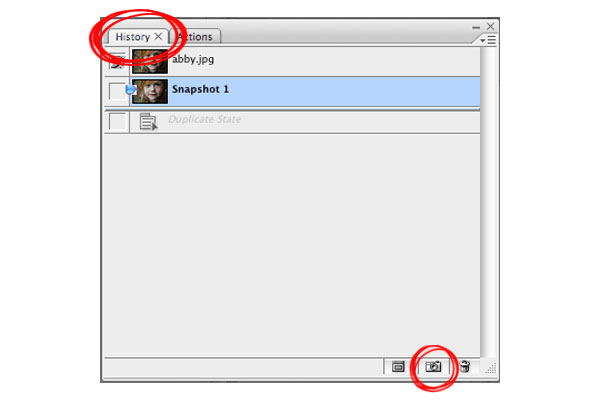
Now we could certainly stop here, and I do recommend you Save the photo at this point and also create a Snapshot (click on the History tab and then click on the little camera to create a snapshot of your image as it is right now- so that way, no matter what you do to the picture after this, you can always come back to this point, as long as you don’t close the photo.)
But while we’re here, let’s have a little more fun. :) In the Layers palette, click on the little arrow next to the Fresh & Colorful folder to close it. Then, from set 2 of The Pioneer Woman actions, play the Seventies action.
Oh goodness gracious- so sweet! So pink! So Valentiney. Meep. Open up the Fresh & Colorful folder and play around with the layers again. I set the Soft Light layer to 0% here. Click on the Hue/Saturation layer and click CTRL-J for a double saturation boost. Click on the eye next to the layer to hide it if you don’t like it. When you love it, definitely save it and take another snapshot! :)
How about Black & White? In the History tab, go back to the first snapshot you created, Snapshot 1. Then play PW’s B & W from the first set, adjust the Light layer like it says to do when the window pops up, and then click Play again to finish the action.
Classic. I adjusted the Quick Edge Burn layer to 44% here.
So that’s it! If this was your first time editing a photo in Photoshop, congrats! Thanks for following along! :)
Effectively using layers is one of the most basic, but most important Photoshop tools you can equip yourself with. Actions are great, but without the ability to edit them specifically for your photo- you’re just kinda stuck with the basic, cookie-cutter look- and that may not always work. So now, hopefully, after this tutorial, you can achieve the customized look you want for your photo- everytime! :)
Thanks for looking! :)












Hi Amanda! Could you post a tutorial on using Adobe new software. These settings doesn’t work out on Lightroom and Elements.
Great photoshop tips. I also sometimes do layers when I sharpen because I want the eyes tack sharp, but I don’t want the hair to look strange. Great step by step.
Great tutorial! One question was this photograph shot in RAW or JPEG ? Curious to know thanks!!
Much thanks for this! I’ve been using Photoshop for years as a web developer, but I’ve never known the best way to optimize photos for awesomeness, and not just for clear and fast web pages.
Finally, a tutorial I can understand! Lol. Thank you soooooo much for posting this!
Finally figured out how to take good pictures now I just need to find a good go to set of actions to use. I swear I could spend hours just editing one photo. the bad part is I usually end up up taking over a 100 pictures in just one photo session. These actions definitely help!! Thank you
I am a self-taught, rookie photographer and photo editor trying to bring beautiful images to my home and blog, show off my crafts and parties, etc and I can’t even tell you how amazingly helpful this post has been in the last 10 minutes. I have been taking online classes, reading tutorials, practicing, trying out new things, Googling questions about blogs and photos…the list goes on and on…trying to get my images to ‘pop’. Your tutorials are helping me finally bring all of these things together to make it work. Can’t wait to do more!
A million thanks!
Anne @ circusberry.wordpress.com
Thank you so much for the DSLR and PhotoShop tips. I’m looking forward to trying what you’ve written about and through some trial and error of my own, actually understanding what I am doing. God bless!
cant get it to work any tips for photoshop elements 10? sorry just learning.
Do you know what everything is called in Photoshop Elements 7.0? That’s the one I have and it seems everything has different names, or I’m just very lost. Could it be because I have Windows, not a Mac?
Wow, just found out about this blog and it is really awesome! It cointains MANY things I need and I was looking for :))) thank you. And please keep posting!
I love this so much! Thanks for the tutorial!
Hi! I just found your website through pinterest and love all of the photography information and photoshop tutorial. They are some of the easiest to understand and comprehend that I’ve found! PLEASE consider doing more “what settings to use” and info about editing in photoshop!!!! I would be very grateful!
Kristin
How do I get photoshop??? Is it a website that i download from? I’m really curious about using it. Thanks.
I am so excited about your photograpy blogs! They are so clear and easy to understand, I have learned so much from you! Thank you for sharing and taking the time to help all of us!
Hey Amanda,
I have been following you for a couple of years and have never left a comment before… well on any before. Anyway, I LOVE the things you post! The last trip you took looks amazing. I am especially interested in your weight loss you look great. I am struggling with 30 lbs…ugghhh. any secret tips?
love to here from you
cheers!
Marlene
Thanks Amanda! This is great tutorial. I noticed this was written back in 2010, will you be publishing other parts of the photo editing tutorial? I can’t wait to learn more!
When I downloaded Photoshop last night, the first thing I did was come over here to learn how to use it. Thank you so much for taking the time to do this!!
This is great, thanks for sharing…I follow your directions with a picture of mine and it was great. I had used some textures before, but I really didn’t like them because they didn’t fit my pics (because I didn’t know how to adjust different layers). Now I know what to do and I can start playing around. You are the best in the blogosphere!
Thank you sooooo much! This was so informative. Literally a goldmine of information.
That’s good! Thank u..
Hi Amanda: when I tried running the PW’s B&W action, it kind of stopped half way and popped up a message saying THE OBJECT “ACTION ‘QUICK EDGE BURN’ OF SET ‘PWActionSet1(Updated)'” IS NOT CURRENTLY AVAILABLE. Do you know what’s going on and how to fix it? Thak you so much. Loved the tutorial by the way!
You are SO fun!! Thanks for all your posts!!
thank you so much for this wonderful tutorial and for sharing to us your magnificent talent :)
Amanda, you are a genius & an awesome teacher. I refer to this page often. Lots to learn over here ;) xo
hi! I love your tutorial! :) may I pleeease know, which version of Photoshop are you using? many thanks! <3
HEY HOWDY HEY! I DID SOMETHING COOL TODAY! How do I show you what I did with the photo I edited using your tutorial?
Thank you for this tutorial. Very exciting and very helpful. I love learning from you. You know just how to translate it for “everyday people” so that we understand the techniques. I was really excited about your camera post and now this Photoshop post. Keep ’em coming girlie!! {have a great day!}
I have a question that I’m hoping you can answer, Amanda –
I’ve been dabbling in digital scrapbooking this past year. On my screen everything looks good, but when I have the pages printed there are huge lighting differences. The colors of the “paper” look good but one or two of the photo images are too dark, for example. I’ve lightened the photos to reprint, but I’m wondering if there is anything to do that will automatically adjust the lighting over the entire image to make everything even out once I’ve got my layout done. Thanks!
Thanks Amanda! No matter how much I think I know, I always learn something from your tutorials. I am going to go practice now! :)
Thank you so much for this wonderful Photoshop tutorial! It seems as if lots of people are having trouble downloading Pioneer Woman’s actions as of late (including me). Her site is full of comments of users with the same error message. I’m not sure how long it’ll take for that to be fixed. In the meantime, do you have any other sites with free action downloads that you could direct me to? I’m anxious to get started with editing my photos.
Thank you!
Hi Amanda!!!
Love the Tutorial! AWESOME! do you know if they have actions that are compatible with CS4? I tried to follow the steps but apparently the actions are not compatible with this version of Photoshop…
I guess I’ll keep trying! Love your stuff btw :)
Thanks for sharing. What can we do in Elements to get some of these great looks easily?
first of all, love this tutorial. but i have the 30 day trial of photoshop cs4 and it everytime i try and download the pioneer woman actions it says its not compatible. is that because its a trial? please help.
Just what the doctor ordered! I’ve been hesitant to even consider visiting Photoshop since I consider myself to be technically-challenged. I get lost midway through most tutorials. The one you’ve created here is perfect. Thanks!
Looking ahead to reading more cool Photoshop how-tos from you. :-)
This is fabulous…I am sure it took you alot of time to put together SO THANK YOU!!!
looks beautiful without be too overdone! I so wish I had photoshop sometimes!
Thank you so much for the tutorial! Your blog is amazing and so helpful! Question though – the files said they wouldn’t work with CS3 – is there a way to work around that? I want to use these actions so bad! Thanks!
I love love that you are giving tutorials on photoshop!!! I have spent many nights trying to do one simple thing and I am sure I am making it harder than it is! Thank you so much!
WOW
Yoa are amazing! Where do you find the time to do all your amazing things??? Thank you SO much for sharing all your creative wonderfulnessess with me and everybody else on WWW!
Thanks for the tutorial!! I have PSE 7 and I hope this can be used to help me learn how to use PSE 7. Kweta PS…love your blog!!!!
Thanks for the tutorial! I am a newbie to Photoshop (my husband is a whiz at it) and can use all the help I can get. I tried to download the actions from PW but they don’t seem to work. I looked around her site and couldn’t figure out if they would work for CS. Any help you could offer would be appreciated.
Thank you for this tutorial!! LOOOVE it! :)
Thank you for this tutorial. Is your original image raw or jpeg? Looking forward to the rest of your series!
Thank you SO much for this awesome tutorial, and I look forward to seeing the rest of the series. :) I have used Photoshop for a bit of scrapbooking but am still new at it, and have never understood how to do all the amazing photo enhancements that I see everywhere. Thank you for making it so clear for us newbies. You rock!
This is so cool! Thanks. I actually use Paint.net, but I was able to achieve the same look! I posted a link to this on my site along with my picture.
This is great! I’ve been wanting to get Photoshop, but I didn’t think I could figure it out. I wasn’t even sure I would buy the right software. Is there more than one? Tell me exactly what to buy. I’ll get it and try this right out. I only have a laptop. Do I need to get a regular computer too? I’m not of your generation…..I’m age-computer-challenged.
Thanks so much.
Great tutorial! thanks for the tips and tricks, you have a great site!
Thanks so much for this! Your blog is just amazing and i’m in love with it!
xoxo
Hi Amanda,
Thank you so much for this tutorial on PS!! I got PS for Valentine’s Day and cannot wait to play around with it; however, I must say I have been a bit intimidated. But……not anymore! I am going to take some pics of my son tomorrow after school and go *crazy*!! Ha! Ha! You are so very smart, talented and fun! I find myself looking forward to reading your blog – I just LOVE it! Thank you again for posting this tutorial and have a great rest of the week! ;o)
This tutorial couldn’t have come at a better time! I spent the weekend trying to tint my photos like yours above, but had not gotten it. Now, I can! SOOOO EXCITED! THANKS A MILLION!
:)
Perfect, just perfect! I just googled yesterday ‘how to remove background layer’. I just painted some angels with daisies. Then I thought I should paint out the daisies. No, I can just Photoshop them out. But how do I do that? And here you are! Thankyou so much!
love, love, love the tutorial….thank you!! It is so much easier than trying to follow the PS tutorials or figure it out on my own :) You are awesome!!
I just ordered Photoshop and I can’t wait to use it! Thanks for posting this tutorial. I hope you will keep posting short ones every now and then. Have a great week!
Hey Amanda I love the blog have been following for a LONG while. Are these tutorials for Photoshop Elements 7 or just the “big” photoshop program? I only have photoshop ele 7— thanks-mamajax
Thanks so much for this awesome tutorial! I think you should be working on a book on Photoshop. Your instructions are so much clearer than most of the books out on the market!
Amanda, thank you so much! I love your site and you are so helpful. I just got a Nikon D90 for my anniversary and I am still trying to learn how to use it to the best of its ability. With you sharing this tutorial information, as well as the information on camera settings, I am good to go! I even bought the “Exposure” book you recommended. Keep all of the great information coming, it is truly appreciated!
I can’t wait to try this!! Great tutorial…thank you!
Thanks so much.
I’ve been playing in Photoshop for years but you pointed out a few other items I didn’t know about.
I love your blog by the way.
Oh boy am was I glad to find this post today! I just got Photoshop CS4 the other day and have been feeling a bit overwhelmed. Please keep the tutorials coming. You are the BEST!!
Thank you! Thank you! Thank you! I have had Photoshop for a few weeks… maybe months now and have had no idea what to do with it! I suppose I was going to have to read a book or something ;) This tutorial gave me exactly what I need to get started and start using it!! This is Great!
Your tutorials are fabulous. I have been trying to teach myself a few things in Photoshop and this will sure help. Now if I could just take better photos. I just made a blog background from scratch following your tutorial and it looks great, if I do say so myself. Now I wish I could find a tutorial on how to make a banner for the top. Do you have one?
THANKYOU.This is the push I needed to have a go.I will spend the day tomorrow in my PJs playing around.
Great tutorial!! Thanks!!!
This couldn’t have come at a better time! I have CS4 and have done quite a bit of playing around but I honestly don’t know the basics step-by-step! Just by trial and error!
Thanks so much! Please keep the tips and how-to’s coming!!!!
Lindsay
http://www.passengerseatkindofgirl.com
Thank you for this great, easy to follow tutorial!
Thank you for this Great tutorial!
Thank you for that quick tutorial. It was very informative, and easy to understand. Bravo!
Thank you so much for this easy to follow tut with the pictures. I’ve got Photoshop and when I open it I just sit here and look at the screen cause I don’t know how to use it *LOL* Now I can work with my pics, printing this out now. Thanks again for sharing with us.
Beautiful! Thank you so much for this tip!
Thank you!!
Thanks so much for your tutorial. I can’t wait for more!
Awesome!! Love any extra help with Photoshop. Thank you so much. I can’t wait for the next one.
I am SO amazed by you….can I grow up and be just like you?!
Thank you so much for all your tutorials, recipes and tidbits!
I have photoshop elements 6 and it seems to be quite different from the options you have mentioned.
Sadly.
What a fabulous tutorial. I’ll be putting the link on my blog so everyone can find it. Clear, concise… perfect. Thank you so much for this!
Thanks so much for sharing this! I can’t wait for the next tutorial!
Now if only I had Photoshop or any photo editing program, I’d be set! Maybe one day. I’ll know where to go when I do get one.
This is going to be printed out and hung on my desk. Thank you for this quick reference. Don’t you just love The Pioneer Woman?!?
I love Photoshop CS3!
Wow! Is she beautiful!!! Thanks for all you do, Amanda. I don’t know how you do it all! Amazing!
(((HUGS)))
Clara
Thank you so much Amanda. I love this tutorial and the Actios, I didn’t know how to use them and now I´m going to have so much fun with this.
Thank you again!
Kisses from Argentina!
I need to go look for that camera. I use PSC3 and have never noticed it! Thanks for explaining the flatten image. I thought it was something to do when completely done with changes.
Thank you SO much for this! I just purchased Photoshop CS4 a few days ago and have yet to really play with it too much. I found your tutorial to be quite helpful and am ever so grateful for the link to PW’s actions! Looking for some good actions was on my ‘to-do’ list. I love the Warmer action :-) I can’t wait to see what you share next!
Thanks so much for this. Step by step is just what I need! You are so helpful and I love your posts!
I have PW’s actions, but haven’t used them in a long time. I really like the way you’ve walked through everything step by step showing the before + after effects. This is a fantastic tutorial!
Thank you so much for sharing with us! This is really helpful, I love photography but I haven’t made time to play with PhotoShop much. I really appreciate you taking the time to share with us!
THANK YOU SO MUCH for including these directions/steps on your site! I’ve had photoshop for a year and even though I’m decent at figuring out technology this one still has me questioning my skills! You are so smart and talented! Thanks again for sharing your “SKILLS”!
Melissa
WOW. Amazing! Thank you so much for this, i’m currently enrolled in a desktop publishing class, where we work with photoshop for competition type stuff, and this can really help me become best in my class (there is only 12 of us) haha.
For graduation, i’m asking for photoshop, i’m actually going to colledge for graphic design, so the more I know now, the better i’ll be :D
Anyways, Thank you <3
So much fun!! My hubby ordered me the Canon 50D for Valentine’s Day which should be arriving today! I can’t wait to play around with it and some photoshop!!
Do you know why I can never pull up PW’s free actions? When I click on your link and hers from her website there is a page full of chinese looking little boxes :( I’d love to download it if you have any suggestions how I can do it. I have a pc, not mac.
LOVED your tutorial, I am going to download a trial of Adobe Photoshop this week and play around :) Have a great Tuesday!!
Jenny-
On PW’s site it mentioned this, I had the same issue and so when you want to download her actions, press ALT then click on her link, it’ll allow you to save it. Hope this helps and is not too late.
I am a newby at Blogs and Scrapbooking. I enjoy your blog and tutorials tremendously! Thanks for teaching and sharing!! :0)
Yay! Thank you so much for doing this. I just got PS and really need a basic tutorial. You’re awesome!