This easy editing tutorial will teach you How to Brighten a Dark Subject on a Light Background with ease! Learn the best photo lighting tips and tricks!
How to Brighten a Dark Subject on a Light Background
If you’ve ever tried to take a picture of anything against a bright background, no doubt you’ve run into this problem. Either the background is just right but your subject is TOO DARK, or your subject is fine, but the background is TOO BRIGHT. It’s hard to take pictures in this tricky lighting situation because either way, one of them is just not going to look right! This can happen when trying to achieve the bokeh effect in front of the Christmas tree, taking pictures in the snow, or any number of other tricky lighting situations. Of course, taking pictures in perfect lighting is always ideal, but unfortunately not always an option. So if you’ve got a special picture you’d like to try and rescue, here is a super easy Photoshop fix. Anyone can do this! :)
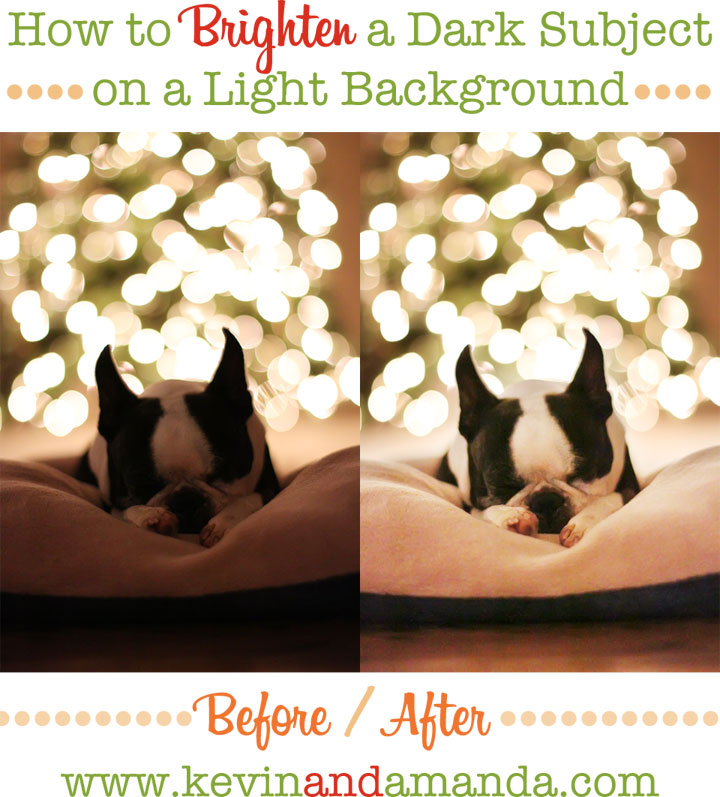
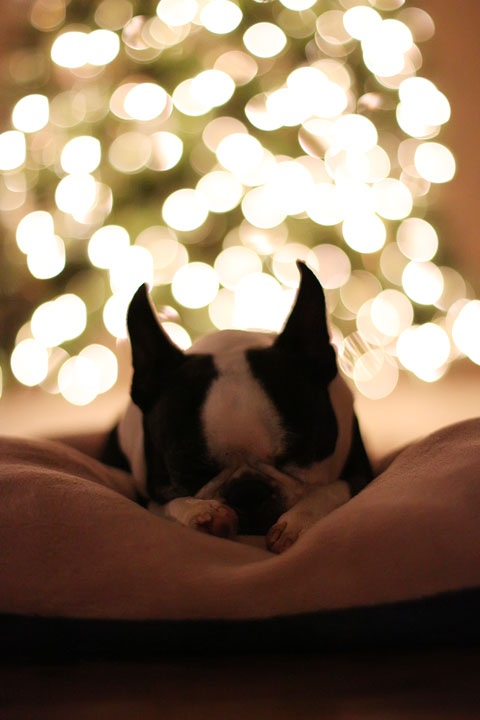
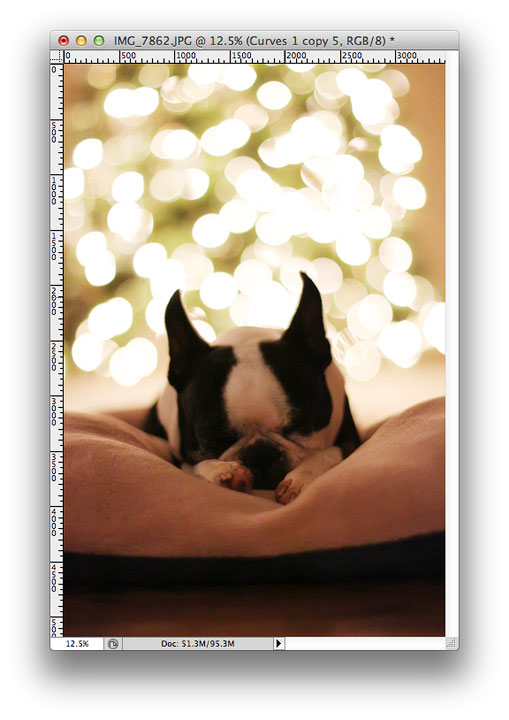
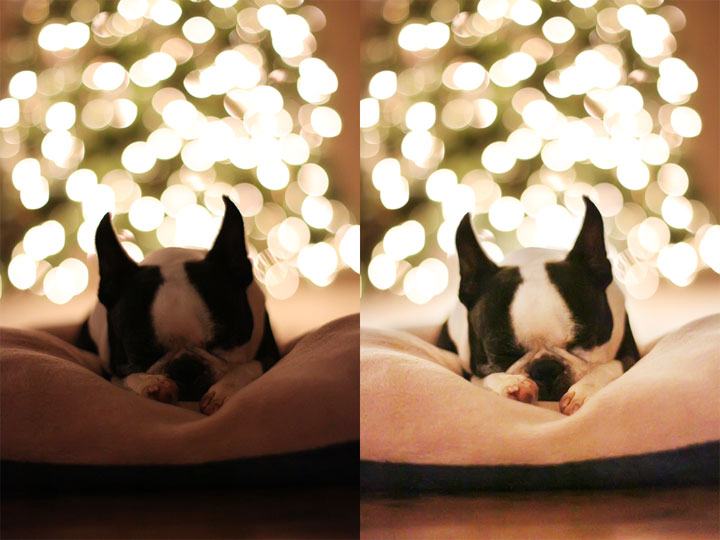
Here’s our “Before” picture. The tree looks great — very bright — but our subject Howie the Boston Terrier is way too dark. If we were to lighten the whole photo, the background would be way too bright or “blown out”.
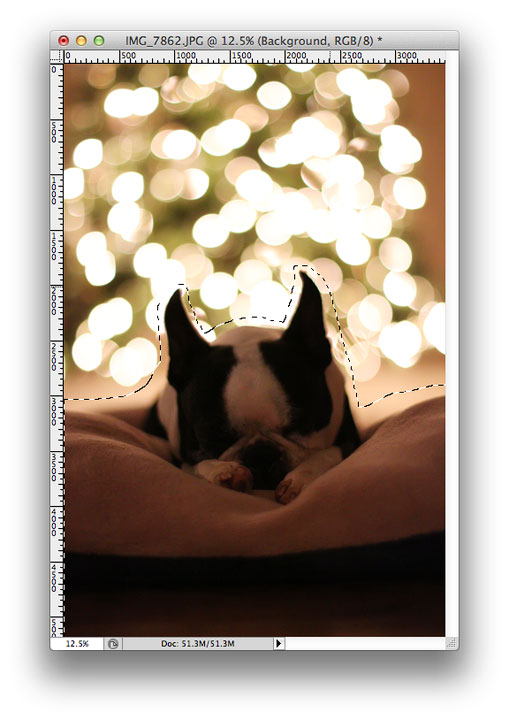
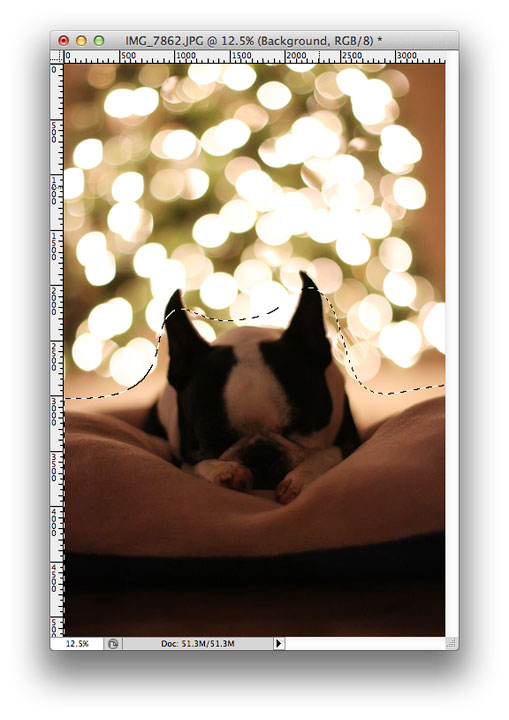
To start this simple fix, use the Lasso Tool in Photoshop to select a rough outline of your dark subject.
Right now your selection has a hard, sharp edge. It would be very obvious if we tried to make it brighter now! You would be able to see a defined line around the subject we just selected.
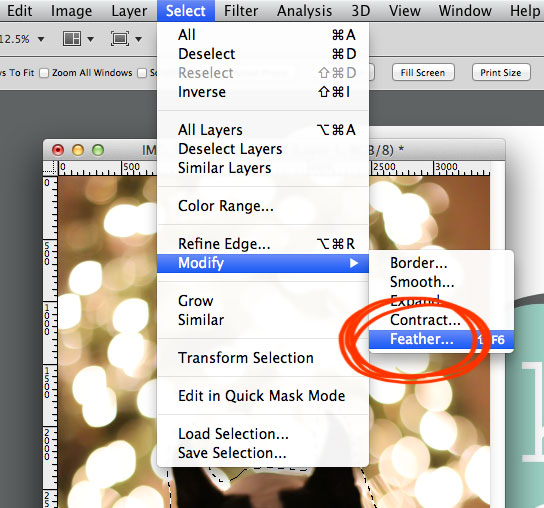
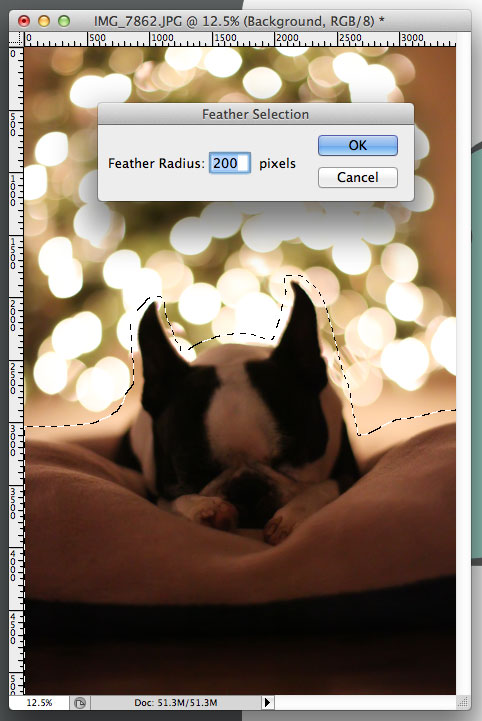
Go to Select > Modify > Feather to give that selection a smooth, feathered edge that will blend in with its surroundings.
Choose a Feather Radius of around 200 pixels.
Your new selection should look smooth and undefined. If it looks TOO smooth, you can make the feather radius number smaller. If it doesn’t look smooth enough, you can make the number bigger.
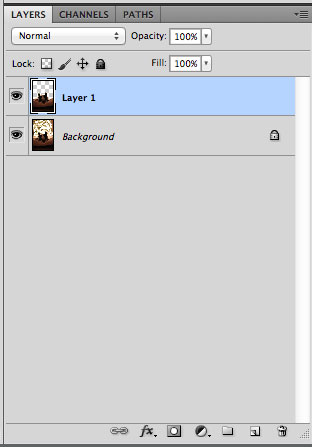
Next click CRTL-J on your keyboard (or command-J on a Mac) to create a new layer of your selection.
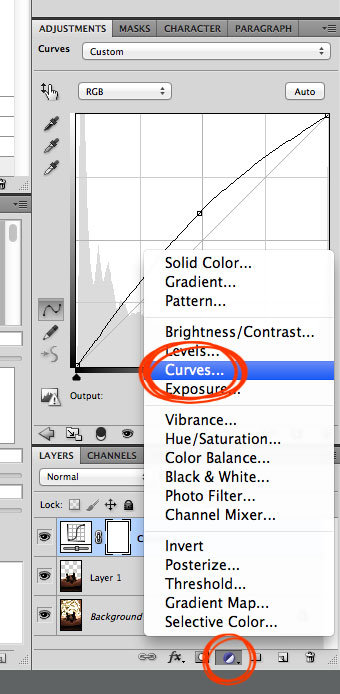
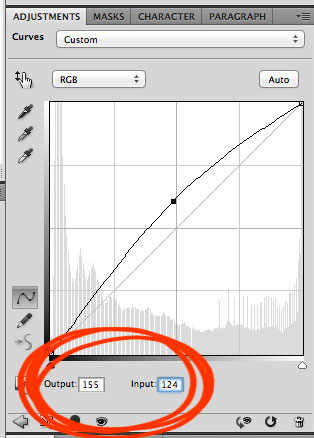
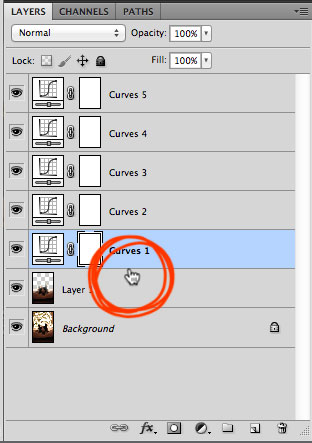
Now we’re going to make that selection brighter. In the Layers pallet, click the black-and-white circle button to create a new Adjustment Layer, then click Curves. (If you don’t see the Layers pallet on your screen, you can also select Layer > New Adjustment Layer > Curves from the top menu).
Click anywhere on the Curves grid that appears, then change the input and output to the following:
- Output: 155
- Input: 124
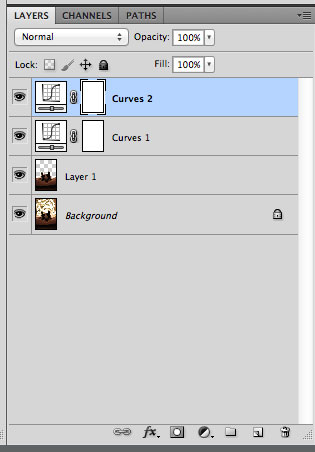
In the Layers pallet, click on the Curves layer you just created, and click CTRL-J to duplicate the layer.
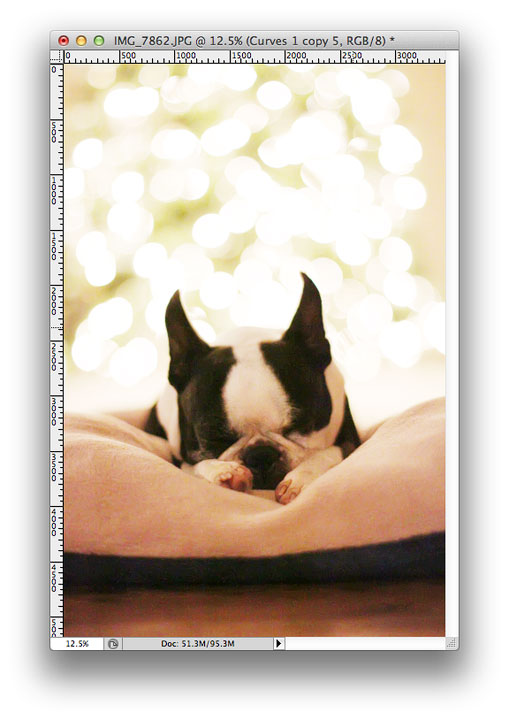
This is what my photo looked like with two Curves layers. Better, but not quite bright enough yet! Yours might be bright enough with just one or two Curves layers, but if not, just keep duplicating the Curves layer until your subject is as bright as you want it. Ignore the background, it will be way too bright! Only look at your subject.
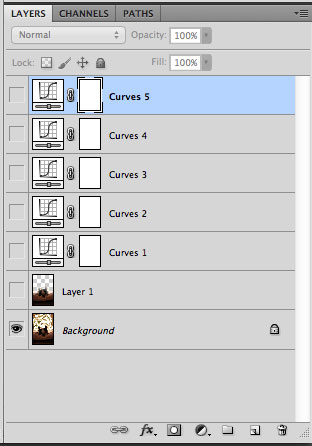
I made five Curves layers.
There! Now the subject is bright enough.
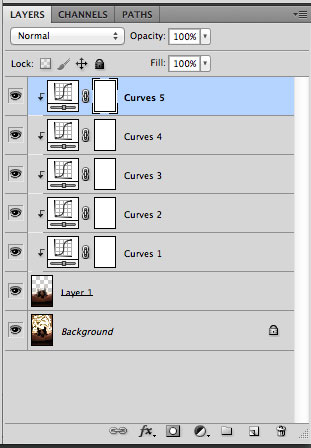
To return the background to normal, hover your mouse in between your subject layer and your first Curves layer. Hold down the ALT or Option key on your keyboard, and the cursor will change into two intersecting circles. Click in between the layers. Repeat this step for the remaining layers. For example in my case, I clicked between Curves 1 and Curves 2, then Curves 2 and Curves 3, then Curves 3 and Curves 4, and finally I clicked between Curves 4 and Curves 5, all while holding down the ALT key.
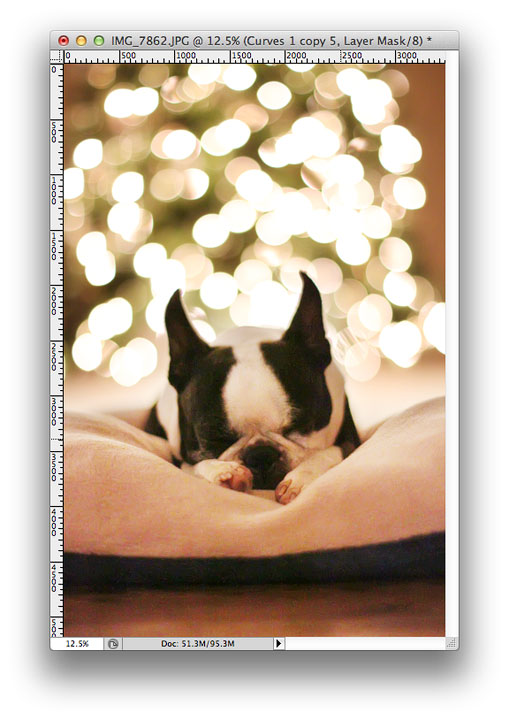
Now the bright Curves layers are only applied to the subject and not the background.
That’s it!
It’s seriously that simple. The subject is bright and matches the background. You can’t even tell what we did! From there you can edit the photo as you normally would, or leave it as is. :)
Here’s another look at our before and after.
Of course, the Christmas tree bokeh effect works during the day too, so if you’d like to save yourself some heartache, you can always take your photo during the day. :) Note that the bokeh is smaller in this picture because Howie is closer to the tree, and I am further away from Howie than we were in the other photo. To achieve the largest bokeh possible, move your subject as far away from the lights as possible, while moving the camera as close to the subject as possible.
Also if you’re interested, you can click on any photo (not the screenshots) to see the settings, camera, and lens I used to take it.
Hope this helps! Happy holiday photo taking! :)








OMG….an answer to a perennial problem this time of the year. I found you by accident, but have now bookmarked it so I can find it when I am done wrapping all these presents and baking cookies and……well, whatever. Thank you thank you.
Great tutorial! Makes me wish I still had time to use my Photoshop. lol Thank you.
I had to stop by once I saw your pin and tell you how awesome your Boston (and your photography tips) are. :)
What. Photoshop program do I buy to do all this stuff please help am new to all this editing but I really enjoy doing it.
Oh my god thank you!! I have a photo of my two Labradors that I took at the dog park the other day and the photo is perfect for size comparison (the 5 month old is almost as tall as the 2.5 year old) but the stupid shade made them WAY too dark and I didn’t think I was gonna be able to salvage it, but this worked perfectly. This is freaking amazing, thank you so much!
hi,
Just used this tutorial to fix a picture of my puggy, it worked beautifully. Thank you so much!
Thanks for the tip! Now, I have to figure out how to get my 2 bostons to lay still! LOL
hi there!
this is an amazing post! I have a picture of my son that REALLY needs to be saved, his background is a sun set but his face is priceless! I followed this step by step and am using photoshop elemnets 12. The “curves” option was the only one I didnt have and when I tried different option it would just light up the background or chnage the color/brightness/contrast of the background and not him. Hope you can help! great blog!
thanks
Cath
I have elements and it has curves. I’ll have to go look to see where to find it. It’s there, check your elements book. :)
hi there!
this is an amazing post! I have a picture of my son that REALLY needs to be saved, his backround is a sun set but his face is priceless! I followed this step by step and am using photoshop elemnets 12. The “curves” option was the only one I didnt have and when I tried different option it would just light up the backround or chnage the color/brightness/contrast of the background and not him. Hope you can help! great blog thanks
Cath
He is so cute!
This tutorial could not have been made at a more handy time. I was about to discard some images from this soldier’s family session because I could not fix the subject in front.
Thanks!!
thx – I hv had many photos thru yrs like this
Thanks, Amanda!
These are my FAVORITE posts!! Thanks. Keep em comin’
all I can say is… I LOVE YOU!! This tutorial has truly helped my workflow on a many a shot!!
Awesome tutorial!
Amanda, did you use a flash in the Xmas photo series with your two sweet puppies? Or is that just daylight? The photos are incredibly well balanced and I am trying to decide on a good flash.
Thanks in advance! Lovely blog.
Mariya :)
Hi Mariya! Yes, I used the Canon 580EX External Flash pointed at the ceiling :)
Hello!
I’ve been trying all night to get a picture of my beautiful kitty in front of the tree before I take it down with the bokeh effect but I cant get my camera to actually take the picture. If I change the lens to MF then I don’t get the bokeh effect but if I leave it on AF then my camera just keeps trying to focus and wont take the picture. Any tips for me?
I’ve just come across your site and I love it!
I love your tutorials! As a matter of fact I just finished using one of your tutorials from back in 2009 on adding my signature to my blog so it would also show up on my old posts! Well! I am just tickled pink, OK, I messed up a bit because photobucket turned my .png image into a jpg so that white box is around my signature but my background is white so I not sweating it, for now. I’m just happy as a clam that I was able to design my signature (I used PowerPoint) and it is installed and actually working! Thank you , Thank you, Thank you!
Hugs and Happy New Year!
Beth P
P.S. Those pooches of yours are just too adorable so use them often for subject matter so we can see what they are getting up to! :D
As always, thanks for your great tips Amanda. I was wondering if this is how you would acheive this fix with Photoshop Elements 10?
Have a wonderful New Year~
Thanks for the tip. I have a few photos that I am going to work on!
Thanks for the tip! The feathering is the part I’ve missed before, and like you said it always looks really obvious!
Quick question… does this method also work with PS8? I’ve been trying to find the “curves” & am not having any luck. Please help! Awesome tutorial by the way. Thanks for sharing it!
This is so helpful!
As always, love these tips!! Thank you SO much!!
Yes… I think even I can do that!! I’m going to give it a go!
I was going to ask if you could do a lightroom tutorial as well :) pretty please
Thank you so much for this tutorial! I just salvaged a friend’s pic from her fiance proposing – you couldn’t see her in the background at all because the flash hit her fiance. Wonderful, thanks thanks thanks!!! Merry Christmas (:
And this doesn’t hurt the dog?
Hahahaha!
Thanks for the tips!
You can also mess with the exposure setting instead of doing multiple curves layers. Just do a layer for the dog and up the exposure on that. You can fix it in Bridge or in Photoshop.
CreativeLive has some wonderful Photoshop classes for those who are interested.
I like how you combined the lasso tool and feathered the edges. I’ll have to try that one.
You are so awesome to share your skills. Thank you!!
Thank you Mindy – I will definitely check it out!
I love this!! Very helpful, Amanda and I will be looking out for the LightRoom tutorial!! :D Happy Christmas to you and Kevin and your furbabies!!
Amanda! You are a life saver! All of your easy-to-do photoshop/camera/photography tuts are amazingly awesome and have helped me a ton! Thanks for all of your help!
What happened to my comment? There were no other comments this morning when I left one. I’m confused??? Anyway……..what I was asking is this: is there some sort of “photoshop for dummies” tutorial or book or something that I could use? I really want to start using it and am totally overwhelmed by it. I love your tutorials, but they are greek to me. Please help! And thank you for posting your “secrets” about how you get your photos to such a nice finished product!
Lois, Yes! There is a “photoshop for dummies” book. You can check amazon, I believe they might have one.
I love the bokeh and the pup!
Do you know of any bloggers that use Aperture by Apple? I bought it when I got my Mac. I know I can do the curve thing in Aperture, I just don’t know the ins and outs of it all :)
Hi! I love love love this photo, and the tutorial. It is super helpful, I haven’t spent as much time as I would like on my Photoshop. So this quick and easy tutorial is very helpful, thank you for helping me!
You make things so easy to understand. I love it. and a big ol Yes Please! to any Lightroom tutorials.
Nice tutorial. I actually learned something :)
Plus, anything with Boston terriers grabs my attention.
We have two.
Howie is a sweetie!
Merry Christmas :)
Or you could use fill-in flash when taking the photo.
Girl, your photo/photoshop tutorials are the. bomb. Thank you! Hope ya’ll have a great Christmas! :)
Oh my goodness, Amanda – that’s genius! I had no idea…………I fool around with a “levels” layer – trying to get my “Howie-equivalent” dark subject right – and then – mask back the “lights equivalent” – and I’ve never been happy with it…………I’m so going to try this!!!!! Thank-you so much!!
Warmly wishing you and Kevin – and those adorable fur-babies of yours, the very merriest Christmas ever – and – a 2013 that’s your best year yet!
Take care ……………. Rosemary
Love your tutorials and fonts. I will be back and I will be “Pinning” stuff. :)
Thank you!
I’m definitely bookmarking this baby! Thanks Amanda!
Awesome! Thank you for sharing!!! I don’t know what I’d do without Photoshop.
Any way to achieve something like this with Lightroom?
I with you, Southern Gal! I’d love more info for Lightroom. I typically in LR4 would increase the Shadows slider for something like this and also increase the Contrast but it’s not always perfect.
You totally can and it’s super easy! Would ya’ll be interested in a tutorial?
Yes, please. That would be fabulous!
Just use the dodge adjustment brush in LR. Adjust the exposure higher if the area you want to lighten does not get bright enough. To see where your brush is going on your photo, just press O on your keyboard. Hope this helps!
Thank you — clear and very helpful!!
Merry Christmas.
I love that Christmas tree bokeh, it’s dreamy and your subject for this tutorial is the sweetest. :-)