This is an easy, step-by-step guide with photos that will show you exactly how to use the Breville Barista Express to make the perfect cappuccino or latte!
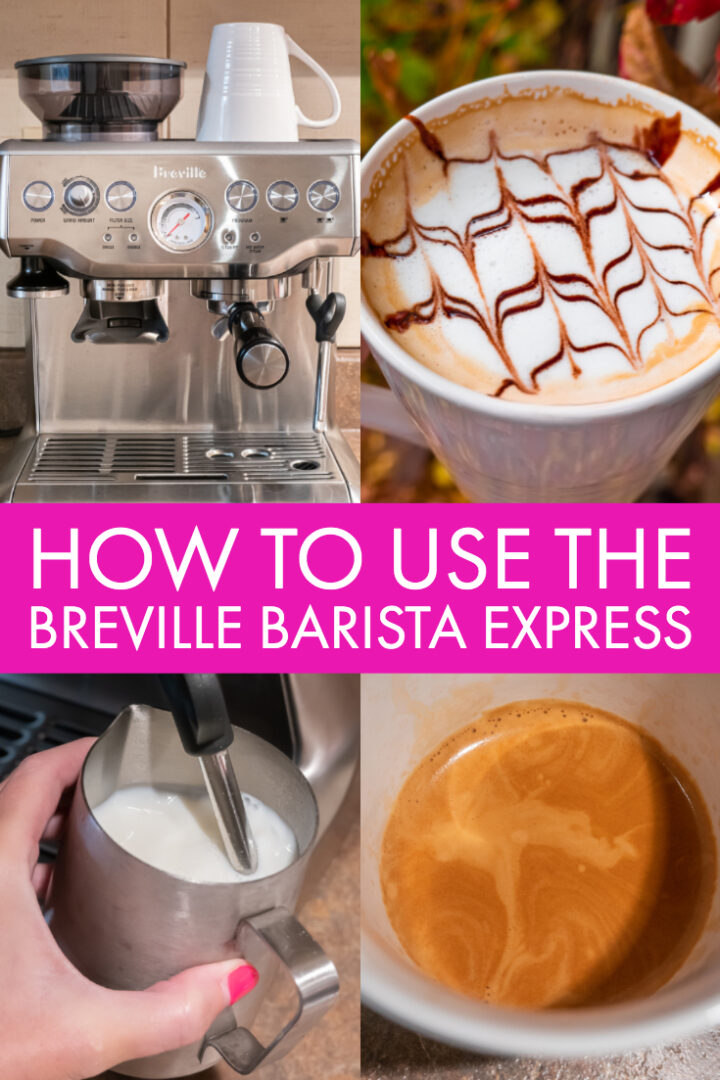
Breville Barista Express Tips & Tricks
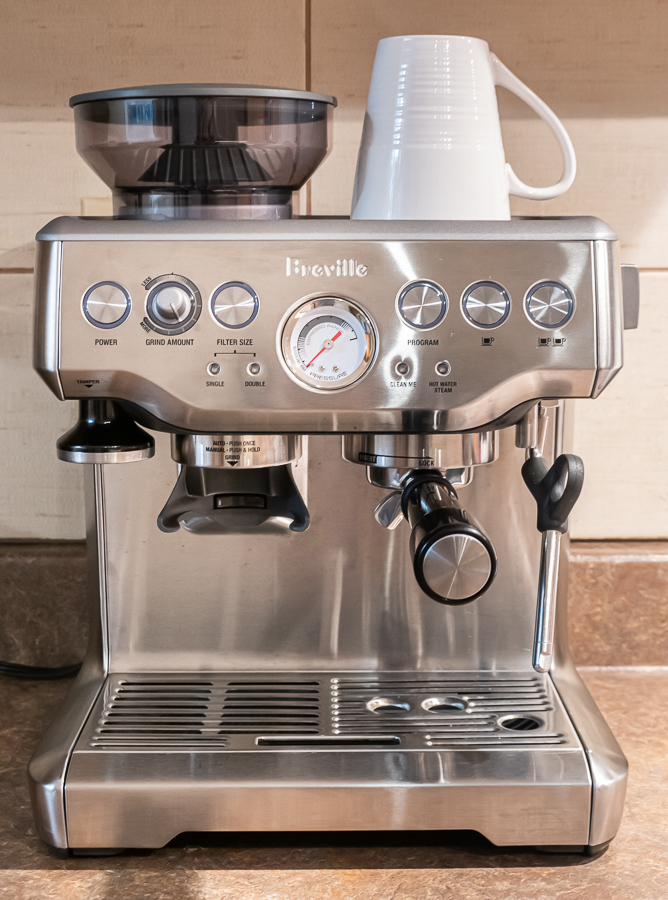
The Breville Barista Express (see it on Amazon) is ranked all over the internet as the “Best Home Espresso Machine“. But if you’ve never used an espresso machine like this before, it can be a bit overwhelming at first. The machine is not self-explanatory.
But don’t worry, if you just got this espresso machine, or you are thinking about getting it, we are about to guide you step-by-step how to use the Breville Barista Express to make your very first cappuccino or latte.
Please read this post so your new machine doesn’t frustrate you!
Breville Barista Express Step #1 — Read The Manual
First things first, read the instructions for how to put together your new machine. The manual will also show you few things you need to do before you use it for the first time, like washing all the parts, installing the water filter, and flushing the machine.
After your new espresso machine is all set up and plugged in, move on to the next step:
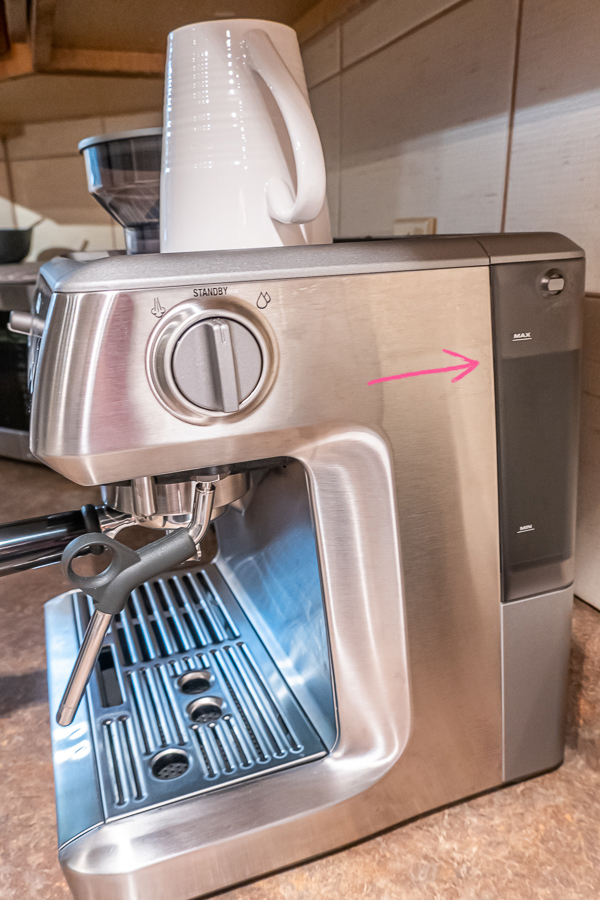
Breville Barista Express Step #2 — Check the Water Level
Every single time before you use your new espresso machine, before you even turn it on, do a quick check of the water level. Unlike a Keurig, the Breville Barista Express does not warn you when the water level is low or you’re out of water. So to avoid burning any parts, always do a quick check of the water level.
Breville Barista Express Step #3 — Preheat the Machine
After you turn it on, this espresso machine is ready very quickly. When you turn it on, it will make a bumping / knocking noise. This is normal. When all 6 buttons are lit up, the machine is ready to use. It takes less than 30 seconds.
However, it’s better if you can let the espresso machine warm up for 10-15 minutes before you actually use it, so all the parts are nice and hot.
If the parts are too cold, it can affect the flavor of your espresso. So if you have a coffee every morning, to get the best flavor, turn on the espresso machine as soon as you wake up, then go to the bathroom, start breakfast, etc, to give it a few minutes to warm up.
Also, keep your mug on top of the machine like mine — the top of the machine is a warming tray!

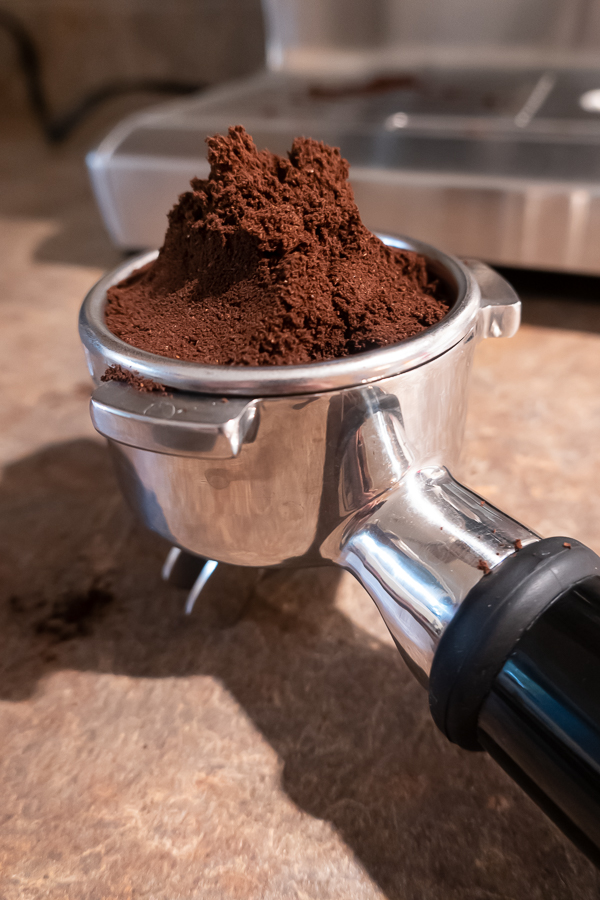
Breville Barista Express Step #4 — Add the Coffee Beans
After the machine is warmed up, add the coffee beans to the “hopper”. You don’t have to add a certain amount, just make sure you have “enough”. The amount pictured above will make about 3 double-shots of espresso.
What Kind Of Beans Are Best To Use In An Espresso Machine?
For the best espresso, use high quality whole beans that have been roasted recently. Try to find beans that have a “roasted on” date within a week.
The best flavor will come between 2-10 days after the beans have been roasted. However if you can’t find something that recent, coffee beans will stay fresh and keep much of their flavor until about 30 days after the roast
Always use whole beans, never pre-ground. Coffee beans lose their flavor and freshness much more quickly after you grind them.
Store your beans in a cool, dark place, preferably in an air-tight container like a ziplock bag.
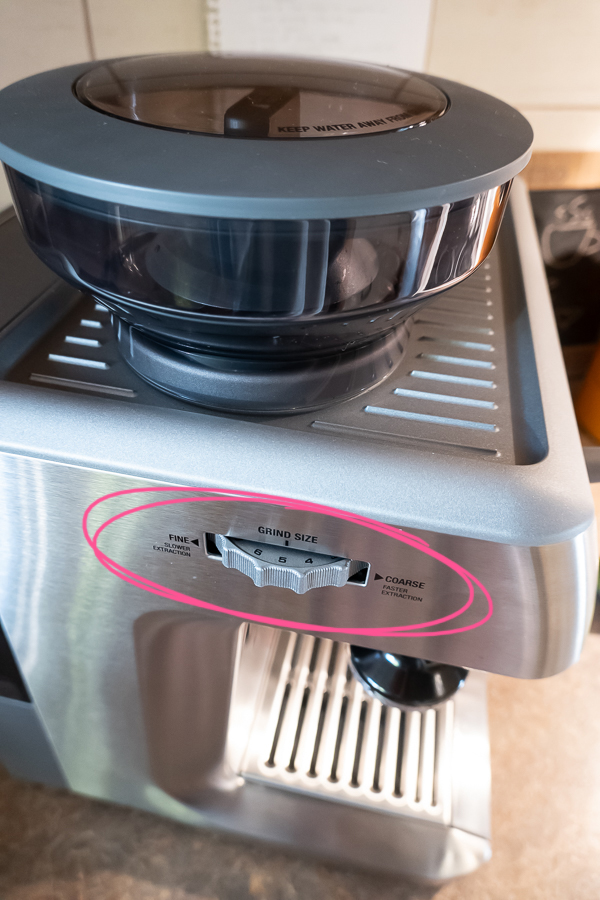
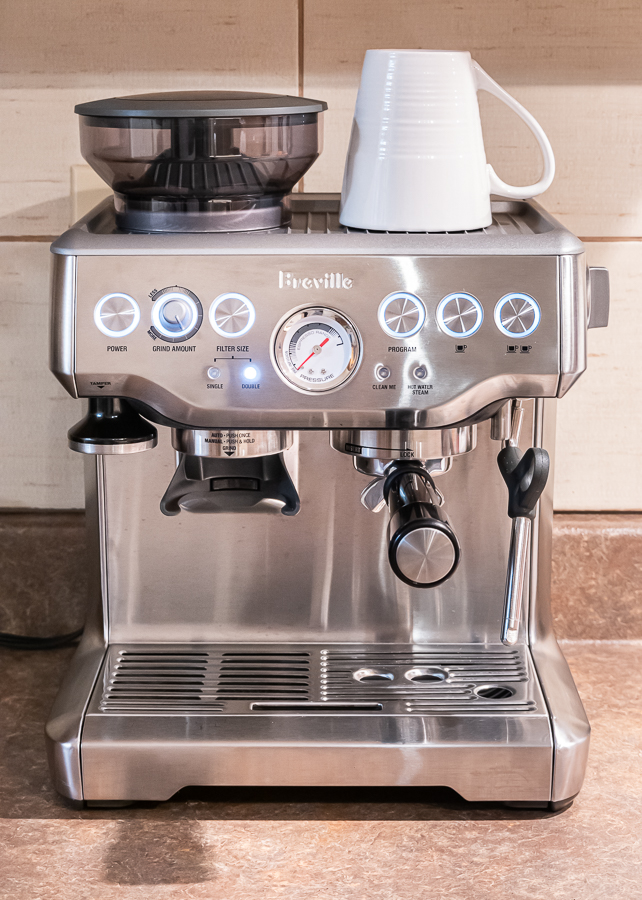
Breville Barista Express Step #5 — Set the Grind Size and Amount
Here’s where things can start to get a little overwhelming. To make the perfect espresso, you need the correct combination of three components:
- Grind size
- Grind amount
- Tamping pressure
This is mostly achieved by trial and error, and it is something you will have to adjust every time you use a new type of coffee bean.
HOWEVER, it’s pretty easy to figure out, so don’t worry! Im going to help you!
Grind Size
Set the grind size to 5 — this is the number Breville recommends. You probably won’t need to change this number.

Grind Amount
This is something you will probably need to adjust the first few times. But I’ll show you a trick that will make sure you get the perfect grind amount every single time!
For now, set the grind amount right in the middle, at the 3 o’clock position, as pictured above.
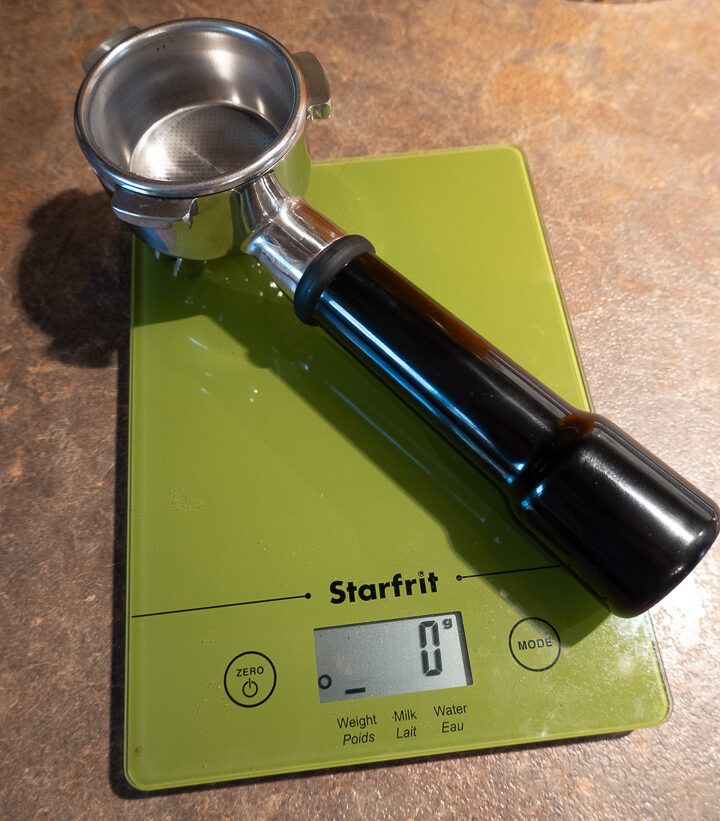
Breville Barista Express Step #6 — Weigh the Portafilter!
See that thing on the green scale? That’s the portafilter. That’s where the freshly ground coffee is going to go. Make sure it’s completely dry before you put any coffee in it.
- For a single shot of espresso, you want 8-10 grams of ground coffee
- For a double shot of espresso, you want 15-18 grams of ground coffee
If you weigh the portafilter first, then “zero” it out, you can ensure you have the exact right amount of ground coffee every time.
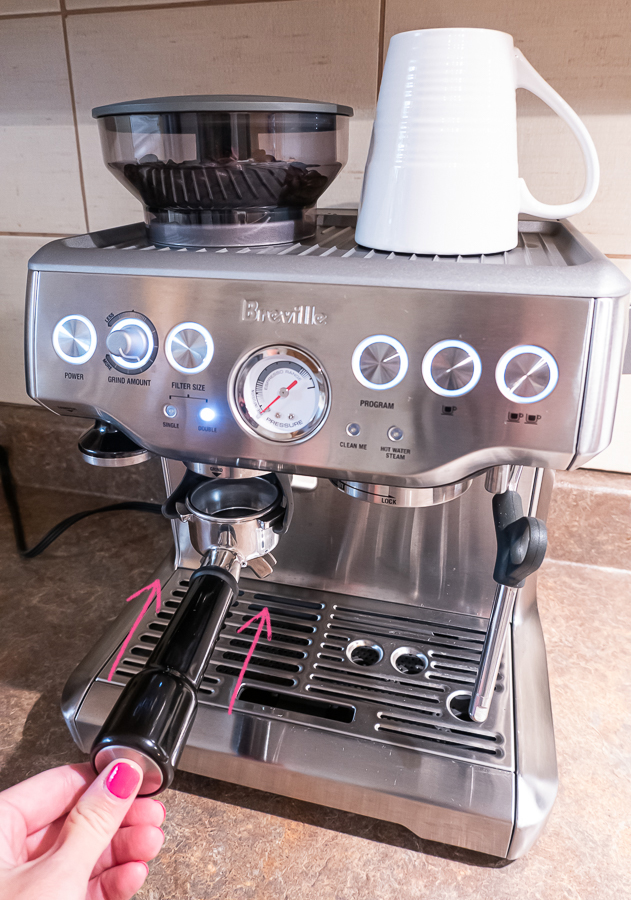
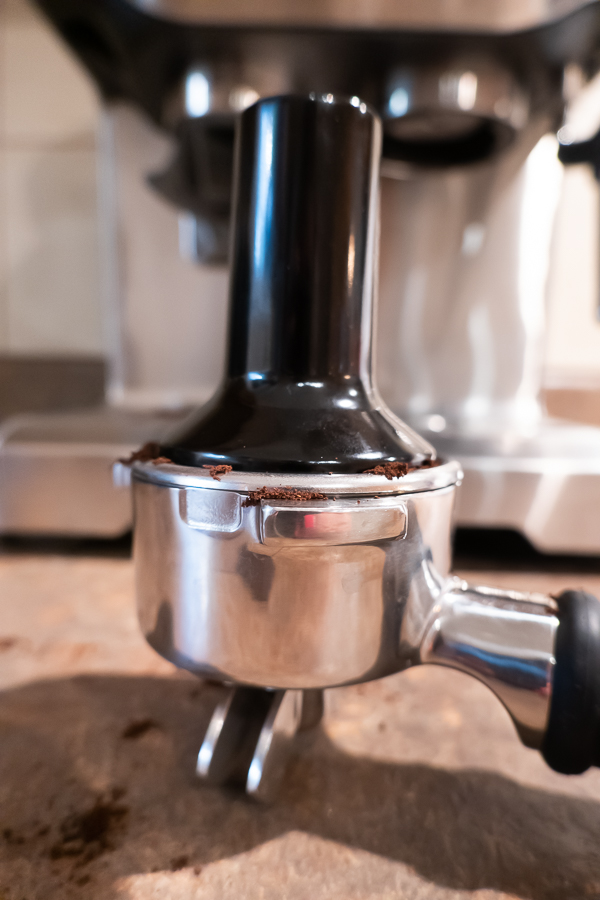
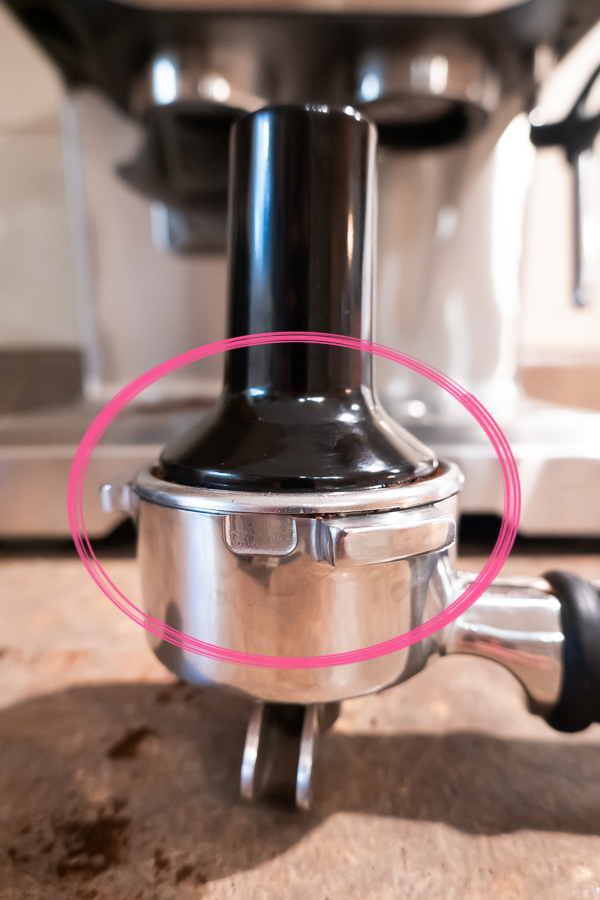
Breville Barista Express Step #7 — Grind the Coffee
Once you’ve zero’d out the portafilter, place it in the “Grind Outlet”.
Press the filter size button to select what size espresso you want, Single or Double. In this example we will be making a double shot.
Give the portafilter a quick push in, then release, like you’re pushing an elevator button. This will start the grinding.
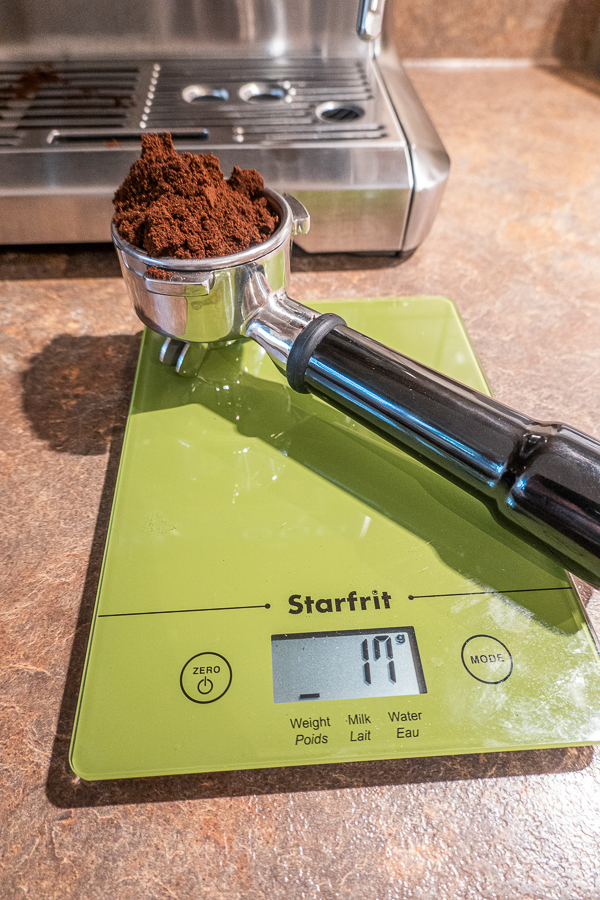
Weigh the amount of ground coffee you got. If you’re making a double shot and you got between 15-18 grams, you got the perfect amount! You don’t need to adjust the grind amount or add more coffee.
If you got more than 18 grams, take out a little coffee until you have 18 grams, and adjust the Grind Amount to give you less for next time.

If you got less than 15 grams, you can just add a little bit more. This time push in and HOLD the portafilter — don’t release. Hold it for a second or two until you get some more coffee, then release and weigh again.
Do this until you have between 15-18 grams, then adjust the Grind Amount to give you more for next time.
Breville Barista Express Step #8 — Tamp the Coffee
First, use your hands to push the loose coffee into the center of the portafilter so it doesn’t spill out when you tamp it.
Tamping Pressure
Tamping pressure is the only thing you really have to “trail and error” here. You definitely want more pressure than just pressing it down to get it even and flat, but you don’t need to Hulk out on it either.
If you don’t use enough tamping pressure, the pressure during the extraction process will be too low. And likewise, if you use too much tamping pressure, the pressure during the extraction process will be too high.
My recommendation is to press it down to get it all flat, make sure the coffee grounds are even and level, then give it a few extra pushes to tamp down, but don’t use too much force.
TAMPING TIP: If you twist the tamper at the end before you pull it out, it will help keep your grinds more level.
Clean all the loose grinds from the portafilter!
Be sure to wipe off all the excess grinds from the portafilter before you make your espresso! If there are any loose grinds around the portafilter, it will not “seal” correctly.
Breville Barista Express Step #9 — Run a cup of hot water
Before placing the portafilter into the espresso machine, press the 1-cup button to run a single cup of hot water into your coffee mug, then dump out the water.
This will stabilize the temperature of the machine and your mug. Remember if any of the parts are too cold it will affect the flavor of the espresso.
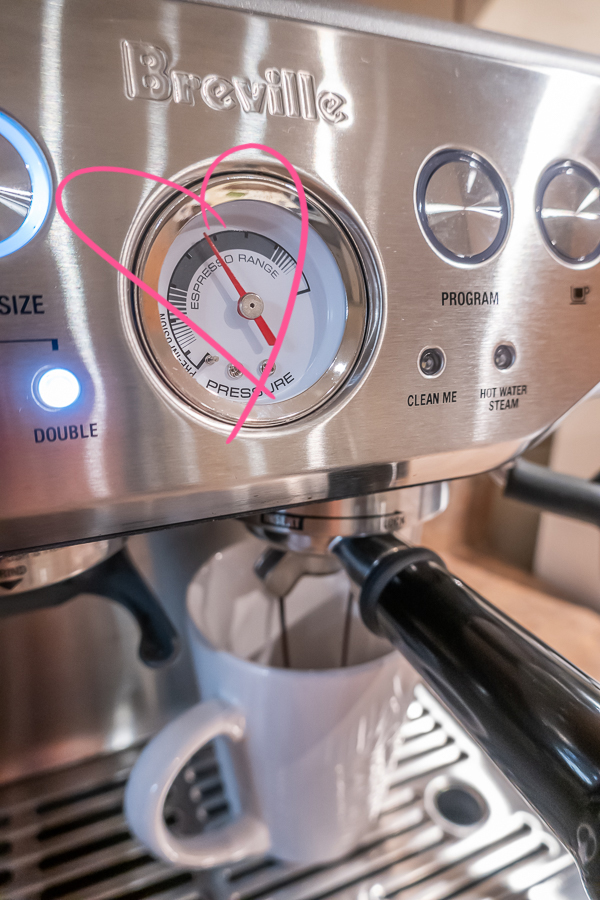
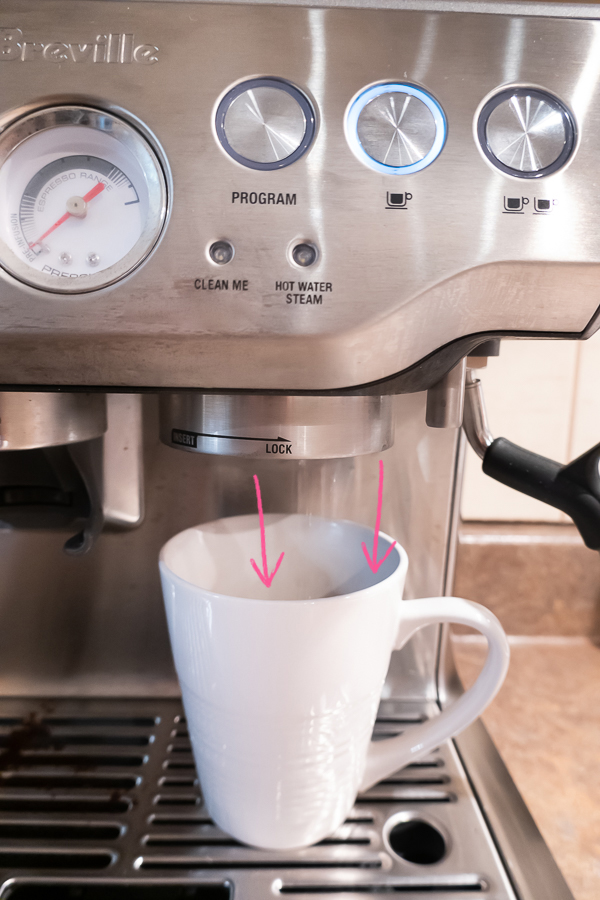
Breville Barista Express Step #10 — Extract the Espresso
It’s finally time to make the espresso! Insert the portafilter into the “Group Head”, where it says “Insert” then turn until the portafilter is in the “Lock” position.
If you are making a double shot, press the 2-cup button, then keep an eye on the red pressure needle.
It will take a few seconds, but if your needle gets in the grey “Espresso Range”, CONGRATULATIONS!!!! You made the perfect cup of espresso!!! :)
If the needle went under the range, try increasing your tamping pressure next time.
If the needle went over the range, try decreasing your tamping pressure next time.
Even if you didn’t get the exact right pressure this time, the espresso is still going to be good, so don’t worry. It’s just going to be even better next time!
Steaming the Milk
If you’d like to make a latte or cappuccino with your newly extracted espresso, the next step is to steam and froth the milk.
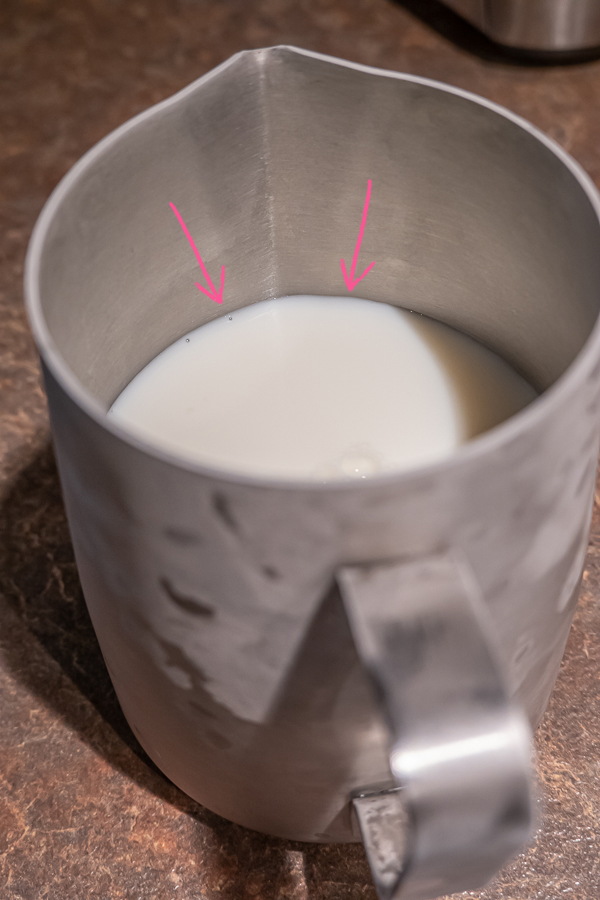
Breville Barista Express Step #11 — Fill the milk jug
This espresso machine comes with this handy milk jug. See the “V” shape that the spout makes on the inside of the jug? Fill the jug just until the milk touches the bottom of the V.
Contrary to the espresso machine needing all the parts to be hot, you will get a richer, finer froth if both the milk and the jug are as cold as possible. To help with that, I store my jug in the freezer. You could also store it in the fridge, right next to the milk!
For the milk, it’s better to use a higher fat milk (like whole milk) instead of skim milk.
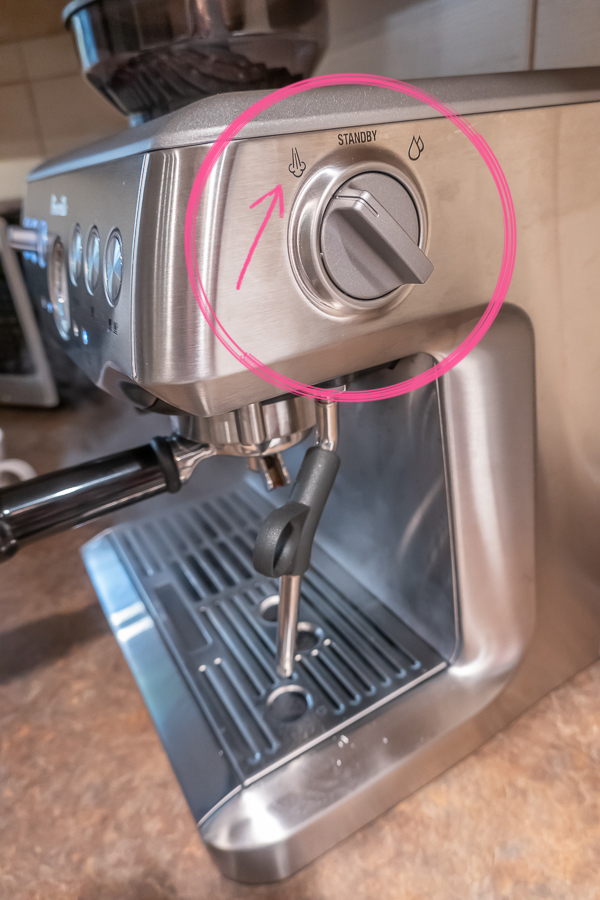
Breville Barista Express Step #12 — Purge the Steam Wand
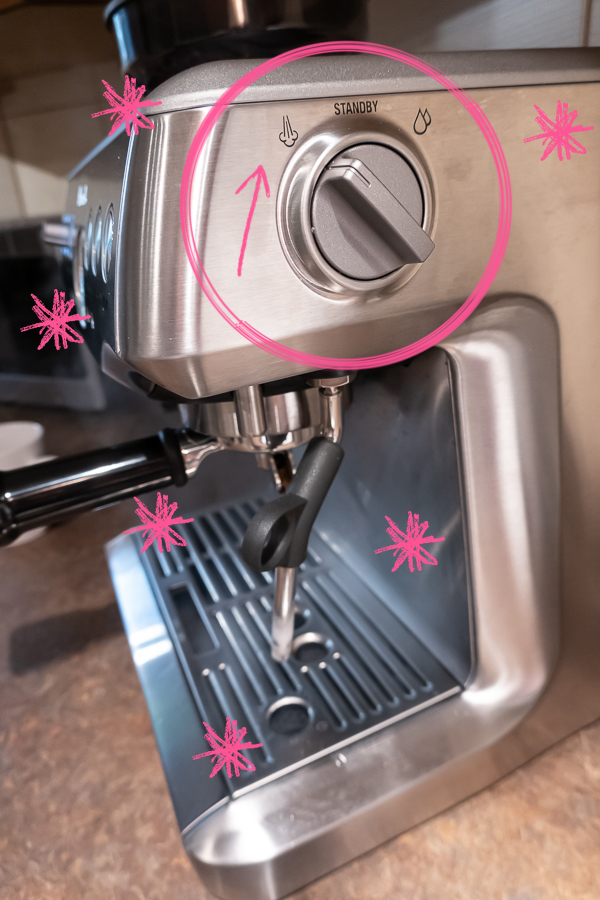
Every time before you use the wand, you will need to “purge” it first. Position the wand over the drip tray, and turn the dial to “Steam”.
Nothing will happen at first, but after 10-15 seconds, water will start to drip out, then it will turn to steam. Let the steam run for a few seconds, then turn back to Standby.
Quickly put the wand into the milk, then turn back to steam. You need to do this within 8 seconds or you’ll have to purge the wand again. You don’t want that water dripping in your milk!

Breville Barista Express Step #13 — Steam & Froth the Milk
The two most important things to remember to perfectly steam and froth the milk is Tip Position and Temperature.
Tip Position
Place tip of the wand so it’s just under the surface of the milk, about 1/4th of an inch.
If the tip is too low, the espresso machine will make a high-pitched screeching sound.
If the tip is too high, you’ll make giant bubbles and potentially splash yourself with milk!
Tilt the jug a little so the milk swirls around the jug, like a whirlpool.
Temperature
Hold the handle with your right hand and place your left hand on the bottom of the jug. (I couldn’t do this in the picture because I was using one hand to hold the camera!)
When the bottom of the jug just starts to be too hot / uncomfortable to touch, the milk is ready. Turn the dial back to standby.
You can tap the jug on the counter a few times and swirl the milk to break up any larger bubbles.
Breville Barista Express Step #14 — Purge the Steam Wand AGAIN
This may be the most important step of all! As soon as you remove the milk, position the steam wand over the drip tray again and turn the dial back to steam again. Let steam come out of the pipe for a few seconds to clean out any milk that may have gotten up in the wand.
Be sure to do this every time you steam milk! If you don’t purge the steam wand, the milk will burn and sour and every cup of milk you make from then on will smell and taste like burnt milk! Yuck! Be sure everyone who uses the machine knows to purge the steam wand after steaming the milk!
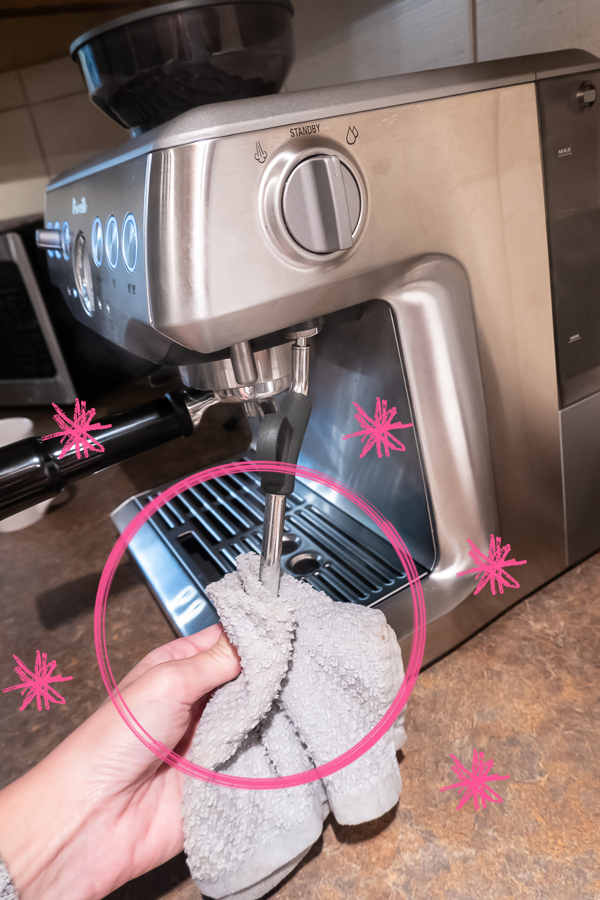
Breville Barista Express Step #15 — Clean the Steam Wand
The final step is just a bit of cleaning.
- Use a wet washcloth to wipe the milk off the steam wand. Do this immediately as it will be much harder to remove if the milk dries on!
- Wipe off any excess water and coffee grinds.
- Empty the coffee grinds out of the portafilter, rinse, dry completely, then place the portafilter back under the “Group Head” (where it says “Insert” and “Lock”). This way the portafilter will preheat when you turn on the machine.
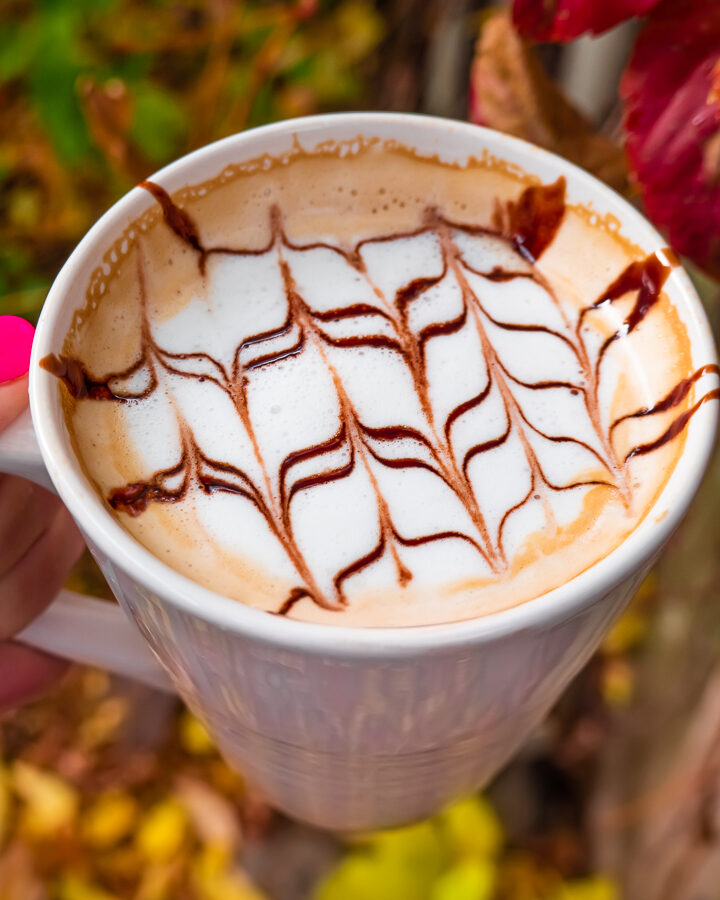
Easy Latte Art Hack!
Now you can start practicing your latte art! Or if you want to make it look super fancy with zero skill involved, just do a few stripes of chocolate syrup on top and swirl with a toothpick! Serve with biscotti and you’ll never get your friends to leave. You’ll be the swankiest coffee hangout in the neighborhood. ;)
Breville Barista Express — Buy it on Amazon!
Save this post on Pinterest!


Hi there
I find my coffee tastes amazing but a single shot brews 6oz of liquid! I measured the beans to be exactly the right amount I’m just curious why it brews so much… even when I adjust the grind size it still brews a lot
Any tips?
Not hot enough after making americano even after increasing water temp on machine as per manual.
Did you get a reply to your question?
Thank you for your informative post. I’ve recently bought this machine and have followed the instructions in the booklet. However, it seems to have a misprint and says use grind size 8. That must be why I’ve not got it sorted yet.
I’m back! Now I’ve made lots of coffee of varying standard but never undrinkable, I think I’ve got it sorted. I’ve bought a tamping mat (not expensive but it helps keep the portafilter level and steady, and protects my quartz worktops) and would recommend it. I can froth milk beautifully but haven’t got latte art under control yet. This machine is definitely a hobby but one worth pursuing.
We love our 3 year old Barista Express. However, the other day the button that is pushed to start the grinder was non-responsive. Where can we get a small switch or new grinder?? Everything else works great. Help!
The only way I can get enough water to come through is to drastically increase the grind from a 5-7 to a 12+, I loose the espresso strength then. Any ideas?
I should add, I am getting perfect pressure when ground at a 5-7, low pressure when 12 +.
What is missing for us with the Breville Barista Express: Simply does not produce a hot enough cup of coffee (Latte)!
When compared to a coffee/Latte from Starbucks or regular hot cup of coffee from the Kuerig, the Express still produces a Latte that is lukewarm /-: And yes this is what we’ve tried…
(1) Programming to increase the water temperature. Machine off => Press Program button => Then start button => Press Two cup button.
(2) Making sure the steamed milk is hot.
Q: How hot can you make the water; or, how many times can you use the programming method to increase the temperature?
What’s the average OZ of espresso should the double shot button produce? Mine does about 1 3/4 oz of espresso. Is this low? Normal? Can I make it give me more?
I’ve had my Breville Barista for about 10 months now and have taken OCD care of cleaning, wiping, and processing coffees (and cleaning again). Perfectly working until last descale procedure 2 weeks ago. Now, when I brew espresso, I have to depress the button (manual) to make the water stop extracting. It’s as if the machine is “stuck” in descale mode, unless I depress the button to stop running water thru my ground coffee in my portafilter group head.
Is there a hack to factory reset the water exit level, or is my 10 month old Breville in need of a possible repair already? Everything else about the operation and espresso results have been very consistent, up until this continuing water extraction issue.
Help!! Thx.
Just wondering if you found a solution to your problem as this is the same issue that I am experiencing.
My extraction will be only 8s, the needle did go up nicely. How to make the extraction timing correct? It should be at least 30s?
Yes, the article missed the ever important step of calibrating the pull. So, once you have placed the portafilter on the machine, press the program button, then when you’re ready to start your pull, press the two shot button (for two) and count out your perfect pull. Once you’re satisfied, press the two shot button to stop. Now the two shot button is calibrated. Cheers!
Still traying out the beans and flavour. First try with my Breville BES870BKS, the grind was good, but the coffee was watery, just kept on coming. I had to stop the machine manually. Is this a problem on some machines? Do i have to stop it everytime, as it does not stop on the desired output? Tried with1 cup or 2 cups, the outcome is the same.
Hi there,
I’ve had the Barista Express for about a week now and one thing that I noticed is the steam/hot water knob is hard to turn when I need stop the steaming milk process. Is this something that other people have dealt with and will it “break in” after more uses?
Hi! This was SO helpful! After several tries (and new beans), I finally got my espresso in the right pressure range! I have two questions though:
1) After I rinse out the portafilter, I can hear a bit of water inside it when I shake it. Am I supposed to get this water out each time? It seems like the only way to do that is to take the filter off and dry the inside, which is a lot of work. I seem to need to pry it with a screwdriver to get it off…am I missing something to make this easier? It’s not a big deal if I rarely have to do it, but if I’m supposed to dry that water out each time, that’s a pain!
2) When I fully tighten the bottom spigot part of the portafilter, the two spigots are no longer parallel to the front of the machine when I insert it to make espresso. They are positioned front to back (perpendicular to the front). Does this mean I overtightened it? Does it matter?
Hi
Have recently purchased Barista Express. Bought lavazza oro beans set 5 for grind and 3 o clock position for grind amount came out fantastic all great then bought Vittoria oro beans and can’t get it right! Changed dial to 1 finer still under pressure almost given up. What am I doing wrong. Wasting a lot of beans right now!
Use freshly roasted beans from a specialist coffee roaster, not beans from the supermarket
Pull the bean holder out snd vacuum whats inside. Then pull up the metal ring inside and twist to unlock. Remove the metal ring and twist to line up a smaller number smaller than the preset 6. I used 3. This is the burr setting. Reverse the steps and enjoy watching that espresso needle get in the sweet spot.
Did you find a solution??? I’m having the same issue with same brand beans!!!
Hi
Just came across you tutorial. Great job. I have n problem with mine. The machine is about 6 years old. But in the last month or two i have a problem with frothing the milk. The steam pressure is so high it blows the milk out of the jug. Any tips?
Thanks
Great instructions thank you. I have done all of this and followed a number of other posts but every cup of coffee I have made is sour and undrinkable …. any suggestions??
This was super well done and thank you. Even though I’ve brewed home espresso now for about 20 years, this was very well written and explained.
The only thing I would tell newbies is:
ALWAYS steam your milk FIRST.
If you brew shots (technically referred to as “pulling shots”) right away then let them sit for longer than 8 seconds, they “die.” Dead shots are bitter.
If you use clear shot glasses, you’ll see the beautiful, carmely-looking appearance of the shots. If you’ve ever poured a glass of Guiness beer, they will look the same, and they will have a sweet-ish flavor and are optimal for use. As seconds tick by, you’ll see the caramel color slowly disappear and they’ll turn black. They are now dead and will taste bitter. At Starbucks we always dumped these shots and re-brewed fresh shots.
** Note: If you put a drop (literally) of water in shots, you can “save” them a little longer. If you use flavoring and you put flavoring in your cup 1st, then pour the freshly brewed shots into the flavoring, it will save the shots and keep them from being bitter.
In the end, use this process:
1. Grind your coffee into your portafilter, tamp and set aside- RESIST the urge to put the portafilter into the brew head while you steam your milk because the brew head (it’s technically referred to as the grouphead) is crazy hot and will burn the coffee, giving it a bitter flavor.
2. If you’re using a flavor like Vanilla for a latte, put that into your cup. Set aside.
3. Steam milk to temp (140°- 165°) Set milk pitcher aside.
3a. Prime your machine by pushing and holding the double shot button until there’s no steam coming out – only water, then wait til the gurgling sounds stop and it’s resting quietly.
4. Now insert portafilter into brew head and pull your shots.
5. Immediately pour shots into your waiting cup.
6. Add milk to the shots, top with the foam, and voilà, you have a delicious latte for a fraction of the cost and better quality than most mom and pop stands!
I hope this helps.
Enjoy
Hi! May I know if I can set the same grind size at 5 for Barista Pro to make a perfect latte? :)
Hello, I purchased this machine a couple of weeks ago. It’s been really great, however, during pre-infusion the coffee does flow through (generally quite dark) and then goes to the middle of the desired pressure gauge. Is this normal for this machine? I had read that no espresso should flow through during pre-infusion. The tutorial was very helpful!
I’m having the same issue when I learnt on this machine at school it was perfect. Now I cant seem to get rid of this extra flow once I bought my own. My only possible explanation would be tamping pressure.
New to actually making espresso myself – are you using the pressurized or non pressurized cups in these instructions?
Thanks for this very helpful tutorial! Great job. I have a question though. I noticed that compared to the instructions that come with the machine, you have left out the step where they say to use the blade thing-y to level off the ground coffee after you have tamped. Is this an oversight on your part or do you recommend skipping this step?
I’m still experimenting and often get ‘under extraction’.
Hi Paul! I’m not sure if you’ve already gotten an answer for this, but I also struggled with underextraction for a while. I never used the razor and don’t think I will. I fixed the extraction bit by tamping more evenly and harder. Hope this helps. Good luck!
Thank you for your tutorial. My tray is filling up every other day?? Thankfully it warns you when its full but do you have any idea if I need to clean something to make that slow down? Advice? Thanks so much for your time!
Hmm… How many cups a day are you making?
I tamp, then use the Blade to scrape the inside of the portafilter so it helps with keep the the group head or brew head cleaner. Basically that’s all I use it for.
3 year old BES870XL. The extractor will not stop. Need to stop it manually. Have cleaned, decalcified regularly. Have changed out the silicone ring and also cleaned the screen. Have reset to original factory settings as well as tried to set time of extraction manually. No luck. Any suggestions?
I would contact Breville!
My first shot (double) is perfect, but when I try a few minutes later, the espresso just dribble out or not at all. What should I do to get the second as good as the first?
I’ve run into the same issue. Do you let the machine warm up before you use it? If not, it could be the heat difference between the first shot and the subsequent shots.
If you leave the machine to warm up, you will eventually find the portafilter is actually hot to the touch. This is the time to pull that shot. If the first shot is choked when you’ve warmed the machine up, then you know it’s the heat difference causing it, and can just dial in your grind for a hot shot and wait for the machine to warm up in future.
Are you replacing the grinds each time?
I’m having a new problem where the pressure is in the correct range (On the higher end) but there is too much liquid coming out. It’s probably 4 oz for a double shot. Any suggestions?
Potentially change your grind to something a little coarser to bring the pressure down a tiny bit. If you place a set of scales onto a chopping board, you can sit this on the machine under your cup, and zero it out. The hit program and the 1 or 2 shot button to extract; when you’re approaching your desired coffee amount, hit the button to stop. Note it will keep going up after you push the button for the coffee that is still ‘in the air’ and not in your cup, so this can be a bit of trial and error to stop the extraction to get your number right on.
Thanks for the tutorial
Picked up a Breville Barista that does every perfectly, except the temperature of the pre-heated brew head water is only 174 degrees F. The manual says I should expect closer to 200 degrees F. I’ve preheated EVERYTHING, it’s a brand new replacement from Breville (nice folks), and I’ve pre-programmed the plus 4 degree double shot. Using an accurate digital thermometer, I cannot achieve anything close to 200 degrees F so my pulled shots aren’t quite extracting all the coffee flavor profiles. This is my second machine and everything else works as expected. Just underwhelming espresso. Any hints on how to achieve a hotter extraction? My water is soft and filtered and I’ve pre-warmed the machine, portafilter, and cup, still no dice on achieving anything close to 200 degrees. :-/
oh yes, the extraction is 30-35 sec, the grind gauge and pressure at extraction is near perfect, the pulled shot looks fine, and the Lavazza beans are less than one week old (after opening package).
Did you find a solution to the low temperature extraction? I have the same issue, and have also tried the same solutions.
Hey! Love this article! I just got a a Breville Barista express for Christmas and I’m having a hard time finding the right flavor for the coffee. I have lavazza caffe espresso beans and every time I grind and pull a shot (I’ve tried every grind setting!) and it comes out so sour or bitter. Water is filtered and the pressure is always good. What am I doing wrong here? Help me! Thanks in advanced!
Maybe there’s a problem with the beans! I have never tried that brand before. Do you have another brand you can try? Do you have a coffee shop near you that could recommend a type of bean for you? Crossing my fingers for you!!
Still no luck after all these steps…
Try changing the grind size!
If there is too much pressure, make the grind size number bigger
If the pressure is too weak, make the grind size number smaller
Good luck!!!
So I just got my machine and I have been messing with the grind amount and size. No matter how I adjust the pressure gage needle does not move! Is it me or is maybe something wrong with the machine?
Hmm, for more pressure you need a finer grind size (try the smallest number, like 1) and weigh your grinds to make sure you have exactly 10 grams for a single shot or 18 grams for a double shot. Good luck!!
Hey Katie, you might have solved this by now, but I thought I’d mention a similar problem we had with dad’s machine. When assembling his machine, the factory didn’t set the internal adjustment on the burr grinder correctly, so a grind setting of 5 behaved like 13 and we just couldn’t get it fine enough for the pressure gauge to move. Find the bit in your manual that shows you how to adjust the inner burr and set it finer. Takes a little while but it turned dad’s machine from ‘broken’ to perfect. Good luck.
I have the same problem, and to solve it i just use the double wall (pressurized) baskets. Pulls a good shot within espresso range everytime. I think i burned through 500g of coffee beans experimenting with the grind size, amount and tamping pressure and NEVER got it right :( any suggestions aside from using the double wall baskets?
This tutorial is absolutely awesome! My little Delonghi died a couple of weeks ago, and after a lot of research settled on this Breville. I didn’t have to do any calculations with the Delonghi, so this is all new to me. Your instructions make the whole bewildering process manageable. I’ve been doing all the preliminaries all day so hope I’ll get my first cup of coffee tomorrow morning!
Enjoy your new machine!! :)
Excellent information!
i have just got a coffee espresso, and after reading your blog post i am very happy that got too much information thanks for sharing.
I just got my machine. Thanks to this tutorial, I was able to pull a pretty great shot (in the proper pressure range) my first try! Thank you!
That’s awesome!! So glad it helped!!
I was having such a hard time trying to get my shot in the espresso range. With your tutorial it made it so simple and easy that I made a perfect cup of espresso. Thank you so much for taking the time to do this.
Yay!!! So glad it helped!! :)
EXCELLENT tutorial!!!
You make it sound so easy!