With Labor Day weekend coming up, I know a lot of us are going to be out there taking pictures! Since we have a long weekend to practice, I wanted to share with you this basic DSLR beginners photography guide. If you have an SLR camera and are nervous to take it out of auto mode, this is the tutorial for you.

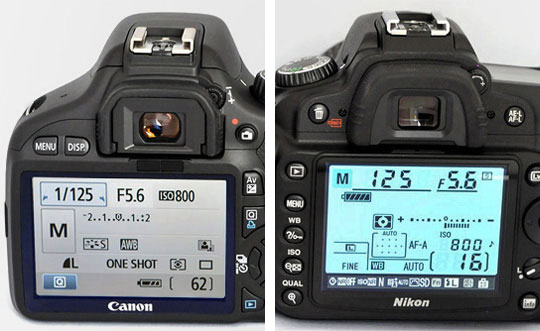
Left: Canon T2i. Right: Nikon D40.
This Photography Tutorial Will Show You How To Take Great Pictures
You may have heard words like aperture, exposure, and shutter speed and wondered just how on earth they come together to give you a better photo. I’ll give you a brief introduction on what they do and how they affect your photos turning out too bright, too dark, too blurry or JUST RIGHT. :) This guide will show you how to get the most out of your SLR camera and give you confidence to take it out of auto mode in no time!
What Is The Aperture Priority?
To start, let’s put your camera in Aperture Priority mode or Shutter Priority mode. On a Canon, this is AV or TV. On a Nikon, this may be represented as A or S.
Let’s talk a little bit about Aperture. On both cameras above, the aperture is set to 5.6.
Photos taken with a low aperture let in more light, allowing you to take pictures in situations where there is not much light (like indoors and at night).
A low aperture will also give you a shallow depth of field. You know, the photos where one thing is in focus and the background is blurred?

Canon 50mm f/1.8
f/1.8
1/200 sec
ISO 800
In the photo above, the aperture was set to 1.8, a low aperture. One earring is in focus, the rest is blurred.

Canon 24-70mm f/2.8
f/16
1/60 sec
ISO 100
In this picture, the aperture was set to 16, a high aperture, allowing everything to be in focus. However, when you take pictures with a high aperture, you need to have a lot of light, like outside during the day.
Note: Depending on what lens you have, you may not be able to set your aperture much lower than 3.5. And at 3.5, you may not be able to achieve much of a blurred background. If you like the blurred background look, you might consider purchasing a lens with a low aperture.
Now you try!
Turn the dial on your camera so that you are shooting in Aperture Priority mode. That means that you will be setting the Aperture, and the camera will automatically adjust the shutter speed. The camera will attempt to give you a correct shutter speed so that your photo turns out just right- not too bright, not too dark.
Set your aperture. In most cases, you can change the aperture by turning that little black dial on top of the camera, but double-check your manual if you can’t find it.
When To Use A Low Or High Aperture
Set it to a low aperture if you want a blurred background, or a high aperture if you want everything to be in focus.
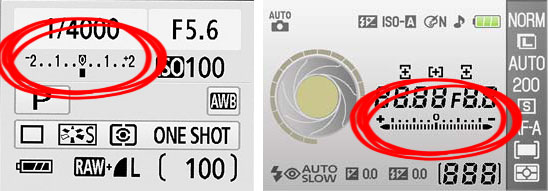
Left: Canon XSi. Right: Nikon D40.
Look on the LCD screen of your camera for a grid that looks like the image above. That’s your exposure. The exposure determines if the picture is too bright or too dark. Usually when it’s set to 0, that’s just right. In Aperture Priority mode, it will always stay at 0 unless you specifically tell it to move. (Check your manual for setting the exposure compensation.) If you tell it to move higher (to the right of the 0) the picture will be brighter. If you tell it to move lower (to the left of the 0), the picture will be darker.
Try taking a few pictures in Aperture Priority mode with the exposure set to 0. If the pictures need to be brighter, move your exposure to the right a few notches, until it looks right to you. I like bright pictures, so my exposure is usually set above 0! :)
Note: Be sure to keep an eye on your shutter speed as you do this. See the number 125 in the picture above? That number represents the shutter speed. As a general rule of thumb, you don’t really want to let the shutter speed get below 50, unless you have an extremely steady hand. If the shutter speed gets below 50, the camera cannot take the picture fast enough to compensate for the shakiness in your hands, so the picture will be blurry. If the shutter speed is getting low, try using a tripod or table to steady the camera, or lean against a wall, door frame, or tree to steady yourself.
If you find it difficult to get a high enough shutter speed when trying to take pictures inside, you can try setting your ISO higher…
Your Camera’s ISO Setting
The lower your ISO (100-200), the smaller amount of light your camera will use. So if it’s a really bright sunny day and you’re taking pictures outside, set your ISO to 100. The higher you set your ISO, the more light your camera will use. So if you’re trying to take a picture inside without a flash, and need more light, you can try setting your ISO to 800 or higher to see if you can get a high enough shutter speed to hand hold your camera. The catch with using a high ISO is that it makes your pictures pretty grainy, and it shows up REALLY bad in reds and oranges, so I always try to use the lowest ISO possible.
How To Set The Shutter Priority
Now turn the dial on your camera so that you are shooting in Shutter Priority mode. That means you will be setting the shutter speed, and the camera will be adjusting the aperture. Shutter speed is how fast the camera records the picture.
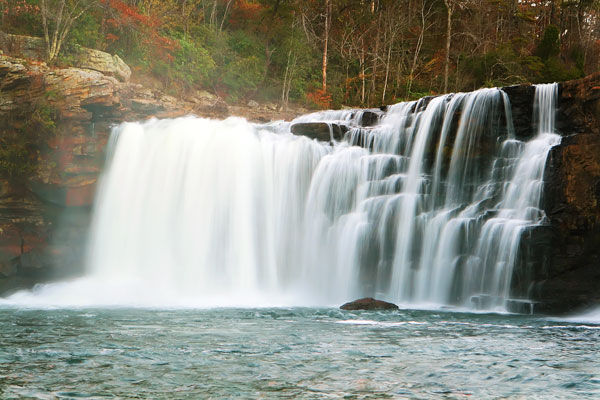
Canon 24-70mm f/2.8
f/8
1/4 sec
ISO 100
In the photo above, the shutter speed was set to 4. That’s a slow shutter speed, allowing me to capture the movement of the water. A tripod was used to take this photo.
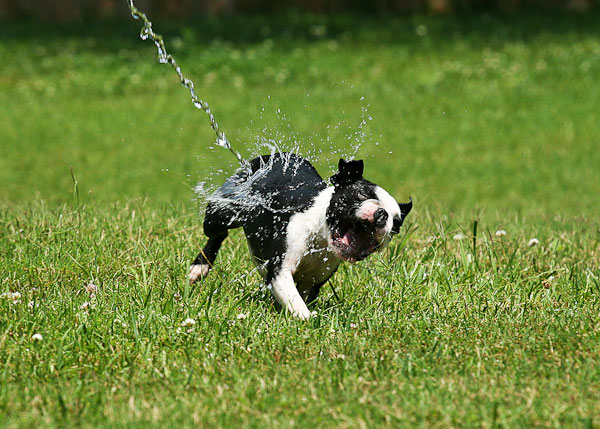
Canon 70-200mm f/4L
f/8
1/640 sec
ISO 200
In this photo, the shutter speed was set to 640. That’s a fast shutter speed, allowing me to stop my boston terrier (and the water!) in his tracks!
How To Change Your Shutter Speed
To change your shutter speed, you will probably use the same little black dial you used to change your aperture. When set in Shutter Priority mode, the dial will control your shutter speed. Turn it to the left for a slower shutter speed and to the right for a faster one. I generally keep my shutter speed around 125 when taking portraits of something that’s going to be relatively still. If there’s movement, you might want to go higher.
Note: Be sure to keep an eye on your aperture as your change your shutter speed. If your aperture number starts flashing, that means that the shutter speed you selected is too high to or too low to correctly expose the picture.
What Happens If Shutter Speed Is Too High?
If it’s too high, that means you don’t have enough light, and the aperture can’t go any lower to allow in more light and your image will be too dark. You need to lower your shutter speed until the aperture number stops flashing. That means the picture will be correctly exposed again. (You can also try increasing your ISO to compensate.)
In rare cases, your shutter speed may be too low (say you’re trying to take a picture of a waterfall in bright sunlight). That means you have too much light, and your image will be too bright. You need to set your shutter speed higher until the aperture number stops flashing for the picture to be correctly exposed. (You can also try decreasing your ISO to compensate.)
Canon 85mm f/1.8
f/1.8
1/250 sec
ISO 400
How To Get Your Camera To Focus Properly
If you’re having trouble getting your camera to focus on exactly what you want it to focus on, you might want to take a look at the AF Selection. If you’re shooting with a low aperture, this can sometimes be a real problem. Have you ever taken a picture and the camera focused on the background, and not the subject?
Check your manual on how to set the AF Area or Auto-Focus Area. If your camera is set to “auto selection”, your camera will attempt to “guess” what you’re trying to focus on, and automatically choose what it thinks you want. I get a lot of out-of-focus shots that way! Sometimes I like to change my camera to “Manual Point Selection”. That means the camera will always focus on one spot. I set mine to focus right in the middle, but you can change it to any point, whichever one you feel most comfortable with.
When set to Manual Point Selection, your camera will always focus in that one spot. If you press the shutter button halfway down and look through the viewfinder, the focus point you selected should highlight, and you will probably hear your lens focusing. That means your lens is focused on that one spot. Now sometimes, just because it’s focused in that one spot, doesn’t mean the picture is framed exactly how you want it. Just keep the shutter button pressed halfway down and move your camera until the picture is framed the way you want it. (Just don’t move any closer or further away from the subject! :)) Then press the shutter the rest of the way to take the pic. With practice you will be able to do this very quickly, and you’ll always know exactly what you’re focused on.
How To Use Manual Mode
You’re almost there! Get a lot of practice shooting in Aperture Priority and Shutter Priority. Some people will say that Aperture Priority mode is better than Shutter Priority mode and you should never use Shutter Priority. I disagree- they are both there for a reason and can be very useful in their own ways in different situations. With practice, you’ll learn which situations call for which shooting modes. Is a nice background blur or having everything in focus more important? Use Aperture Priority. Is capturing speed more important? Use Shutter Priority.
After mastering Aperture Priority and Shutter Priority, it’s not that much of a leap to go to fully Manual Mode! To shoot in Manual mode, turn the dial on the top of your camera to M. Check your manual to see which buttons now control you shutter speed and aperture.
Left: Canon XSi. Right: Nikon D40.
After all your practice in Aperture Priority and Shutter Priority, you are probably familiar with what shutter speeds and apertures you prefer. Now you can put them together! When changing the shutter speed and aperture, be sure to keep an eye on your exposure. You normally want to keep your exposure right around 0. Again, most of the time, I keep mine between 0 and 1 because I like brighter pictures. :)
Photography Recommendations For Beginners
Any number of shutter speeds and apertures will get you a “correct” exposure of 0. Which one should you use? The book Understanding Exposure by Bryan Peterson is a great resource. After you’ve mastered Aperture Priority and Shutter Priority modes, get this book and read it cover to cover. It gave me a deeper understanding of my camera and SLR photography, and explained everything in small words that I could understand! It also gives real life analogies that just made things I had previously heard, but not yet grasped, *click*. I noticed an overall improvement in my photography from day one.
One of my all-time favorite lenses is the Canon EF 50mm f/1.8 lens. It’s a prime lens, which means it does not zoom in and out at all. This was hard for me to understand until I got my first prime lens. But it doesn’t move at all! :) If you want to zoom in or zoom out on your subject you have to move closer or further with your feet! :) It’s a great lens for taking pictures indoors, because the low aperture (1.8) will let in a lot of light. The low aperture will also give you a beautiful blurred background.

Canon 24-70mm f/2.8
f/8
1/500 sec
ISO 100
My Favorite Camera Equipment
Photos taken on kevinandamanda.com use the following equipment.
Canon 7D. My camera. I upgraded from the XTi and I couldn’t be happier. The white balance is excellent! And the auto-ISO feature is so convenient. It can also take 8 pictures per second, which is fun when taking pics of our two boston terriers.
Canon 24-70mm f/2.8 lens. This is what I call my “go-to” lens. It’s the lens I take with me when traveling. When I can only have one lens, and I’m not sure what kind lighting or space situation I’ll be up against, this is the lens I want in my arsenal.
Canon 50mm f/1.8 and Canon 85mm f/1.8. I normally use these two lenses for portraits and food photos. The low aperture gives me that super-blurred background, and allows me to take pictures in low-light situations (like my kitchen!). The 85mm zooms in a little closer than the 50mm, which means I have to be farther away from the subject than I do when shooting with the 50. So if space is an issue, I use the 50. If space is not an issue, I use the 85, because it gives a slightly blurrier background than the 50.
Got it? 50. 85. Okay.
So, those are my favs, but I do have a few more. :) See our Amazon Store for my complete Camera Lenses & Equipment Info. The most updated equipment info can always be found there!
______________________________
Have a great Labor Day Weekend! :) We’re going white water rafting with some friends… it’s my first time. Wish me luck!! I’ll be back on Monday with a follow-up to our Chicago pics.. where we ATE! :) Including my favorite place we ate all weekend.
Give this tutorial a try over the long holiday weekend, and show me your pictures when you get back! :) Talk soon!


Thanks for sharing was really soo helpful
Thank you so much for posting this! I feel like I understand my camera so much better now! I plan to practice this and hopefully have much nicer pictures!
Nice I don’t know that one dslr can use like this
Thanks a ton for posting this tutorial in very easy to understand and relate to terms. You are a true blessing for those of us who really want to learn about our cameras, but are to intimidated by all the tech talk and even where to begin.
So glad it was helpful!
Thank you! I really found your article incredibly useful! When I can afford more lenses, I’ll be visiting your Amazon store first of all!
Hello, this website really helped me
I certainly could’ve used this guide when I got my DSLR. I pretty much had to fumble my way through the whole thing and figure it out myself. It’s not so bad though – it was surely a learning experience! ;)
I’m thankful that i found this tutorial, This is awesome tutorial, and so much nicely explained even completely beginner to photography can understand, Thank you guys for making it, It was very helpful
Thank you so much for this.. It’s educative.
This was very useful. Thanks for sharing.
An older article now but still a good basic primer for DSLRs.
I just got my first DLSR camera for Christmas and your blog has helped guide me in the right direction, thank you!
Thank you for posting this! But how do I change my ampture? I have a canon rebel dslr thanks again!
Hello Kevin, It is so attentive session for me as I am very new to photography but badly admiring to be..!
I am going to by a DSLR camera, which one you will prefer Canon or Nikon..? apart from that what is your comment on a Nikon D5300..? I think it is an entry level equipment..!
This post should replace the manual guide haha! Thanks so much for this :)
still useful in 2016! thanks a lot!
Thank you so much for posting all this info about the Canon cameras! I’m just now really getting into exploring and shooting with my Canon Rebel Txi and this has been so helpful!!
Fantastic article!!!
You guys blew my mind away. I came here to find some information about cinematography, but I found a gate that opened my mind for photography world. I guess I need to master my photography skills first, if I want to become a better cinematographer. I have to understand the very basics of my camera and how to get a clean high quality professional looking picture.
I have Canon EOS 700D and it’s my first camera :)
This was a great little explanation! Short and sweet and covered everything i wanted to clarify in simple language! I’m gonna try this out today. Thanks!
Hi there, this was a super helpful tutorial and helped me understand my camera a lot better. I just has a quick question for you guys! I’m going to try and do my own cake smash session with my one year old daughter :)
I will be doing it outdoors (somewhat shaded area/trees). I was wondering what the best settings are to use on my camera? Should I shoot and focus more on the shutter speed setting considering she moves a lot? If you guys could help me out that would be great.
Thanks!
Great tutorial! I was too hardheaded to take the time to step back and learn the basics before shooting with my Nikon. But it was an easy yet inspirational read for taking better photos. Thank you!
your tutorial is fabulous!!!had a yashica 35 mm….brand new to digital slr photography with my Nikon d5500….still unsure as to what other lenses I want besides my 18-55 but y’all have helped tremendously…..thanx again…HAPPY SHOOTING!!!!
Best beginner camera post I’ve read so far. Simple explanation using understanding language to convey instructions. Must watch for any beginner.
Nice easy to understand
Great article!
Thank you so much for teaching this. Actually its so helpful . I learned a lot from you.
Thank u
hi, hw r u ..?
I purchased Nikon D7000 from Chicago but I lived in Lahore Pakistan. I read your informative blog and articles, but I could not find button or options in camera to change the setting as per your instructions. I m new user of DSLR and may be I m confused now.
kindly advise me
soulat raza
0092 3454262294
soulatraza83@gmail.com
Great reading, thanks.
Something I’ve been getting to grips with is background blur isn’t only about aperture but about distance to the object, i.e. if you move in close with a higher aperture the background will still get blown out.
I’ve been getting great results with a Canon EF 70~200 lens but only realising the meaning between f4 (which is what I have) and f2.8… as well as the price difference – http://www.cameracompare.com.au/Search?q=canon+ef+70+200+lens&min=800&max=
Is it worth the extra bucks!?
That’s a great tutorial. Though the post looks at Canon model, it has given a real insight on all the technical parameters of a DSLR. Thank U once again.
Thank you so much for taking the time to give this tutorial – it is extremely useful!!! Love it!
What a great service you are doing! Thanks. I just got my first Nikon DSLR D3300 and am looking forward to learning all the fundamentals, etc.
I just purchased my first (entry-level) DSLR. A Nikon d3300. I also ordered a 35mm f/1.8 lens. THANK YOU so much for this quick tutorial. It’s so confusing and this just cleared up so much! Can’t wait to start practicing.
Thank you very much I Love It <3
tnx a lot. it was very helpful for me.
FAB tutorial. I got so engrossed I deleted ALL my pictures off the camera playing with the settings :(
Thanks for your information and its really helpful
great tutorial! thank you :)
I came across this post after enjoying your Paris trip and all the eats from Scotland and London. I cannot tell you how appreciative I am for all this info. I have asked everyone, even begged but no help. So I was beyond words, this has made my day actually my whole year! You explained it in terms that I could understand and that in itself is so valuable. I love your blog and can’t wait for all the great news from your vacation.
Thanks so much for this explanation. I have been reading and searching all around so I could get a clear understanding of the camera settings for a Nikon and I am so appreciative of this post.
Can I take just as good photoes with a Canon rebel t2i??
I can Now understand Photography. Thanks for sharing this tutorials.
Greetings from the UK.
I just wanted to thank you! I bought a DSLR Camera a few months ago along with several books to teach myself photography.
I have learnt more using this tutorial in one quiet night shift than from trying to understand the books in several months
Thank You Thank You Thank You
I am a little late to your post but your guide to different camera settings is still great. I love shallow depth of field pictures.
APPLAUSE to you my friend!
Thank you very much for this tutorial, it’s perfect for me since I’m an amateur photographer!! :)
Now it’s time to take all of this info to the field!! :)
Very detailed explanation. I had hard time understanding the features until I read your post. Now I’m so ready to explore my Canon 450D again. :) Thank you so much. Such an inspiration.
Thank you so much for posting this! I feel like I understand my camera so much better now! I plan to practice this and hopefully have much nicer pictures! I’m not any more confuse about aperture,ISO and shutter speeds. Again Thank You so much!!!
Hey there Amanda! I stumbled onto this post looking for tips on using my new dslr camera. I am so lost with all the different settings! This post helped me so much in understanding things! I know I’ll come back to it as I learn. I’m just now starting to play with aperture priority mode :)
Thanks a ton!
Just found your site and this helped me tremendously ! I just bought a Nikon and the book Understanding Exposure, so hopefully with these tools I will gain more confidence using the camera!
Very nice tutorials with all basics of DSLR and explained in simple language.
Thanks a lot…………
Hi! I loved your tutorial, it was so simple! I recently wrote an article that has non-technical strategies for taking better travel photos, and linked to your article for the technical side of things! I hope that’s OK!
Very helpful, thank you!
Great article!
I can only agree. 24-70mm 2.8 and 50mm 1.8 are also my favorites.
Greetings
was very helpful for a beginer like me… thanks alot..
Very useful and well written, thank you. I am still new to DSLR photography and reference this article all the time. :)
How about a tutorial on how to ROCK your camera in MANUAL!?!? :)
Thanx … :D… I Appreciate ur help :D…
I was so happy to read your All your Useful TIPS. Thank you very much…
Wow! I’ve had my Nikon D90 for over two years now and have been trying to figure out how to use it to it’s potential. This tutorial helped me immensely! I’m so excited to take more photos and practice using the different manual settings. Thank you so much!!
Thank you for your tutorial. I have referred back to it multiple times. I have a Ti2 canon with the kit lenses and I am currently in the process of buying a new lens. Price is an issue so I am limited to getting either the 50mm or the 85mm. Which one is better for shooting group shots? I have a family of 5 and I take pictures for other family members and would love to have really crisp family photos. Do you have a suggestion on which lens would be best?
Both are great! With the 85mm you will need more room, so get the 50 if you like taking photos indoors. :) Hope this helps! :)
THANK YOU SOOOOO MUCH! Ive been browsing for information on how to get the most out of my camera, and if it wasn’t for this site I don’t know what I would do its been a saving grace!!! You actually EXPLAIN things, and you explain them in a way that everyone can understand!! Before this site I was LOST on all the terminology/gadgets/buttons/etc- but Ive learned so much through this site! Please dont stop! :)
This is probably the best tutorial I’ve read so far. I just purchased the Canon 50mm and did not realize it was a prime lens. I love it for taking pics of food but it’s not so great when I need full body photos. Would you recommend the 80 mm for this?
How kind of you to take the time and explain that….
Thank you, i learned heaps!
Thank you so much. Now I would be able to take some nice phtographs beside auto mode. :)
thank you ! so much amanda and kevin….recently bought nikon 5100 dslr, i need some help in operating the instrument manually so kindly ..help
I recognized your view from the Top of the Rock. I went during the holidays last year but really need to get back there this fall.
Great tutorial here.
So nice of you..it really work for a beginner..Thank you so much!!!!!!!!!!!!!!!!!!!
Thank you so much for this. I purchased a dslr as a present to myself after graduating from grad school this past June. I am slowly learning how to use it while rebranding my old websites and launching a new one. Any help I can get is always appreciated, especially when someone breaks it down and makes it seem so easy.
This tutorial is very much effective for a beginner like me. I used the setting with my Nikon D5100, an excellent result is achieve. Hats of to you guys for providing such a wonderful lesson.
Hope you update more about *night photography, *fashion show photography and *Portrait photography.
hi it was a really useful guide specially for a person who is new to photography. really impressed on your blog and keep the good work going on.
Hi.
Thanks a ton for posting this quick tutorial. I wish i could interact with you more. I just learned that I’m more interested in these cams, than i thought.
Thankyou so much for this tutorial! I have never before read through DSLR explanation and come out the other side with a better understanding! :)
Thanks so much for this! I’m just getting started on a new food blog and I’m shopping for a starter DSLR. I’m sure this page will be open on my computer screen nonstop!
Great job featuring this camera. I just took a photography class. I needed visuals and this info gives me the visuals I need to take great pictures. Thanks!
Thank you so much! I was just starting to play with aperture recently and I got the focused foreground, blurry background shots you mentioned…very exciting! The lowest aperture my camera will go to is 2.8 though. I never use the zoom since I mainly take close up photos of jewelry so I think I will look into an f/1.8 lense to get more of what I am looking for.
Have you ever thought about including a little bit more
than just your articles? I mean, what you say is important and all.
Nevertheless imagine if you added some great photos or
video clips to give your posts more, “pop”! Your content is excellent but with pics and
videos, this site could undeniably be one of the most beneficial in its field.
Very good blog!
Hey, Nice stuff.
Thanks so much for this great post! I was going on vacation and wanted to use my new DSLR camera and this post gave some great tips and pointers for how to take the best photos for our family vacation and how to best capture the great memories.
Wow!! This is a great quick and easy tutorial for all the beginners out there. I’ve watched quite a few videos on how to use my new Nikon and none have them have even come close to teaching me what I’ve learned here!! Thanks for the great article!!
great information on shutter speed, iso and aperture settings
Thank you so much.. Very useful information. I am starting a little photography business but still have lots to learn. Do you have tutorials on lightroom and photoshop?
Thank you for an interesting read. I will show this tutorial to my lad when he gets one of my old DSLR cameras .
Thank you for sharing this information! I have always loved photography, and have recently upgraded to a DSLR. I’m usually really good at figuring out things on my own. However, with two year old twin boys running around, I don’t have as much time to mess around with my camera as I’d like. I’m so glad I found this. It is a huge help to find such an easy to read/follow break down of things!!!!!
your detailed tutorial and examples make it easy for us beginners to understand. thank you!
this is fantastic! :) just received a Canon for my birthday and I would love to take it off of the Automatic setting sometime… this just may do the trick.
You don’t know how helpful this is! I echo the HUGE THANK YOU!!! I was considering a sigma 24-70 lens, but should I go with the canon? I know there is a big price difference, so is it worth it? Thanks again for the awesome tutorial! Sending it to all my peeps!
Omg, Thank you!!!! This was so helpful! I have had my Canon camera for almost 2 years and have had no idea on how to use it outside of the auto mode. I am taking up photography and you will never know how much this has helped and more confident I am in using my camera.
Again.. Thank you!
Amazing tutorial! Thank you!
For those still wanting to learn more, I’ve been loving the “Master Your DSLR” book for iPad:
https://itunes.apple.com/us/app/master-your-dslr-camera-better/id487976827?mt=8
Thanks so much for posting this tutorial. It’d been years since I used an SLR and I’d forgotten the dynamics of aperture and shutter settings.
I’ve recently been assigned to shoot stills for my work conferences and seminars, using a Nikon D40. Although the “P” mode is sufficient for spontaneous snapshots, I wanted to delve into more creative shots with shallow depths of field, etc. Doing a quick Google in between shoots, I found your site and couldn’t be happier that you decided to use a D40 as your example DSLR cam. It was a quick and easy lesson.
thank you very helpful nice to know there is still selfless people out there to help people out when in need giving your expert knowledge making hard things simple for the simple minded love it
Very Informative!!! As my first DSLR is on the way – I am pretty excited to explore my photography with Nikon D5100. Thanks a lot!!!
Hi Amanda,
I’ve been enjoying your site for over a year now, and love the photo and cooking advice! One challenge I’m now facing is how to organize digital photo files and back-ups. Have you done a post on this yet? If not, please do! I know you must have a million+ digital images by now! I have just had an external drive fail, so have lost 3 months of family pictures, including one shot I had in mind to enlarge for a gift. So sad!
Thanks,
Elaine
I know you have a million comments on here already but I just wanted to really say THANK YOU. This tutorial is wonderful and I wish I could adequately express how thankful I am to you for sharing this. It has helped me SO MUCH and taking pictures makes me SO happy- especially now that I know what I’m doing. ;)
Carmina
thank you much
Great tutorial! I bought a Canon T3i and I love it (and I make little review of it ) but your tutorial is very simple for people who don’t understand all the world of DSRL. Well Done! And thanks for share.
I am really lucky to have found this within a month of buying my first DSLR (actually a SLT in my case–Sony A57 with the 18-55 and 55-200 kit lenses). My wife, family, and I have loved my pictures so far (blindly using aperture mode), but with this tutorial, I am positive that I can take my pictures to another level. I am going to keep this tutorial in my camera bag for a quick reference. Like everyone else has said, THANK YOU. This tutorial should be issued with every first time purchase of a DSLR.
This is such a great post, thank you for simplifying!! Will the Canon EF 50mm f/1.8 II Camera Lens you have in your amazon store fit on the Canon EOS T4i? And is it about the same as the stock 18-55mm lens that comes with the T4i? The reviews on this lens are awesome and for the price, I don’t think I can pass it up! But I was curious on how similar the two are and if it would be beneficial to purchase the 50mm. Thanks!
I just read your tutorial . Thank you I
Oh my gosh – I’ve had my new Canon T4i for a month. It’s my first DSLR and I have been SO frustrated trying to learn how to use it. This article started helping everything click! Thank you for posting! I’ll be stalking the rest of your site now, thanks. :)
Your are a photography hero. You have rescued my photos from the hands of this photography newbie. My kids will have heads, un-blurry bodies. their memories will be saved from blacked out faces, red eyes:) hehehe
Thank you for breaking it down and making it simple, making it fun. And even encourage me to try, discover and play around with my new camera. Your awesome
Mel
I’m intereseted in purchasing the Canon 55mm f/1.8 lens, but I have a Nikon. This may be a really dumb question, but are the lenses interchangeable? Or, do I need to purchase a Nikon lens? If so can you provide the Amazon link for the Nikon version of this lens. I already went to your Amazon store and didn’t see it. Thanks so much. Your tuturiols are always the best. You make everthing so easy to understand!
Thank you, thank you, thank you!! This is by far the best tutorial I’ve seen. I got my first “big girl” camera – a Canon T3 with the 18-55mm kit lens – for Christmas and have been a little overwhelmed. I had just given up and have been shooting in Auto mode. This explains everything so well without being to “techy”.
Thanks again!!
Wow! I’m a beginner photographer and have read tons of tutorials, but yours has been by far the best. Not only is it very informative, but it’s super easy to read and understand. Thank you so much! :)
Thank you so much. I have been trying to understand my camera for a long time now. But I simply never find anyone that actually explains it simle, until now! So thank you very much! This was so helpful! xx
YES!., i’m so glad to found YOU on this tutorial, your the best and I sharply apply your tutorial if ever i have my own camera., thanks a lot.
What fun!! I committed to taking a photography class at the beginning of the year and then found you on Pinterest! Your 30 Photography Tutorials are now my weekly class that I soooo look forward to! Thanks…off to practice what I just learned!
Blessings!
I could hug you right now. Thank you so much for this tutorial, beautifully written,well explained and just what I needed!! Thank you, thank you, thankyou :0)
Thank you for this wonderful post! It helps me to understand better my Nikon Camera! Keep Sharing!
Thank you! Just what I need.
Great tutorial I have a EOS and always use auto, I’ve just tried using your settings and whamo perfect pics. THANKYOU so much. Sydney Australia
I been reading the helpful hints on taking pictures in Manual mode. I just purchased a 50mm 1.8 lense. I just tried taking a picture of an earring as you show in your demonstration. I seem not to get the one earring in focus can you tell me what I am doing wrong. I used the same settings that were used.
Your information on how to use a camera was very helpful to me. Do you know anything about a Sony AX55 ? I purchased one last year. I am older, and wondering if this is too much for me! I love photography! I always play with a camera! Had friends on either the Cannon side or the Nikon, and the dealer talked me into a Sony! Did I make a mistake?
Thank u the book is so confusing and this was Awsome !! I hope everyone is having as much fun as I am and enjoying great pictures !!
I’ve tried to read tutorials over and over and none of them have made sense, until now. Thank you!
Thank you for spending in preparing this tutorial. It is very very helpful for beginners like me.
I just purchased the Canon EOS Rebel T3 and I’ll admit it … I’m a MAJOR n00b at this. Thanks for taking the time to post this article … it was very well written (and very easy to follow)!
Thank you so much for writing this!!! I have had my Nikon D5100 for a year now and I haven’t tried The M mode yet cause its all been to confusing for me until I read your blog!! I just ordered back drops and I’m going to use the M mode to take my kids pictures for Christmas
Thank you SO much for this tutorial. I have a very nice Nikkon camera that I barely know how to use. My husband bought it so that I could take high speed photos of our dogs and I haven’t known how to do it. Now I have hope that I can figure this out! :)
THANK YOU so much for this tutorial! It’s incredibly helpful!
Thank you for this great tutorial!
I love this post. It has taught me so much more since i started using my camera a year ago. I took photography classes in High 6 years ago and forgot all this and had to re teach myself but this has def help and I plan on printing it out and putting it in my New Camera bag this year come Christmas. In my bag is my Canon Digital Rebel XTi EOS i love it. Along with my EFS 18-55mm lens. Along with that is my 58mm hard tulip lens hood, 58mm 3 piece filter kit , Fotodiox Canon EOS marco ext. tube set kit. Oh and my brand new bag Case Crown Digital SLR :)
can you share with us what your camera menu settings are set to? I shoot a 7D as well, and I am just curious what you have chosen to use in the menu. Love your site!
OMG…I’m so glad I found this tutorial. I just got my T2i; first DSLR. It’s still in the box because I’m too scare to take it out. Anyway, the tutorial is easy enough to follow. I’ll give it a shot this weekend – well, more than one. Thanks you so much.
Dear Author .. THANK YOU SO MUCH .. but i just struggled for days together go through all manual and experiment and understand these concepts 60% but your post gave a 100% feel of these basics in just ten mins .. Amazing .. thanks for sharing your knowledge in mostly importantly simple terms ..
THANK YOU SO MUCH for putting up such a helpful article. I have understood a lot from this and would definitely use the tips to capture some better pictures..:)
I’m definitely going to try this. Thanks for sharing!
Excellent tutorial !!!! Thank you thank you thank you ! I can’t wait to give it a try. I have been trying to take photos in our treehouse & because it is dark in there (all those trees !!), I have had NO LUCK. You saved me ! Thanks so much ! Cheers for that !
Lynne xx
Thank god for this guide! I had been looking for exactly this for a while. Seriously, I appreciate the time it took you to write this.
Thank you so much, you did a great tutorial that was easy to understand and follow that wasn’t filled with technical terms. I loved how you included pictures with each example so we can see what the result is when you change the settings. Fantastic job I re-pinned it and forwarded it to my friends too.
Thanks so much for this great tutorial. Very informative and concise enough that I can print it out and use it as a cheat sheet in my camera bag!
Thank you so much for this tutorial! I now have the confidence to move away from the manual mode on my DSLR! Thanks!
Hi Kevin and Amanda,
Thank you for your great tutorial. I have a Nikon and when I took pictures using A or S modes, all the pictures turned very dark. i can’t even make out what the images are no matter what the #’s are on A or S are. Help!
I was wondering if there’s such a thing as a little cheat sheet where people could bring a little booklet out to a photoshoot… and if you forget setting.. people can just glance in their book…help!
I don’t own a slr, I’m the proud owner of a canon sx40 hs (point and shoot) but your post helped me a lot too! I don’t even know the difference among dslr, slr and bridge cameras. But thanks for explaining everything so well .
This was awesome! Thank you so much! We got a Cannon as a gift before my son was born and I’m still trying to figure it all out! This was a huge help and I can’t wait to play with the camera now after reading this! Here’s to capturing some great pictures! Thanks!
Wow Thank You so much for this lesson. I really did not know anything about my camera and this was just amazing. I have learned so much. thank you again..
Thank you so much for this beautiful and simple tutorial. I went ahead and bought BOTH the book AND the 50mm f/1.8 lens you recommended. Can’t wait to show the world some awesome photos on my blog!!!! CastleofCostaMesa.Com
what happens if my picture is to dark i know what i have to change, if you changed RAW would it help?
thankyou sooooooo much!!!! thankyou for putting it so simply! i don’t like to read instruction manuals because they are so complicated. this is a lifesaver!!
This is a wonderful overview! So many just take shots in auto but a whole world of creativity is available when you understand your dslr.
This is Awesome! I’m so ready to try these tips! After my attempt to try & figure out things on my own (see my post on my blog… It’s a hoot) a friend suggested your site to mE. I’m so glad that she did! Thanks for sharing these great tips!
I know with all of these comments, it must have been said time and time again, but thank for this. :D A couple weeks ago, my mom passed down her Nikon D40x to me since she barely used it, and I went from just messing around with it, to actually taking really nice pictures of our pets.
Thanks again! \/ (^3^)
Amanda, this is such a wonderful tutorial! I had pinned it long ago and finally got a beautiful DSLR and read this last night and again today – I took UBER detailed notes – this was absolutely WONDERFUL you explained everything so well and with such detail THANK YOU! HOpe you have more photo tutorials already or in the near future!!!
Thank you very much!!! this is very helpful and clear to understand with examples… I am a beginner but I got a canon from my sis cz I need to take photos for a university project and it’s crucial for me to have high quality photos… Thank you so much
Thank you so much for taking the time to do this! I got an amazing Canon for Christmas and I have spent tons of time practicing with it but really needed some good teaching on it! This was perfect for a beginner & it didn’t cost me $600 to take the class :)
God Bless,
Alex
this post makes me want to purchase a new camera
Thank you so much! I just found your blog and you are adorable! You are so kind to take the time to share about all of my favorite topics! Photography, food, blogging, etc. Many thanks!!
P.s. I have the Canon 7D and Photoshop, too, so keep the tutorials coming! Thank you!
You rock!! Your tutorial was so unbelievably helpful -THANK YOU!
Now, my biggest struggle right now is how to make my pictures look good like this: http://www.thetomkatstudio.com/preppypoolparty/
What camera settings and photo shop settings were used in the photos, can you tell?
Thanks!
Hi Amanda! Thanks so much for this tutorial, I think I have a little understanding as to how dslrs work now. I just got the entry-level Nikon D3100 for my birthday, along with 5 of my grandfathers old lenses so this is a lifesaver. (I had an epiphany every very few sentences That I read from your guide haha)
This is well written. I just got a DSLR a few days ago and have read a lot of photography “quick guides” in the past couple of days and this one made the most sense as I read it. Thank you!
P.S. WAR EAGLE! (I’m a current Auburn student)
This was an awesome and thorough tutorial for beginners like myself! It was really easy to understand. Thanks!!!
it really help me to take some exciting snaps
Thanks for the information. My hubby just bought me a Canon Rebel, and I am learning slowly. You put it in terms that make sense to me. Your pictures on your website are beautiful! Thanks again!!
This was really, really helpful. Have been reading a lot of beginner’s guides to DSLRs and a lot were really useless. This summed up really good basic info to get me started on my Canon 600D. Thank you!
Thank you so much for posting up these DSLR tidbits! It was much more interesting to read your post(and see illustration) than the manual (:
Nice “dslr 101” article. I would add a brief paragraph on the Composition & Rule of Thirds. Although composition is not specific to DSLR, it is a very useful concept for beginners.
Thank you thank you very much until I read this tutorial I’ve been intimidated by my new Nikon D3000 now Im extremely excited to go out and take some pics!
Just found this post on Pinterest and I’m so glad I did! Thank you for the easy to understand tutorial, just got my first DSLR camera last week, can’t wait to play with it! :-)
Thanks so much! A great read! I found your blog tonight and I’ve been loving it!
Thank you for posting this tutorial, very helpful. I am in the midst of camera shopping and would love to know why you chose Canon over Nikon if you don’t mind.
Thank you so much. This blog really helped me analyze what I was doing wrong while shooting! Thank you! You have an eloquent way of ‘breaking the issue down Barney style’. ; )
Great tutorial! Thank you for including Nikon.
Thank you sooo much for this!! I just got a new Nikon p510 and was totally clueless about how to use everything! This is a huge help!!
I am new to the DSLR world and honestly couldn’t be happier! I have the Canon Rebel T3, and I LOVE LOVE LOVE it!! I couldn’t help but comment when I read your paragraph about your 50mm lens. This was the first lens I purchased (roughly 2 months after receiving the camera for Christmas) I read the reviews on Best Buy.com regarding it and after a friend said she wanted a 50mm, I knew I needed one as well……..I LOVE this lens!! I am such a fan of blurred back grounds and such, and all my lenses have helped me learn in so many ways! I have the 18-55mm that comes with the camera, the 75-300mm and the 50mm, they are all FANTASTIC lenses and I LOVE them all! My next will be a fish eye lens, but until then I am having soooo much fun with the ones I have!
And your blog about understanding your DSLR is amazing! I have bookmarked it so I can refer back to it often!
I just wanted to thank you for this tutorial. (I get that Large aperture is a smaller F#, and a small aperture is a larger F#) But I have to tell you. I paid for a class where I didn’t learn as much as I have with your tutorials.
Thank you for taking your time to share your knowledge. It has helped me immensely, especially since my daughter just graduated high school last Thursday. I got some wonderful pictures, thanks to you!!! I am in your debt!
Nice beginner tutorial, my only beef is with some of your terminology. Since aperture describes the size of the opening allowing light to pass through the lens it is not HIGH or LOW, it is referred to as LARGE or SMALL
LARGE aperture is a large opening or smaller F number, where a SMALL aperture is a smaller opening or larger F number.
You guys are so amazingly generous. Thank you so much for taking the time to write these tutorials. I can’t believe how much I just learned. I made note cards that I plan to keep with me. Thank you so much!
Reb
Thanks for this!
I’ve spent a year poking around websites and photography books, and this is, hands down, the most useful information I’ve seen yet. Very well presented, and a great combination of theory and practical tips about what works for you.
Love these helpful tips…. the most helpful and easiest to understand!!!!!!!
Thank you soooo much!!!!
Thank, thank you so much. I’ve got a Canon for Christmas, and I’m still so nervous to use it.
I can’t wait for tomorrow (I don’t work on Fridays) to start follow practicing this tutorial.
Thank you again so much :)
Thank you very much, for taking your time to share these great tips. God bless you!
Thanks for this! I’m relatively new to photography and blogging. Will refer back to this time and again, I’m sure.
Christa
Thank you for this! I have been working with aperture for a couple of days & couldn’t figure out why all of my pictures were overexposed. It turns out I needed to adjust my exposure compensation. THANK YOU!!!
THANK YOU FOR THIS TUTORIAL. I WISH I COULD FIND MORE LIKE IT AS I AM NEW TO DSLR CAMERAS. I LOVE THE CAMERA BUT I AM SO CONFUSED ABOUT THE MANUAL MODE. I THINK IT’S MORE OF THE FACT THAT I’M SCARED TO USE IT!
Thank you so much, easy to understand!
I can’t thank you enough for such a meaty blog here. I learned a lot. Took note a lot. And would love to read more a lot from you. Thank you so much..
Amanda – Love this site! Because of you, I am determined to figure out my Rebel T1i camera (not just the auto features). I’ve been playing around a bit with Photoshop Elements 10, too. Lastly, that Tamron lens is now on my Amazon wish list! You have successfully triggered my new obsession!
Great post. I just finished reading hte Understanding Exposure book and also found it incredibly helpful. I’ve been trying to improve my photos and am looking into purchasing a new lens (I currently have the 50mm prime and the 18-55 kit lens). I would LOVE to have the 24-70 but am afraid it’s out of my price range : /
I just bought my first DSLR and I want to thank you so much for this easy to understand tutorial. Thank you for your time and sharing your expertise. You take amazing photos.
canons aree really cool
OK this is exactly what i needed I just got a canon SLR and I am starting a new cooking blog so this will help me tremendously ! Thank you soo much ! :)
OK this is exactly what i needed I just got a canon SLR and I am starting a new cooking blog so this will help me tremendously ! Thank you soo much ! ;)
Thanks a heap Amanda! I’m taking a Digital Photography I course in the Fall and I’m picking out my DSLR (in case anyone’s curious, I’ve chosen the Sony Alpha A77 with it’s well-reviewed kit lens) and a couple of lenses (I’ve settled on one for telephoto, I’m thinking the Sony 75-300mm f/4.5-5.6 Compact Super Telephoto Lens) and I was curious about what that f/x number is… Your post helped me answer that and more. ^_^
Thank you so much!! This is amazing, it’s probably the first website I have seen that gave a really quick overview of a dslr without going into confusing territory. I was wondering what Nikon you would recommend for a very beginner student?
Thank you so much for posting this! I have always wanted to learn more about my camera, just never really had the time. This has helped me an incredible amount. I have a Nikon D90. It’s supposed to be hot and sunny tomorrow, so this has really inspired me to go outside and play with my camera!
Amanda, I’ve read a lot of posts, blogs, books, and websites to better understand DSLR photo taking for my blog. FINALLY, i found something simple enough to understand since I am a beginner. I can’t thank you enough. I feel like i know it all now. Thank you so much for the photo examples as well.. SO very helpful. :)
Thanks so much it finally “clicked” for me. I think I can finally figure out what I’m doing now.
Hi!
Love the tutorials! It’s a very basic SLR tutorials that I know by heart but still I find it very well done and a joy to read. Love the photos you used for illustration/examples as well.
Thank you!
This is amazing! I can’t wait to try all of this when the kids go to bed!
thank you , nice tutorial !! new Nikon d 90
na eiste kala gia tis sumboules pou htan polu endiaferon
Thank you for this! It is very helpful. You “broke it down” in a way that this “newbie” understands. So glad I stumbled upon your blog via Pinterest. It’s my favorite!
I have needed a tutorial on the use of a camera. I just got one and I am trying to figure out the camera. Thank you!!
So glad I found you! I’m a proud owner of a Canon Rebel T3. I just got it and only have the EFS 18-55mm lens. My question is how to take action photos in dark settings without getting the blurred images. Recently went to a Hawaiian Luau and most of my pictures were blurred.
Thanks
Hi, try:
– increasing your ISO (sensitivity to light) setting to allow a higher shutter speed
– use a flashgun (speed light) to add light
– use a larger aperture lens like the affordable 50mm 1.8 this captures far more light than the kit lens
hope this helps
Hi.
I want to share this post for my readings later but look like they come with warning.
“Photography Tutorial: A Quick Guide to Understanding Your DSLR Camera Warning: file_get_contents(http://su.pr/api?url=http://www.kevinandamanda.com/tutorials/photography-tutorial-a-quick-guide-to-understanding-your-digital-slr-camera.html) [function.file-get-contents]: failed to open stream: HTTP request failed! HTTP/1.1 503 Service Unavailable in /home/kevinandamanda/kevinandamanda.com/wp-content/themes/thesis_182/custom/custom_functions.php on line 761 via @kevinandamanda”
Just want to let you know.
What a great tutorial!!! I’ve posted it on all of my social networking sites… I think I’ve learned more here than I have in the three days I’ve spent searching the net for info on my new Canon D60. Thanks again for the great content! :) – Olivia –
This is great! I have been trying understand Aperture and Shutter speed for so long…but it’s like parallel parking for me: if I think about it too hard, I can’t figure out how do it. You’ve explained how to use Av and Tv in a way where I feel comfortable adjusting them based on what I want to capture…without obsessing over numbers too much.
Thanks!
wow! this tutorial is one of the easiest i’ve seen on the internet to understand! thanks so much!
Very nice post! I like that you dont use a bunch of complicated lingo…you just put everything out there in basic, clear form and did a great job! Wish I had this a few years back! :-)
Hi! I just started a new permanent linky on my blog for photography tutorials. I added this one to my linky! If you have any other photography tutorials, please feel free to link them up!
Michelle
http://www.heartfeltbalancehandmadelife.com/p/photography-tutorial-linky.html
thank you so much.. i have read other sites to help with understanding photography and never really got it down.. but coming to this site really worked for me thank you very much!
I’ve read a lot of DSLR tutorials, and this is no doubt the best and easiest to understand that I have come across. Thank you so much!!
k so I am a beginner and I have an Olympus DSlr and I was wondering what I am doing wrong. Every time I try to take pics indoors with pretty good natural lighting in manual mode, I follow the directions with the iso, ap. shutter speed and it’s still blurry to me? This keeps me in my auto mode cause I always end up getting nice clear pics that way? what am I doing wrong? I’ll take a pic…no its too grainy…no it’s to blurry…no it’s not bright enough…ahh auto…just right??????
thanks for all your great info…tutorials, fonts, recipes, etc.
Thank you so much for making this tutorial. I took a lot of photography in college, oh so many years ago now! But haven’t touch a SRL in years, until last month when my husband bought me one for my birthday. I’m so out of practice and forget the basics. This tutorial has helped me so much to better understand my camera and be able to take beautiful photos of my baby daughter. Thank you so much!
Thank you so much for teaching this. I cant wait to put it into movement :)
You are the best! This is the best overview I have seen! Thank you.
Just found this post and it is so incredibly helpful. I am about to be new to SLR photography and I feel like I will be going into it with a small amount of confidence. Now to decide between the Canon Rebel T3i or the Nikon 5100 so I can buy it and get started. So excited to get going. Any advice on camera choice totally welcome.
Hello Amanda,
Can I say you are amazing! God Bless you…I arrived at your site looking at your FREE FONT downloads and got hooked. I LOVE your tutorials especially the Photo ones! Your Photos are very attractive! It really help me out…Your also very ORGANIZED! Your Scrapbook room is 2 DYE 4! Your story about your weight loss is very encouraging and helpful as I embark on those journeys all the time. Watching calories was never my thing and now is…
I’ve been looking at other blogs to reference my “Soon to be Blog…hopefully God’s gracious with my time :) I have three children (MY CANDIES) so they take up most of my time…
I just want to THANK YOU for your site. Your gracious to share your life with us and I certainly will be checking in every now and then.
God Bless,
Leilani
Excellent article, if you ever feel like contributing something to my site please get in touch we are always after photographers who can write adding to our pages :)
This has been the easiest to undertand tutorial I’ve seen yet. Thanks so much for putting things in easy to understand language.
I was woundering what would be your suggestions for photographing high school basketball games I have a cannon rebel xt with a efs18-55 .28/.9tf
You aree my hero!!! thanksssssssss so muchhhhhhh what a great way to teach us!! love itttt cant wait to go and practice!!!!
Holy moly! This was awesome! I have a Canon T2i and got the Canon DSLR book for Dummies and what you just described was way easier to understand than trying to find it in that book! Thank you so much for sharing your knowledge it is greatly appreciated!
This is a really great website and tips im so happy i found this thanks so much for sharing!!!
Wow! It really makes sense now – Thanks so much for explaining it with examples!
Seriously…I love you. HA!!! THANK YOU! This has been UH-MAZING!
thank you so much for this. i will try some of your settings ideas and see what happens. im trying to figure out how to get pics from camera to post on facebook. you have any ideas forward them on. thanks again.
Thank you so very much! Just print and starting a photography “Help Me” notebook…XoXo
I cant get the menu off my screen. I have to look through the eye hole to take pics??? any tips?
If you have a Canon the button just to the right of the eye hole of a camera should get the view on your screen. I don’t know where the option is for a Nikon or other brand of camera. I also know that if you do the view through your screen it drains your battery pretty substantially. Hope this helps.
This is such a easy to understand tutorial and exactly what I was looking for!!! Just found out about your site from Pinterest…thanks for the tutorial!!!
THANK YOU!! This was by far the easiest to read and understand article on photography. I have been struggling with how to use my T2i and you have given me the info I needed to finally take it off Auto!
Wow, finally after searching the internet, you finally made it make sense to me! I think I can play with these settings and really know what I am doing. I will re-read these over and over. You put it in such a simple way. I wish I had started here! I can’t wait to take my camera with me tomorrow and begin on a setting besides AUTO!
This tutorial has been wonderful. Thank you for taking the time to do this and breaking it down for K teachers like me to understand. ;-) Sometimes, even we need things in 5 year old terms. I am wanting to purchase a lens that allows for lower aperture. You were right, mine doesn’t go below 3.5. :( However, I was wondering if the lens link you attached from amazon would work for my camera? I have a Cannon Rebel T3. If not, where can I find one that would? I did some googling but some of the terms and abbreviations are still foreign to me. And before I buy, I want to be certain. Thank you, Erin
Wowsers! This is a great tutorial for me and my new D5100 {eeek!}, very well put together and easy to understand! Thanks sooo much!
OMG I learned more from you than all the photography and “DUMMY” books…you broke it down setting by setting and giving examples (which for a visual learner helped me understand things so clearly)>>>THANK YOU A MILLION TIMES OVER for taking the time to educate on a level a layperson can understand and apply.
Nice job, I don’t think I’ve seen a better more practical tutorial. Way to go.
this is just what i was looking for! thank you so much!
Thank you so much! I had so many “ah ha” moments while reading this! Now I understand why some of my pictures turn out the way they do! Thank you again!
What a BLESSING you are! Thank you so much for sharing your know-how for us beginners. I don’t even have a camera and this made sense! Looking forward to getting started someday :) Can’t wait to see more from you guys!
Thank you…gonna.try.it
This is great! Thanks!
Thank you for a lovely tutorial. I can’t wait to go home and play with my camera!
I will be back…often!
I just wanted to take a moment to thank you so much for posting this. I just recently bought a Canon DSLR and this will help me to understand more about my camera. THANKS A BUNCH
Thank you so much for putting that all out there. I actually just found a really good book that I have been reading and that I could understand but this is great!!!! I am really into photography and have just started up on my own doing photos on the side. This will be great!!
Hi Amanda,
Aperture = Operning on Lens!!
So it is more intutive to call High Aperture means more light and Low Aperture means Low Light. Just from the terminology point of view …
f = focal length (mm)
= fstop number
F = Aperture
Formula:
F=f/
But I really got your tutorial and the science behind photography … Thank you so much!!
Oh my formula’s got HTML tags.
f = focal length (mm)
~num (like 1.8, 4, 8) = fstop number
F = Aperture
Formula:
F=f/~num
Thank you for these tips, Amanda! I’m looking for a new camera. Maybe for Christmas….so I’m really interested in getting the best camera for my specific needs. What can you tell me about the lens: 28-135mm f/3.5-5.6 IS USM Standard Zoom Lens? In comparison to your favorite: 24-70mm f/2.8?
Flipping amazingly awesome/helpful tutorial. You guys own!! =)
is there a PDF of this for printing I could locate?
HI! I found your blog via Pinterest. :) This is so so so helpful! I recently got my first DSLR & hadn’t braved manual mode until I read this tutorial! I still have a long way to go but this post got me going in the right direction! :0) I featured a link to pin that led me here on my blog: http://www.pinfluence.com/2011/11/07/the-princess-brides/
You are the COOLEST PERSON I KNOW for putting this in a post!!! Thank you so much! Now the Cannon DSLR camer I got 2 mother’s days ago will actually fulfill it’s purpose!
:)))))))
Just read your article and just love it. It made everything come together as easy :)
I have a Canon Rebel. Can you give me advice on what lenses and external flash to buy?
THANK YOU! This is perfect!!!
Thanx, very good blog.
Hugs from France.
Thank you so much for this post! I have been scanning the internet for just such a post. I recieved a new DSLR Canon Rebel T3 for my birthday this year and was completely clueless on how to run it. Naturally, I signed up for an Adult-Ed course on Photography to learn but unfortunately more effort is put on editing in Photoshop Elements then actual camera knowledge and getting the shot right the first time. So this post was perfect and so easy to understand. Thanks again!
Amanda Dawn
Thank you so much for this post! It’s very well written! Although I do wish you mentioned white balance (that you mention when praising your lens), as I have no idea what to do about it, haha. I’ve had my DSLR (Canon EOS 1000D) for more than 2 years and I’m still shooting in automatic mode … sad, really! I’m very interested in photography, but I admit I haven’t practiced enough. Besides landscape photography and shooting people, food photography is my favourite, so I think I should get macro lens … But first I need to get to know my camera better!
Hi Amanda,
Just posted a comment on your other page.. I’ve been reading and rereading your settings again and again because I can never get the combo connection AV TV… but having to refer to your page is awesome refresher always..
You mentioned you used AI-Servo.. was thinking maybe that would be useful if I take pics of my active . Where can I find AI-Servo for my D90?
Great tutorial, thanks for sharing!!! :)
This is WONDERFUL! I’m only 19 years old and fairly new to the world of photography, though I’ve fallen in love with it. I have a Canon T1i that I got a little over a year ago (before that I played around with my Dad’s old 35mm film SLR!) and I love it and I take some beautiful pictures that I’m completely happy with, but I definitely need a little bit of work understanding and fine tuning the different features that my camera offers. This was so helpful! And plus, I just bought the 50mm f/1.8 lens, thanks to your recommendations! :) It’s great and I’m very happy with it. Again thank you so much!
Emma*
P.S. **Shameless promotion** Check out the blog! It’s brand new and features my own photography, along with many other aspects of my artsy life, including dance, theater, travel, and food!
Kevin & Amanda,
I am almost 57 years old and I was introduced to your website by a former high school student whom I met at my work. I love FB. The first introduction was to your Oreo, Chocolate Chip, Brownie Bars. Mercy! Best thing ever! So I started checking out your webpage and fell in love with it! I haven’t seen it all but love what I have adventured into so far. I don’t even know who you two are but can’t wait to find out more. Anyway, just wanted to say thank you! This camera information was great can’t wait to apply some of it and I will difinitely be sharing this with others!!!
Thank you so much! You really made it simple and easy to understand.
Thanks so much for sharing this! I have had my camera for a year and have had no idea how to use it or what anything meant. I know feel much better and confident I can take better picture.
thanks so much for the tutorial (actually all of them are excellent). i would have no idea how to navigate my dslr out of manual mode (or maybe even in) without them!
Hey Amanda — I just wanted to say a big thank you for this tutorial. I recently bought a DSLR camera and read this tutorial before going on vacation. I have taken so many photos on my trip and this post helped me SO much. Your blog is awesome and I absolutely love visiting to see if you have posted anything new.
THANK YOU!!!!!!!!!!
Thank you soooooooooo much for doing the tutorial in relation to the Nikon D40. I have the D40 and have never been able to find a tutorial for a Nikon, most all tutorials I’ve found before are using Cannon cameras. I’m a very visual learner and the photos of the display screen helps understand what to look for. Your photos are beautiful and I’m excited to know more about my camera. I’ve posted a link to this tutorial on my blog and shared your website link with my readers!
This was such good tutorial, it definitely helped me understand my camera so much better, and be able to take some more great pictures!! I can’t thank you enough!!
thanks so much for this post. it really helps with understanding all those buttons!
This is such a wonderful tutorial. I currently use a Canon 550D with the Kit II lens (18-135mm) and a 60mm for portraits and food shots. We are travelling next month and I’m looking for one that will serve us good throughout the trip. For my cropped body camera, which lens will you recommend as I understand the 24-70mm f2.8 will work differently on my mine. Thanks loads!
Thank you Amanda! It was great to see you in Mexico, and see you soon in NYC!
thank you so much for this! this weekend is all about me and my new d300. i feel like i’ve moved into the grown-up world of dslr’s and this post is a great (simple to understand) reminder of all the basics!!
Thank you! I just recently got a cannon rebel t2i and love it but I haven’t taken a photography class since I was in high school and couldn’t remember what all the little symbols meant. This was a fantastic quick refresher.
Thanks so much! I just got my Canon camera this week, this tutorial helped me alot! :)
I have read so many tutorials on using a camera and I get SO confused SO fast. This was so easy to understand!! I love my camera and i’m so excited to finally learn how to use it! THANK YOU!
Thank you very much, Amanda! I’m starting to use my new DSLR camera and I was so confused! You helped me a lot! :)
Thank you so much. This is a great tutorial. Simple & to the point. Also lots of info without a lot of technical talk.
Thank you so much! I just got my first “big girl” camera. Canon rebel T1i. I love it so far. I’m offically obsessed with taking pictures! Your tutorial was awesome. Thank you so much!!!!!
This is an awesome post… I have been wanting to get out of manual mode, but didn’t know where to start. Thank you so much!
You have exlained everything so well! Thank you. Now it’s practising time!
Gosh I love you for doing this! Just spent some quality time with my DSLR and now feel SO much more optimistic about my photography. Thank you for explaining in a sweet and straight forward way.
Also, the recipes on your blog are so inventive and unique (and delicious-looking!). I can’t wait to try so many of them. Thanks for everything you do girl!
/gush
THANK YOU! I just got a Canon Rebel t3 and dreaded driving into the instruction manual and trying to interpret their language, this was perfectly dumbed down for me : )
Thank you, great effort, nice info for students. Stumbled here from another link.
Thank you for this useful tutorial! I already knew most of the basics but it’s nice to get a refresher course… I am sure I’ll integrate your tips to the advantage of my photography blog :)
Blessings,
This Good Life
Thank you so much for a great tutorial! I’m very interested in purchasing my first dslr. But I have no idea how to use it! I’m familiar with your typical point and shoot cameras so when I went searching for a good how-to guide it was quickly overwhelming. Your explanation is very well done. Thanks again!
Hi there Amanda, this tutorial is brilliant! I’ve been lusting over a DSLR for ages but a bit afraid because I don’t know what all those extra knobs and functions mean… just a little overwhelming. But I’m definitely bookmarking this to come back to after I’ve gotten my first DSLR. :) Keep on posting more!
Amanda,
I STILL reference this tutorial on a regular basis. Your way of explaining things is PERFECT. :) I’m still learning, but with the help of your tips I’m a lot further than I would have been without help!
Thanks again!
Lindsay
Thanks so much for a clearly written tutorial. As a primary teacher I can appreciate a well structured lesson.
Thxs a lot for this nice article kevin and amanda…you both rock!!
Wonderful tutorial! I just purchased my first SLR, the Nikon D40. The manual has a wealth of very techical information all good. But I needed some good basic information to get started without being overwhelmed. This does that! Thank you!
I have been taking “snapshots” (some very good!) for 45 years. It is time to learn more and move on to great photographs!
Carolyn
Fantastic tutorial! Very detailed and great straight forward explanations!
THANKS i’m definitely going to use these tips/instructions.
QUESTION: Where was your last picture taken, the one of the ocean?
Thanks so much for this, I plan to study up as I’m clueless on using my new Canon SLR.
Hi Amanda! Sorry to be commenting on such an old post, but as a beginner in photography, I had a quick question for you. I recently bought a Nikon D3100 – it came with the 18-55mm lens f/3.5-5.6 – it has been great, but the main thing (like you, I think) I like about photography is that blurred background look. I was wondering if there is a specific lens you would recommend? I was looking at the Nikor 50mm f/1.8 lens – but as you said, I am having a hard time with the fact that it does not zoom in or out at all ! Just thought I would get your 2 cents when you have a moment! :) Thanks so much for your help.
Loved this….spent 5 boring weeks in a photography class with my new Canon 7-D. I knew it was a bit Ready to pitch it & go back to point & shoot!! Learned more reading this than in the entire 5 wks!!! Thank you, I actually think I can handle it now!!:)
Thank you for simplifying this so much. Extremely helpful.
Such a helpful tutorial. I just bought my first grown up camera – by that I mean the Canon XS and am super excited about learning how to use it!
K&A
SUPER TUTORIAL. Thanks for putting it out there.
-Lexie
Really helpful…thank you! I bought my first dSLR last year and reading this post helps. :) I’m still learning, but I’m so glad I finally bought one.
This is so, so, so helpful for someone who just got their first dSLR. Thank you for putting all of this information together!
By the way, your Bostons are kissable. I have two of them myself :)
Awesome. I have a Fuji S100FS (sophisticated point & shoot). It’s a great camera but I haven’t taken the time to switch out of “auto” mode. Thank you. I’ll reserve some time with this excellent tutorial and my camera.
Thank You, Thank You, Thank You!!!! This has been extremely helpful. I bought the Canon Rebel xsi 2 years ago and haven’t fully taken the time to learn what all of the settings are, etc. so therefore while my pictures have been better than the camera before, I knew it had a lot more potential. For christmas this year I used some money I got as a gift and purchased the 50mm f 1.8 as I’d heard so many raves about this lens. I just sat and went through this tutorial and was SUPER excited to actually learn something. Thank You!
This is a WEALTH of information! Thank you so much! I just got the T2i and have ordered the 50mm f/1.8 lens. Can’t wait to get it!
Thank you so much!! nice tutorial!!
oh my goodness i am so glad i stumbled upon this tutorial! i haven’t been able to find any easy to read info about how to use my nikon d90 since i got it nearly a year ago! thank you so much for taking the time to lay it all out :)
Oh my gosh, THANK YOU!!!!!! Thank you, thank you, thank you!
I learned a lot! Thanks for sharing this!
Love your blog, it’s help me a lot. I just wander if you can do in SONY a390 DSLR.
this was so much help. I’m just getting started and want to get some good pictures! Thanks :]
Thanks Amanda for posting such a great tutorial. I am a visual learner and this really made sense to me. Can’t wait to try these great tips out! Great job – as always
Wow, what a great easy to understand tutorial. I think I’ve confirmed my photo issues…lenses! Time for me to step it up!
I am so glad to find this tut. I am looking at purchasing a Canon and being able to understand more about it will be so helpful. I aspire to take beautiful photographs like yours. Thank you.
Excellent and easy to understand! I’ve used a fully manual film SLR for years and had yet to learn the ins and outs of using my digital SLR, even though I’ve read the manual several times. Thank you for presenting what I needed to know in plain English!
And it’s great that you did side by side shots of Canon and Nikon cameras. So helpful!
Excellent, as always, Amanda. I have been following some of your advice (and I got the book!) and my photography has improved a lot. Thanks for including the info on Nikons. I am a Nikon user, so that is very helpful. Now, I just have to try to figure out which Nikkor lenses are similar to the ones you have recommended… I am asking Santa for a 50mm. ;)
Eeek, just found this and am SO excited!! I just bought a used Canon EOS 30D (wasn’t sure i wanted to invest over $1,000 quite yet!) and feel LOST. This tutorial is easy to understand and took away the fear I was feeling every time I turned this big girl on! :)
Thank you, thank you, thank you!! LOVE your blog!!!
~cm
This was a great tutorial. I am currently taking Photography classes. I have had an D-SLR for almost a year now and LOVE IT!! I always enjoy your insight and tips and LOVE your Pictures!
I have a question for you. I am really wanting to get a new lens. I just have the lens that came with my Rebel XSI kit and I have the canon 50 mm prime lens. Its pretty much the only lens I use.
I am thinking about getting the 24/70mm f/2.8 lens but I wanted to ask if this lens is to “fancy” for my Rebel xsi. I plan to eventually get a new camera like the Canon 7d so I thought if I bought a new lens I would want it to be good enough to use in the future so I wouldn’t have to buy more lenses just for the new camera. I hope I am making sense. Basically I want to buy a lens that I know I will have for a long time, but I am not sure if its too much for my rebel??
Thanks so much. I wish I would have read it sooner. I took a bunch of pics of my granbaby and did not even look at the images as I was taking them. I had accidently put it on manual and all my pics came out very white. She was so cute at the playground and now I won’t have any pics of her there. I need to learn a lot about my dslr.
Thanks again.
Thank you, times three billion times! I have a cheap point and semi shoot Kodak Z650 and I have always wondered what that PASM on the dial meant! Now I know! I just took a pic of some droplets of water! My family will think I am a genius and that’s thanks to you!
Patty
nuestrasaventurasentexas.com
Great tutorial, Aperture can seem overwhelming to some, yet really it’s layering and you write it simply and so that anyone can understand how to set a frame to get a certain picture, you’re truly the BEST!!!!!
Thanks Amanda!
Thanks! I learned a lot, although I still have no clue as to how to turm off flash on my Nikon D3000 in Manual…
Best. Post. Ever.
Seriously, thank you!
I have to bookmark this. This is EXACTLY what I have been looking for after getting my dslr last month. Thank you SOoooooo much!! Do you also have any book reocmmendations for someone starting out in dslr/photo-world?
I have a question in regards to the exposure setting. I thought if you turned the dial to the left that meant more light, to the right meant less light. I think your post said the opposite. Just want to clarify. I have the Nikon D40X and I really like it.
THANKS so much Amanda for this tutorial. I have struggled for years trying to get aperature and shutter speed right. Just when I think I’ve got it, I still end up messing up my pictures! The most reason mess ups was for my son’s high school graduation last month which was held inside the gym. Needless to say, lots of blurry pictures!!!!
You listed your favorite equipments. What’s your favorite camera bag??? Do tell!!!
Thank you so much for this, Amanda. I haven’t purchase my camera yet. I’m still waffling between a Nikon and a Canon. But for you to post this in both camera formats is such a blessing. I’ll be adding this post to my faves for when I finally make the decision/purchase. Thanks again!
Amanda, thank you for this tutorial! Awesome! Now all I need is to get that amazing camera. Will have to sell quite a lot, a whole lot, at my little shop to have one:-) You rock!
Can I say “I love you” Amanda? Thanks so much for this post. It comes a couple of days before my first ever photography type course. The thought of reading through my manual is a little daunting (I know I’ll have to do it one day), your photos and words make it so much easier.
Thank you so very, very much for this. I don’t even know how to tell you how happy I am to have this guide. I have done so much research on how to take better pictures, but was left more confused than when I started. You are so awesome to share all this cool stuff with us….your fonts, you recipes, your tips. Thanks Amanda!!!
Thank you so much for this quick but really helpful tutorial!
That was amazingly informative!! Thank you!! I have been playing with mine and took a library-offered class on it but I still was sketchy and this is a great reference! I printed it out so I can ‘study’ it! :) Thanks for sharing your knowledge on this!!!
The timing of this post was amazing. I have been using the Canon Rebel XTi and just purchased the T2i today online. Came across this post and looked through your bag of goodies. What I’m curious about is filters and things that enhance pictures. I know nothing about that. How to create landscape pictures that have amazing reflections or colors. Is that done with filters or photoshop? Do you have any lens filters?
Thank you! I’ve only had my DSLR for a month and half and am trying hard to grasp everything. Your post helps. My biggest issue is getting the camera to focus on the spot I want and not want it THINKS I want. :)
Good luck on the rafating.
~ingrid
Thank you for that! You made it easy to understand!
Thank you so much for explaining all of that! I’ve had my Canon XTI for several years and have never gone past the auto mode. I love your blog and all your photos!
O-M-G!!! You are the most awesome person EVER!!!! I have been trying to shoot in manual, but it was always a guessing game for me!! I now know half way what I am doing! You are SOOO good at explaining how the different settings work!! I am SUPER excited to shoot my nephews’ b’day party today and then my lil’ princess shoot tomorrow! I feel like I am almost to where I can actually call myself a semi-professional just because I half-a** know what I am doing now & what to do to fix the exposure in certain situations instead of guessing!! THANK YOU SOOOOO MUCH for sharing!!!!!
Obviously we were all in need of a clear and easy understandable DSLR tutorial and you provided! Thank you so much!! this will make SUCH a difference for me, you have no idea!
Favorite post yet!
Amanda,
As usual, I enjoy reading your blog but this post is definitely most appreciated. My husband’s cousin is getting married today and I was asked to take pictures on Thursday (I am no photographer- I just have a dslr)..this tutorial was great for a good refresher/reminder.
Thank you for the work you put into this to share with others!
Deb
I recently upgraded to a 7D myself -I love this camera, and it made me want to really “get” everything about it. Very excellent primer on concepts, I love your work and your blog and read it often. Thanks.
Thank you so much for taking the time to do this. I need this in a pdf format and keep in my camera case…I’ll take it one lesson at a time. Where were you when I was at a wedding last night taking pictures LOL
Great tutorial! I was wondering if you have any tips for self portraiture (for fashion blogs!)? Right now I use a tripod and focus on a tree or other still object, set the self timer and run in front of the object. Unfortunately this can make for boring pics standing in front of trees all the time! Is there a better way to focus when doing self portraiture that Im missing?
Amanda! Thank you so much for the post! I always want to use an SLR camera (of my dad’s) but he never allows me to do that.., because I can’t use it and my dad doesn’t teach me how! This is great, Amanda! Thanks again, I’ll try to steal it and take any pictures I find! (just kidding.. :P)
Amanda, I have been a fan of your blog for some time now and always enjoy reading it and seeing your pictures. I was beyond excited when I saw your link on my blog show that you had a tutorial for DSLR cameras! It was like you were reading my mind. I have been scouring the internet and other folk’s blogs for any any information on learning how to properly use all the features on our Nikon D40x. My DH bought it several years ago and after taking the same shots last month with his camera and my old Kodak I was blown away with the difference between the two! Needless to say, I sat my Kodak down on the counter and off I was with HIS Nikon (as he lovingly keeps telling me LOL) taking pictures of anything that was not nailed down. I have even gone to Barnes and Noble and Borders to find just the right book to teach me but have not found one yet. Do you think this might be a mini-series? Feel free to drop by my blog anytime and again I find yours so interesting to the point I sat my DH down several days ago and showed him your latest post and pictures.
I thought your scarf tutorial changed my life, but Amanda dear, this just rocked my world! Thank you so much! I’ve had my DSLR over 2 years now and still don’t know what I’m doing with it. I cannot wait to experiment with it now. Thank you!!!
Amanda, what is your super hero name? I can’t tell you how helpful this posting is… I’ve had a Rebel XTi, currently have the Rebel T1i and just ordered the T2i. You would think I’d know what to do with the camera (especially since I have every book printed); but, I don’t have a clue. Seriously… I can point and shoot. Anything else I had over to the hubby and say fix! This is one of the few tutorials I actually kinda get. I can’t say thank you enough! I certainly hope you find time to post more in the guides for those of us that strive to reach your level of photography! (BTW, I even had to buy a scarf after that post! LOL! But, I just enjoy your cooking… b/c that isn’t something I even want to attempt!) Thanks again and have a super great weekend!
Thank you for this fantastic guide!
Hi Amanda, you are such an inspiration. I have always bought point and shoot digital cameras and my latest camera is the Sony DSC-TX9 but I have always been fascinated by the slr’s and now am seriously considering buying one. Can you advise which one is a good camera. I see a new nikon for D-3100 for $700. Do you think that is a good one? I cannot go up to thousands of dollars so I was considering something under a thousand dollars. Any advice you could give would be helpful. Thank you so much!!! Amy
Thank you! I love photography tips! I think I may need to print this out and keep it in my camera bag!
Thank you! I have played with my SLR for a year now and still don’t feel comfortable out of the Auto mode. I play with the manual settings on occasion, but am not comfortable with it yet. This will be a tremendous help! Thank you!
What a great post! Thanks!!
Amanda-
THANK YOU!!!!!!!
This is the first time that I think I understand all of the terms and settings. I have been muddling through all of this time and not really sure of what I was doing. You have put it simply in terms that make sense.
I can’t thank you enough… Now off to get some practice.
Have loads of fun on the rapids!!!!
kknola from Woof
THANK YOU THANK YOU THANK YOU THANK YOU THANK YOU!
I have owned an SLR for over a year, and had NO idea how to do any of that stuff…I can’t wait to try it out this weekend :)
OMGosh! Thank you, thank you, thank you! This seems to be the best, easiest to understand instructions I’ve read ever. I’ve had my Nikon D-40 for over 2 years and still shoot on Auto hoping to get lucky with my shots. Am going to print your instructions & take them with me everywhere my camera goes. LOL. Thanks again, Amanda! YOU ROCK!!
Thank you so much for this tutorial. Thanks for taking the time to show us. I have the canon and don’t know how to use it. I am so glad you did this! THANK YOU!! Once I get back home I will sit and read through all this.
Thanks again!!!
~Dorcas
Thanks Amanda for again giving your readers some inspiration and tips to get out of automatic. I am going to take your tips and put them on a little laminate card I am going to hang from my new DSLR (getting it in October) so when I question what I am supposed to do your handy little tips will be there.
Stacey
Thank you, thank you. I’ve read at least 20 “basic” tutorials like this one, but everyone has their own tips and insights, and yours was very helpful.
I would love it if you would do a “part 2” detailing lenses a little more–what exactly do the numbers mean? I get the f-stop, but what about the mm? Which lens makes a good wide-angle lens, and what are the pros and cons? I’m dying for a macro lens, but is there an affordable option? Do macro lenses (or others) double as good portrait or landscape lenses?
You’re awesome, Amanda. Thanks again for this.
Thanks for the refreshing tutorial, a great summary. : ) I have a Canon 50D and don’t take it off Auto much since I can’t remember what button/wheels adjust what. It’s usually when we are traveling that I get into photo situations that I know could be bettered by using Av or Tv, if I could just learn/remember how to use them. I need to look up how to change to manual point focus too! That’s one thing that gets my hubby (who uses my camera at times) & I the most, the Auto focus on the closest thing to you. Argh! Most of the time it’s ok but when you’re shooting thru tree branches or grass, that’s not alway what we want. I need to dig out the manual and practice it, otherwise I’d just forget and stick to Auto : )
Is QuiBids legit?????????????
This is really helpful. I can’t wait until I have my camera in front of me so I can try some of it. Especially since I’m going travelling in less than a week and will take millions of photos.
Thanks for posting this! I’m new to photography but can’t find a class that isn’t too basic. This tutorial is a great help and you did a great job at explaining things in laymen terms for us non-photographer types :)
You’re so friggin’ awesome!
…and I want your camera. I want it BAD.
Thank you! Thank you! Thank you! I have a pretty great point & shoot that has so many of these features (Canon PowerShot SX10 IS). I am trying to “figure it out” on my own as best I can because I want to know more than a standard photography class offers, but I don’t really need to take an SLR class either. You explained EXACTLY what I wanted to know about ISO and aperture in a way that made perfect sense! Thank you! Thank you!
Hi Amanda! I am an avid reader (more like viewer of all our your beautiful fashion finds, scarp booking, and photos)!
Thank you so much for explaining your process. I have been stuck on which way to expose away from 0 and your method of moving from 0-1 for those beautiful and bright photos you take makes it a lot easier.
I have 2 questions if you have time. Once you decide if you either want to focus on aperture or shutter speed, how do you then decide how much depth of field or how fast of a shutter speed you want? There is still so much room for guessing. Do you understand my question? I hope so. I mean, to get a real close up photo of a flower or bug is easy to decide the settings, and a car passing by would be easy to. But everything in between, I just end up taking 20 pics at each setting making it hard to really see a difference..
Second question is where did you get your shirt pop art type shirt of your pup? Used in your blog photo?
I know I wrote a novel. Thank you for your help!
Thanks for the great tutorial, it is just what my friend needed to get the most out of her new camera!
Thanks for the the easy to understand instructions! I know enough about my camera but this is the perfect refresher and great for a quick reminder!
Than you so much for this! I have always wanted to get the most out of my Kodak camera and this will help alot!!
Thank you! I’ve had a Nikon D80 for waaay too long and I just don’t know how to use it. I’ve done more reading your post today that I have the whole time I’ve owned it!
Wow, thank you SO MUCH for taking the time to do this. Can’t wait to try it out!
AMAZING tutorial!! Wish I would have read this before I paid a couple hundred bucks for a class LOL =) Thanks for always offering us all these great tips and putting them in plain English! ;)
Very helpful! I took copius notes and will be trying out some of your tips this weekend. Thanks for taking the time to write :)
What a great tutorial. When we bought our Nikon D90 we did the best thing we could have ever done for ourselves… We made a pact to only shoot in manual. Having only ever had a point and shoot this was a huge risk for me but it forced me to learn it without a crutch. Some people are so afraid of manual mode, but I can’t stand to shoot any other way now. Wish I had this tutorial when I first started out! Have you ever seen he books by Bryan Peterson? They were a godsend! Anyway, thanks for a well worded and illustrated tut… I’ll be passing it on to my friends just starting out on their DSLR adventures! Have a great weekend!
oh thank you soo much for the tutorial amanda!!!
im still using 450D which is similar to rebel xti.
ive been wondering too have u been upgrading your camera..my guess was true!!! Been thinking of upgrading to (one number)D. maybe 5D or 7D. still a canon fan tho :)
happy labour day to you!!!! :D
p/s : im a muslim and we will be celebrating Eid mubarak in a week! there’ll be fireworks, firecrackers, colourful lights everywhere! and food!!! and with this tutorial, im sure hope will get gorgeous eid’s photos!!! thanks again amanda!!!
Amanda great post! Thanks for sharing your info and experience with us. Have a great weekend!*mwah*
Awesome tutorial. When I shoot photos, I sometimes forget the uses of each setting. I’ve been wanting to make a cheat sheet to carry with me when I shoot, and now you’ve inspired me to do so. Thank you!
P.S. Can you tell us what post-editing software you use? If CS, which number? Do you use Lightroom? Would love to see tutorials on that!
You rock, Amanda!!!
{hugs}
Great tutorial, Amanda. Have fun with the white water this weekend…it’s a blast!
Thanks for the posta Amanda! I love your photos! I have a Canon aind I love it!
Hugs, Luciana.
Who knew that those letters on my dial meant anything I could ever understand?! You are a wonderful teacher. Thank you for your easy to understand explainations! I have a Nikon P80 (not too very technical, but it’s a start) and I can’t wait to take pics of my boys playing soccer and football!! Have fun on the raft!!
Thanks Amanda! I printed it and put it in my 3-ring binder so that I can take it outside with me while I fiddle with my dials. I am doing pretty well on manual, my problem is that my pics don’t come out so crisp sharp as I’d like. Maybe I move too much plus I’ve heard about a lens’s “sweet spot” so I’ll have to find it in my zooms.
Thank you so much Amanda! I have been reading books about photography so when I get my SLR soon I will be able to go out and take shots that I love SOC and not feel like I need to edit them. Although editing is so fun. Your tutorial, while there is so much more for me to learn was VERY helpful. VERY SIMPLE and So easy for me to understand.. more then in the stinkin’ books I have been looking at. I am a visual learner and this makes sense enough for me to remember after a few times reading it. SO AWESOME! btw- love your site too. I have been a reader of yours for a while ever since someone linked to your weight loss story. I just have not commented until now. Life is busy but thankfully it is slowing down enough for me to start commenting on blogs again.:):)
THANKS for this, Amanda! I’m considering purchasing my first DSLR, (I’ve had many other digital cameras). One thing besides the money that holds me back is wondering if I have the time to learn how to use it. Your tutorial looks very doable! You have a knack for teaching! THANKS!
I cannot thank you enough for this FABULOUS tutorial! I’m one of those that haven’t ventured out of my comfort zone (auto mode) many times but that will all change now! :) With your suggestions, I look forward to creating some awesome photos!
This is a wonderful post Amanda! I am continually trying to learn about working with my camera and your tips are wonderful! Now I can’t wait to get my camera out this weekend! Thanks again and have a wonderful Labor Day weekend!
Thank you for the post Amanda! I don’t even have a DSLR camera, but I’m saving to get one soon. I’m bookmarking this post so I have a tutorial ready to go. :)
hey amanda! thanks for sharing. i am ‘favoriting’ this page. i really need to buy a new camera. is there a relatively inexpensive (like 500.00) that you would suggest? any help would be so appreciated! have a great holiday long weekend!!
What a great tutorial! I have been frustrated with manual mode. Sometimes it’s so hard to tell what the picture actually looks like on that little screen once you take it, does that make sense? I took a bunch of pictures on vacation in manual that I thought looked good on my camera, but when I put them on the computer I realized they were definitely overexposed. I guess it’s a learning experience. You’ve inspired me to take my camera on my labor day trip this weekend :)
Thank you for this! You’re awesome!
Wow, thanks so much for this tutorial! I have the Canon Powershot SX110 IS and while not a DSLR, I bought this one because it allows you *some* ability to change shutter speeds, ISO, etc. It was supposed to be my slow entry into DSLRs. Of course it’s been almost 2 years and I haven’t done anything other than point and shoot. But thanks to your post I am totally going to try out the different options on my two Boston Terriers this weekend!
OMG, I saw this pop up on FB this morning and I have been posting something scarily similar lol–
http://nicolemarieportraits.com/blog/
Thank you SO much for this tutorial! It’s perfect and just what I needed to start trying to get myself out of auto! What a SUPER quick reference guide! T so much FS!
Oh, and I wanted to ask…how many of your pictures are straight out of the camera and how many are doctored up. They are always so clear and beautiful and I just wonder if I need to invest in Photoshop or something!
Loved this tutorial. I read Understanding Exposure, which was wonderful, but this quick tutorial you gave was just what I needed. I have the Nikon D40 that you used in your example, and I also recently bought the 50 mm prime lens. The magnifying rings I bought to put on the 50 mm have really added to the fun :)
Again, thank you, thank you for this simple yet informative tutorial!
Great post! So informative, I have got to go get your 27-70mm lens asap!
GREAT info, Amanda!!! You explained it all so well!! :) Have a great weekend <3
Linds
As much as I love everything you post, I have not been this excited to read a blog post on a long time. THIS is perfect for me. It’s like you were talking TO me! I have a Canon EOS T2i and this tutorial is going to make me a smarter, better picture taker. THANK YOU! xxoo
Hi Amanda! Great tutorial! I absolutely love it. Btw, may I have some advice from you on which brand of camera to get? Should it be Canon or Nikon? Thanks! :)
Hi Amanda! I’m still day-dreaming of my first dslr, so i like finding out what other scrappers use…and would love to ask for recommendations for a 1st dslr for a wanna-be shutterbug. :) or you could point me in the right direction…thanks in advance!
hope you have a great time on rafting, be safe!
Thanks for this tutorial! I have a Canon Rebel xs, which I LOVE and have so much fun playing with, but this is gonna help me out even more. Some of it I knew but had gotten fuzzy on the reason of why it works and what it does, etc. etc. I hope to play a lot this weekend. =)
Have fun whitewater rafting! Are you going to the Ocoee? I’ve been there twice and love it.
Thank you for this wonderful resource – you are a star for putting it in plain English for all to understand!!
great post! Happy Labor Day!
BLESS YOU! I just bought the Canon T2i a week and a half ago and am clueless, but wanted to take pics of my nephew this weekend, thank you for this! Just in time!
that explains so much! thanks for sharing your expertise! love your blog!
THANK YOU, THANK YOU, THANK YOU!! This is so helpful.
Thanks for the tutorial! This should be useful when I’m (finally) able to buy my DSLR! :-)
XOXO – Hannah
Thank you so much for posting this! I feel like I understand my camera so much better now! I plan to practice this and hopefully have much nicer pictures!
Thank you SO MUCH for posting this! I have a new Nikon D-90 and haven’t learned to use it yet. This is a great tutorial to get me started! THANK YOU!!!! :)
I loved my D-90 I have the D 7000 and I just feel more love for the D-90. Keep playing with it you will love it.
Just got me Nikon P100 and not very familiar with DSLR camera’s. I’m more use to Canon 55mm old style or Sony Cyber Shot ,which I never like much. Your article has help me to better understand all the switch,button and gizmo settings to get great pictures .. Thx
Michael Lee
Saginaw,Tx