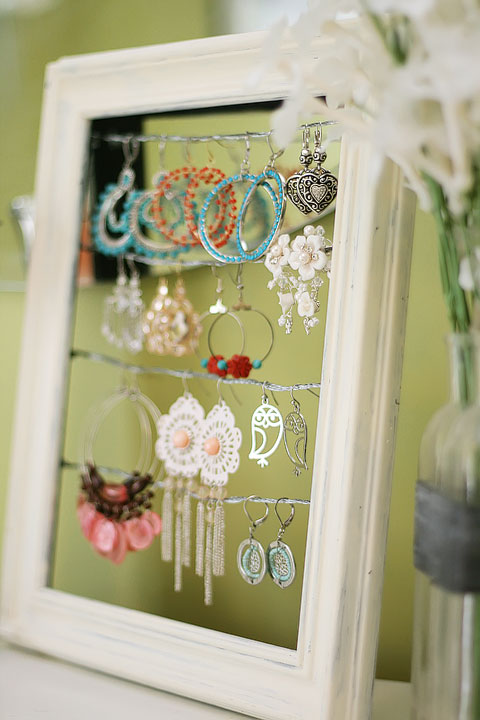
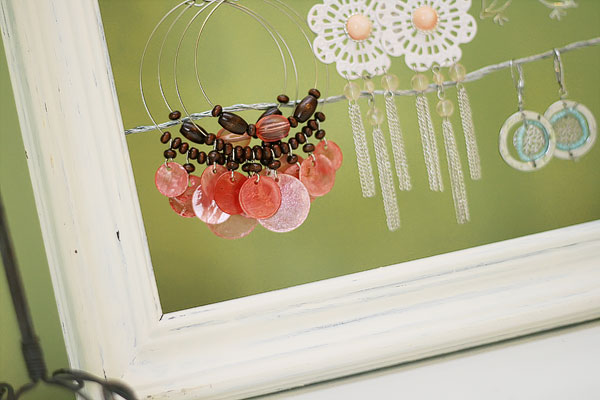
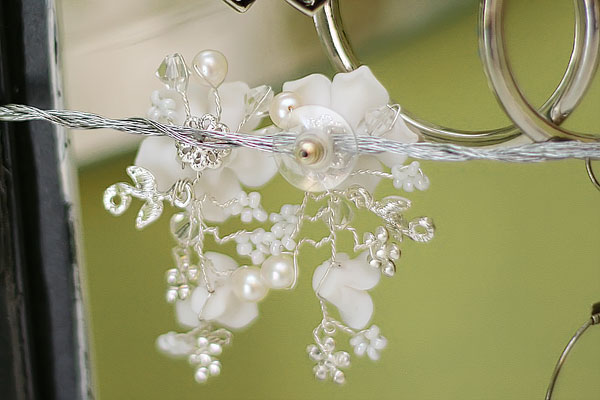
This fun little shabby chic earring stand, made from an altered picture frame, is a great way to hang and display all your beautiful, dangling earrings. I had the idea for this project after we talked about my love affair with dangly earrings and how to display them. I don’t know about you, but I just love seeing them all hanging in a row! :)
The next day I made this earring frame, and it was so quick, easy, and inexpensive to put together, I knew I had to share it with you! :) I spent a grand total of $5.34 on this project. Plus I got to work with a staple gun. (Thats about as close to a power tool as I get!) ;)

Cost: Less than $10
Time: 30 mins
Supplies: picture frame, 12′ of picture wire, acrylic paint & brush, staple gun (or nails/tacks, etc)
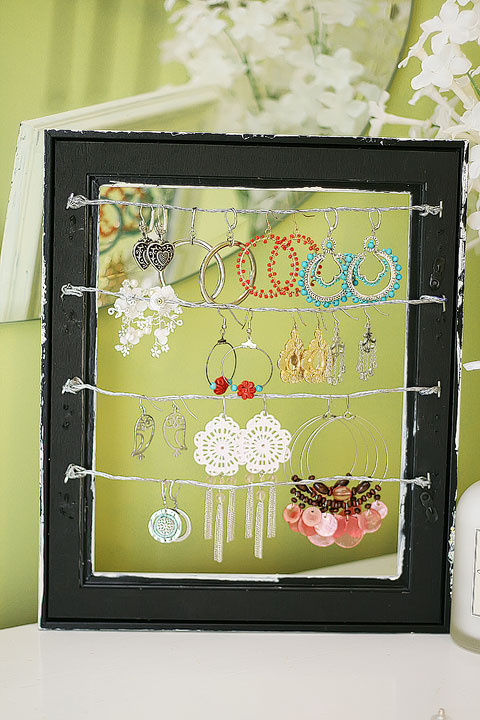
I started out with a black 8×10 picture frame from Walmart, $3. They also have 8.5×11 document frames which would be good too, for a little extra space. On the same aisle, I picked up some picture hanging wire. They sold them in packages of 6′ for $0.97 and I used two.
Since the frame wasn’t real wood, I was a little concerned with how it would turn out once I painted it. I definitely wanted it to have the antiqued look, where you could see the previous color underneath the white paint. I was afraid the only way to do that would be to use a real wood frame, so the wood would soak up the paint and show the grain underneath. I thought this frame, since it was completely flat with no texture, would just produce a flat, solid color when I painted it…
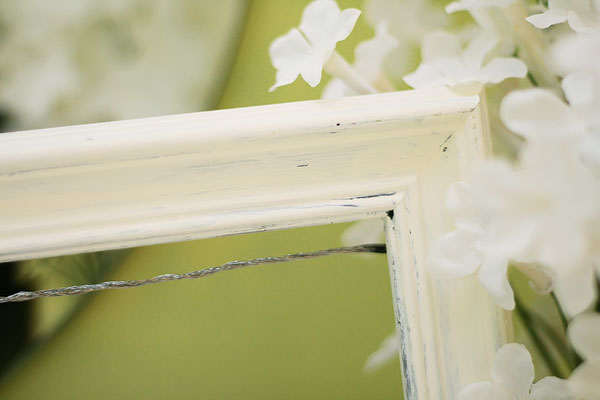
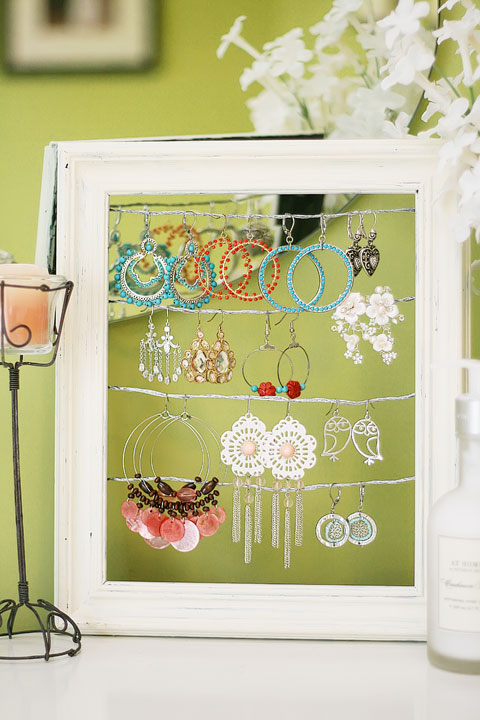
But as you can see from the above images, this little inexpensive frame did great! :) I was very pleased with how it turned out.
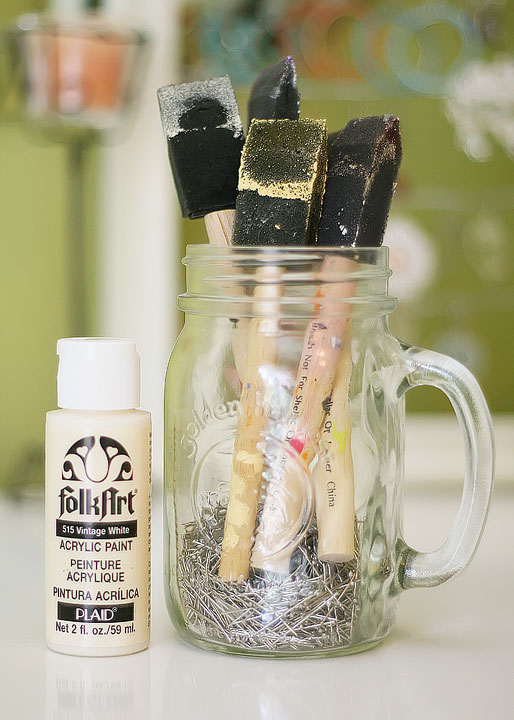
I gave the frame a couple coats of paint with this almost-but-not-quite white acrylic paint using the brushes pictured. I used this type of brush because it’s what I had, but I really liked how it turned out because, well, honestly, it didn’t do a very good job! But in a good way! It would wipe away some of the paint as I was trying to paint more, giving it that faded, shabby look. I just painted the frame, I didn’t have to sand it, wipe it, or distress it in any way.
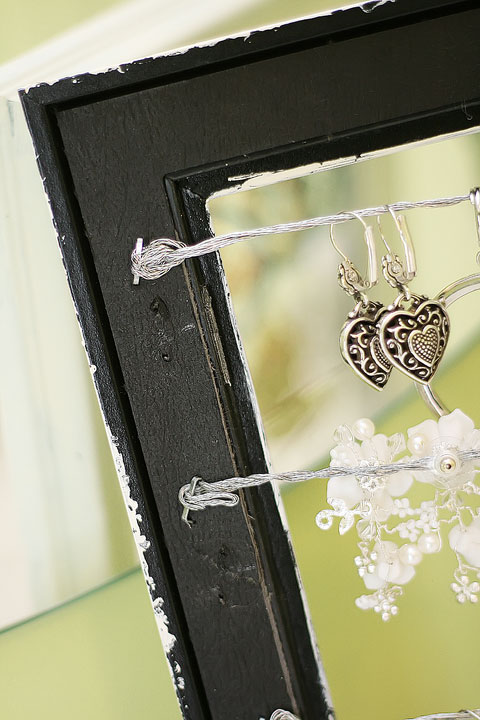
Next, I took a piece of wire and laid it across the back of the frame. I folded it over twice so that I had three strands folded together that were just a little longer than the width of the frame (this was to make the hanging wire a little thicker).
Twist the wires loosely so they hold together, but loose enough so you can stick a post earring through there if you want! :)
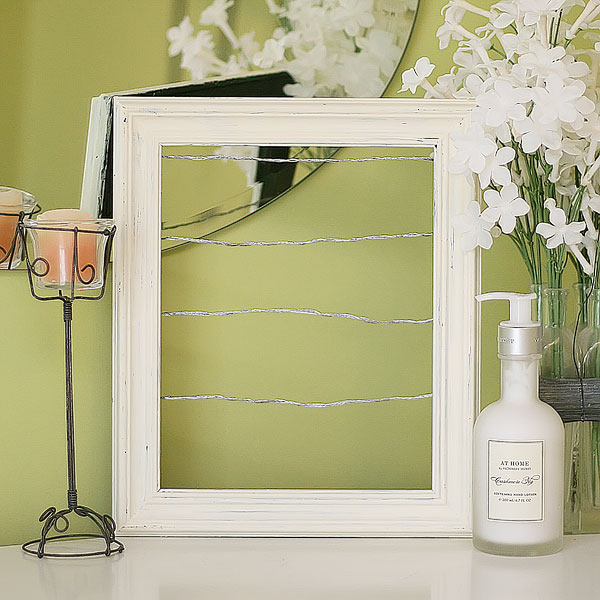
On the back of the frame I used a pencil to mark where to hang the wire. I started with 1/4″ from the top opening of the frame, then spaced the remaining wire 2.25″ apart.
Here’s what the back looks like.
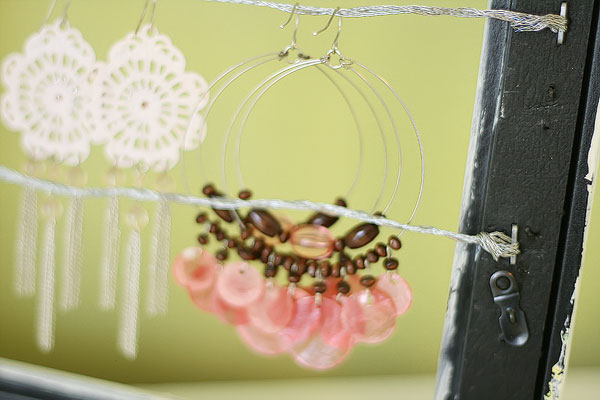
I stapled the wire to the frame, then folded and tucked the wire so it wouldn’t come out. If you don’t have a staple gun, you could also use small nails or tacks to wrap the wire around and hold in place.
I gave the knots a few taps with a hammer to make sure there weren’t any sharp wire edges sticking out.
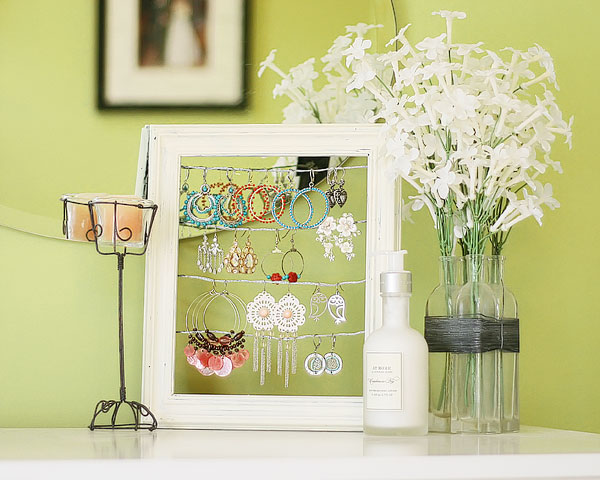
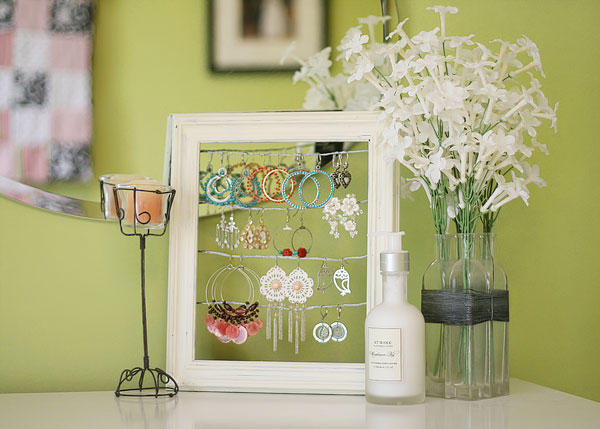
And that’s IT! :) So quick and easy! It looks beautiful on a dresser or chest of drawers.
Let me know if you try it! :) Have fun and thanks for looking! :)

I saw your photos on Pinterest. I absolutely love this design and for $5 you can’t beat the price.
Thanks for the great post and interesting ideas. It is perfect gift for my mom
What a neat idea, need to do one for my aunt.O made one slimier to this using the thick lace with very small loops on one side, I use the loops to put my earring loops through, have to figure out one for studs
Thanks Amanda! I’m going to make this for my friend’s 18th birthday! She’ll love it!
Thanks for sharing such a great idea.
Love this idea! I’m adding this to my to-do list….
I love this idea, will have to get supplies this week! I have ask, where did you get the cute birdie earrings? I can’t stop starting at them!
I love your beautiful idea. I put my own earring organising idea on my blog but linked to this page to show some of the other lovely ideas I’ve found online. Would you take just a minute to check that you are happy with how I’ve linked this and that I have reference it to you properly. I am really new to blogging and really want to make sure I follow proper blog etiquette!
Thank you.
ooh! I have a frame that I bought from the second hand store but hadn’t found a use for it. This is super cute and perfect to hang in my bathroom.
I loved this idea so much that I actually made three of them except one I did sideways for my really long earrings. Yesterday I was trying to figure out what to do with my obscene collection and this was genius! I have mine hanging on the wall and it works wonders. THANK YOU SO MUCH!!!!
A very simple, but practical, original, and pretty idea. Thank you.
I made one for my roommate, only i used a poster frame, rather than a picture frame, so that earrings, necklaces, bracelets, etc. could hang on it :) it worked SUPER well! i used different wire, though, so that i could twist multiple colors together. the wire is thinner,, but still seems to work. thanks for the great idea!!! ^_^
I just copied this and made one! I added flowers to mine :) Here’s the post: http://growingupourstyle.blogspot.com/2012/12/playing-with-pinterest-dangly-earring.html#
I just want to say how much Ive always loved your blog, how do I follow you?
Would love to know where you got the flowers/vase and candle from?! So pretty!!!!
Realized it doesn’t work with plastic frames. Can’t seem to hold wire in place. Need a wood frame.
I made my own today, only I used string instead. I braided four strands then knotted the ends for extra security (although I don’t think they were going anywhere). I love how it turned out, thanks! :)
What a great idea! I made a necklace & bracelet hanger but never thought of doing something for my earrings. Love this!
Saw you featured at The North End Loft.
Debbie :)
Hi! I love your earring frame and have shared it on my Friday Finds.
Hi Kevin & Amanda! I just featured this in my weekly Pinterest Project of the week post! Thanks for this cute idea!
http://thegohmans.blogspot.com/2012/07/my-pretties-pinterest-project-of-week.html
I gathered the supplies from around the house and my husband made this for me today. So cute!! Thanks for the great idea.
And have a great time in Sweden. I cannot wait to see your pics. The ones of Tuscany were breath-taking.
This is brilliant!!! I cannot wait to try it, most likely tomorrow, for it is getting late. ;) Thank you so much for sharin this amazing idea!!! I will need three for all of my earrings. Hee Hee! Thanks again!
This blog stole your entire post and reposted it. I hate it when people do this, so I wanted to let you know.
http://blog.bjohnsonjewelry.com/diy-jewelry-frame-display/
I love this idea and I couldn’t help but notice those bird earrings! Where did you get those? So cute!
Can’t wait to create this! What a great idea.
I really like this idea to hang earrings on, but what would you suggest to have it stand up? This would be a cool idea when I show my jewelry. Thanks
Hi there, you could have a plate holder, like you might have on a shelf. Cheers!
Hi! I featured your earring display here:
http://wastedlace.blogspot.com/2012/02/tutorials-earring-displays.html
Have a nice day!
excellent idea!
I made my own and love it! I had a old Home Interiors frame from the late 70s/early 80s. I took out the back and glass, cleaned up the wood frame, and painted it with silver acrylic paint. My earrings, combined with the frame, look like a work of art! I used the original hangar and hung mine on the wall. The way the frame is constructed, it worked well to hang it. Thank you so much for the inspiration! The only thing I had trouble with was the soft wood the frame was made out of. The staples didn’t stay put until my husband suggested overlapping the first staple with a second. That held great! Thanks again!
Found this on Pinterest and did it today. So easy and cheap. Thank you so much for sharing this DIY craft with us AND for making it so easy to Pin! :)
Thanks for the excellent directions! I’ve been wanting to make an earring display and this inspired me to get it going today. I was curious how you have it standing up without the “leg” that comes with a picture frame. Thanks!
These are so adorable! Could you hang them on the wall?
Love this! I just made one and am having difficulty standing it up. Any tips to make it free standing? I tried even an easel but not working either. Thanks for the tutorial!
A plate or picture stand would work
Great tutorial and creative ideas! thanks for sharing.
WHERE did you get those owl earrings? I just adore owls and have been trying to find some adorable earrings! Ah! Love the frame idea, it’s great for showcasing your earrings!
SO pretty! I was truly inspired and actually made my own version of this.
Thank you for this guide!
http://fitandfashion.wordpress.com/2011/09/26/organizing-earrings/
Great tutorial! I made the earring display and wrote about it here: http://homeinthecity.tumblr.com/post/10125283617/crafting-earring-display!
Hi Amanda,
I just was able to try this today! It came out really cute… the only thing I might change is repaint it with a different color since my room is pretty neutral and my jewelry at this point isn’t all that colorful! lol I hope to get the post up for this week, I would love if you would stop by to check it out!
Hope you are having a blast in NY! Let me know if you want to come to Boston!
-Ali
Wow this is awesome!
Saw this on Pinterest and just made it! Only cost me about $4.00 and it came out great :)
this is the best tutorial ever! thank you!
Wow! Just found you via pinterest (free fonts) and I love this DIY. My daughter has been wanting something for her danglies and this looks very do-able! I’ll be following from now on!
I can’t wait to try this! I have just discovered my love of more costume jewelry! I was always a diamond (Okay, cubic ziconia who are we kidding) simple kind of girl. But I now LOVE my hoop earrings and big long necklaces! I can’t wait to try making this so I can display all my new finds!! I just love your site!!
-Ali
Boston, MA
What a lovely idea! Thanks for sharing this.
I love this! I just picked up some old beat up frames from a garage sale on a complete whim && have been hunting around for a project!
I love this idea! This would be a perfect way to display our earrings, and you made it look so easy to do that even the “crafty-challenge” could duplicate. We will certainly be doing this project. Thanks for sharing.
Dear Amanda,
I am trying to find owl earrings like the ones you have pictured, only in a bronze color. Where did you get your silver ones? That’s how I stumbled onto your picture frame for earrings. I love the idea! So simple, clever, and thrifty! Thank you for sharing!
Connie
Wow! Pretty neat…amazing creativity!!!
I made one…and it turned out great! It looks just like yours…I am in the process of hanging all my earrings on it now. Thanks for the simple, yet great, tutorial!!
I REAlly like this Idea. Its cute, customizable and economical. Thanks :)
Loving the Bokeh on you photos ! :)
I just finished up mine today! I’ve had yours pinned for so long I almost couldn’t find it! I’ll have to give you credit in my next craft post.
Check it here!
http://missrschultz.blogspot.com/2011/06/life-in-craft-room_25.html
how do you make it stand?
Oh! I made something just like this for my mum when I was a boy!
I used Elm slats from an old shop-display to make the frame and shiny metal with holes, in which I think was material for making air-vents, instead of wires; that let her put any size ear-rings in anywhere, so one corner could be all little earrings. It also let her hang little earrings in the middle of the hoop of big hoop earrings :-)
But it took ages to make the frame – I wish I’d just thought of using an old picture frame! Them mum’s sister liked it so much I ended up making another for my aunty and for got all about it! The Internet wasn’t around for sharing then…
This is such a great idea! Thanks for sharing ;)!
Wow! What a fabulous idea and a stylish way to organize your jewelry .. Even hair clips would probably work to.
Thanks for sharing,
Ruth
Very elegant, I am going to try and make something similar for necklaces…I think it would be nice to have a frame for each.
My friend just got her first apartment by herself so I’m going to make this for her!! Thank you! :D
Such a lovely & simple idea! For my own earrings, I use a strand of chain to hang my earrings from, it’d be fun to try them on a picture frame! That way the earrings can be hooked in the links.
Thanks for the inspiration :)
Hi Amanda! I just LOVED this craft! I had so much fun making it! I posted a picture of the one I made here with a link back to your blog. Thank you so much for posting! :D
http://ryanandbrittanywoolley.blogspot.com/2011/04/day-seven-of-happiness-challenge-time.html
Your blog is inspirational! I love this idea. I am writing about homemade jewellery stands and have added a link to your wonderful site. Thankyou for sharing your inspirations xx
Neat idea, and great photos too, btw! Thanks for sharing this
What a great idea! Thanx a lot for such a tutorial
What a great idea. You inspired me to make my own! Thank you! Love your blog. :)
http://brandysbaking.blogspot.com/2011/03/crafty-thing-earring-organizer.html
Hi Amanda, I have been following you for a while now but only yesterday discovered this post and made my own frame today.
http://fancycowdecor.blogspot.com/2011/03/how-to-make-jewellery-frame-holder-at.html
It’s super sweet, yours and mine :)
Hi Amanda,
I just featured your gorgeous frame on my blog.
Thanks
xxx
Betty
Hi Amanda! congratulations on your great design! I will try it at home
That is a fabulous idea! I don’t have many dangley earrings – I generally just wear small gold hoops. But gosh, I almost want to start now, just so I can make this and hang them like that! It’s an art piece! Of course….the earrings are cool too – that helps. Great job. And now…I just saw something about rag quilts in the side bar….got to go check that out too!!
loved this super easy project, my husband loves that I don’t have earrings all over the dresser!! I think it may even be christmas for some special ladies ;)
Oi! Lindo! Lindo! Lindo seu trabalho!!
Saw this last night…made it tonight…will hang it tomorrow :-) Thanks!
Wow, this is gorgeous, I’m going to go out, buy a frame and make on of these. Earring storage sorted! :)
I love this! I’m thinking about making one for myself. Really cute :-)
I did the same thing, but stapled screen on the back of the frame…instant holes to hang your earrings and super easy to make….try it!!!
Made one today and love it! Thanks for posting the tutorial!
Amanda..I want to make this for a very special friend but can you tell me how you have it stay upright when its on display? I love this!
I immediately went to Walmart after reading this and spent a whole $5.57. I love how it came out and it was so easy, thank you so much!
Love, love, love this! What a great gift idea too!! I’m making one this weekend! Thank you so much:)
This is such a cool idea and looks great too! I love making things and have a million pair of earrings so will definitely be giving this a try. Please check out my blog if you have time and take a look at some of my handmade projects :)
http://miniminadesigns.blogspot.com
Samina
Amanda, this is perfect for those of us who travel full-time. I wanted something that would display my jewelry but travel well also. This is perfect! Thanks!
I just finished a 16×20 frame I found outside for my mom for her 60th birthday that is Sunday. She is a crafty lady and thats where I get my love for crafts from, she’s going to be so proud of me for making her this and it literally cost me $0 to make! I had the paint from being a crafty person, I had wire from when I decorated my house and hung pictures, I borrowed my brother’s staple gun, and found the frame!
I am linking to your blog-come visit me!
freshfibers.blogspot.com
Thank you so much for sharing this.I’ve been wanting to learn how to paint something that gives you that faded look,coz i got a wooden lamp,and i’ve been dying to paint it like that .I can’t wait to get started.
Thanks for the great project idea. I want to “run” right out and do it today!
I glued a square of black nylon netting to the back of my frame and the hooks hang though the netting. I have two of these handy on the dressing room wall. They are pretty, too.
I love this!! I have seen so many of these types of things but yours is the first one that I just absoulty adore!! Also, I love the owl earrings!! Where did you find them!?
Amanda – I love this! Made 2 for my business to display earrings on. It was so easy…and so fun! Thanks for inspiring me to make my very own!!!
That is so crazy! It’s been a while since I’ve looked through some of your posts, and I was amazed to see that someone else had found a very similar idea to a project I took on a few months ago for a craft table where I was displaying earrings.
I bought frames at Goodwill, and used dowel rods, even hot glued some as legs to hold up my frames, and hung the earrings on them… fun idea! The pic of my frame is the second one in this post.
http://calebandmolly.wordpress.com/2010/04/17/a-spin-on-date-night/
This was such a great idea i made on for my mom but I did it horizontal instead. My mom loved it. Thank you! You are so creative.
This is a perfect idea for me to use. Thank you so much Amanda for being such a giving person and sharing your wonderful ideas and everything else you give on your blog.
Lee Ann
I love this idea so much, that I actually did it! I changed it a bit because I have so many earrings, but it turned out GREAT!!! I love it! I also used thin lace instead or wire. It took me a while to get the lace pulled tight enough and hot glued down so that it would stay, but it turned out great once I got it right!!! I blogged about it so you can check it out if you want! Thanks for the great idea!!! :-)
http://babyloveblog.com/2010/07/all-the-random-stuff/
When I first found out about this awesome post, I thought to myself hmm, I’m totally gonna make one for my mother-in-law! She is sick with cancer right now, lost a lot of hair and everything and has been in the hospital for little over 4 weeks now. She’ll be getting out pretty soon though HOPEFULLY! So I wanted to make her something before she comes home.
Everything you see in the picture (minus the drawer and the wig) are stuff I bought for her. I did lots of paintings, hammering, bought stuff from both Micheals and IKEA store. Hope you guys like it!
Pictures Here:
http://i32.tinypic.com/zvqxx4.jpg
http://i29.tinypic.com/1495udh.jpg
-DJ!<3
Hi Amanda – I LOVED this tutorial! I went right out, bought two frames {I have LOTS of earrings!}, and followed your great post! Thanks for the idea – I LOVE walking into my bathroom and seeing both frames full of dangly earrings :). I specifically bought frames that would hang flush on my wall – they look so great. I posted about it on my private blog. If you’re interested, send me your email address and I’ll invite you to check it out. Thanks for your fun blog! :) ~Stefani~
I did it! I got mine done and I have to thank you as this little project helped me find a use for something I have had for a few years and no idea what I was going to do with it!
You can see my finished project http://crazyforchipboard.blogspot.com/2010/07/keeper-of-jewels.html
Oh my goodness! Gorgeous gorgeous gorgeous! :)
Well, that is just cool. What can I say? And I’m totally in love with your scrapbook room and especially your organizational skills! Rub some of that off on me, would ya?! ;-)
My friend has a similiar frame for her earrings but instead of the strands of wire across the frame she covered the whole area with a piece of mesh. She used shade mesh which is a heavy duty weave for blocking out the sun but with holes big enough to insert the earing backs. You could also use fly wire mesh if you wanted a wire finish. She can store many earings this way and they stay separated because each earing is in one hole of the mesh. Neat!
Hi Amanda! I made two jewelry frames yesterday – http://turley-times.blogspot.com/2010/07/easy-peasy-jewelry-storage-its-pretty.html Thanks again for the inspiration!
Hannah
OMG! I totally love it! What a great idea! A couple of these would look awesome on the wall if you have a dressing room, I always have problem storing earrings!
SO cute! And I must know where you got those owl earrings!
This is wonderful and i really LOVE it! Thanks so much for sharing and making this tutorial! So happy to have found you very inspiring space! Have a lovely merry happy day and love to yoU!
After reading this post, I went out and bought the stuff to make my own. It is SUPER simple (I used tacks in mine) and is such a creative way to keep earrings organized… normally mine end up in a pile all mismatched and hooked on to each other… not anymore! :) thanks for sharing!
Amanda this is so pretty! I love it. What a great idea. And those Owl earrings made me swoon!
Love this idea! Will definitely have to give it a try. Will post back a link to my blog once I put up some photos! Also, love those little, silver owl earrings. You couldn’t tell me where you got them could you?
OMG!! This is sooo adorable! I think I have all the supplies! I just need to get the wire:) Thanks for the great idea.
This is the cutest idea! I have lots of earrings, some in a hanging jewelry organizer in my closet, some in a jewelry box! I am definitely going to try this!! Cute and inexpensive!! love it!!
I really like this stuff!! Of course I’m going to do this cute organizer!! Thanks beautiful Amanda!!
I can’t wait to try this! I have a BUNCH of perfecto frames to use! Thanks for the steps!
Amanda, this is a wonderful idea!! I was just thinking today how I was going to hang my earrings. Thanks for the post!!
GREAT JOB!!!!!!!!!!! I’ve always wanted to hang my earrings up this way and have never found anything I really liked to put them on. This is a cute and easy idea, I’m going to try and make one myself now!!!! Thanks for your crafty ideas!!!!
Absolutely love your blog, photos and especially love your dogs :) The kayaking ones cracked me up and made me more creative with my kayaking photos — Thanks!
You have inspired me to dig in with both heals on creating a blog … researching now …
I’m scraplifting this one immediately! I think this will be my bestie’s bday present as well. She has oodles of gorgeous earrings, but no real way to display them. Thanks for the awesome tips & photos!
K
I seriously love that!!! What a great idea!
What a clever, unique and creative idea….. I did it already since I had everything in my home already. I have a gorgeous standing jewelry chest in my bedroom, but all of my earrings just sit inside….. Now they create a shabby chic yet vintage look in my already vintage bedroom. I wonder if you could come up with something creative to display a couple of my husband’s ties for work???? We have a vintage and chic “his and her” bedroom…. any thoughts girlfriend??
What a fantastic idea! Love it! Will definately try this out!
Super CUTE and creative idea! I love this and will definitely have to give it a try! Thanks so much for sharing that tutorial!
Please, please, PLEASE tell me where you get your earrings!! I especially love the owls and the ones on the very bottom right – mostly silver, circular with a circle of turquoise color inside. Looking at all your photos of your outfits and jewelry has made me want to go into my closet and purge lots of stuff so that I can acquire some things that look as nice as yours. Thanks for sharing all about the clothes you took with you on your trip. You won’t have to worry about us showing up anywhere in the same outfit, either, since I live in New Jersey!
Okay, here we go! :)
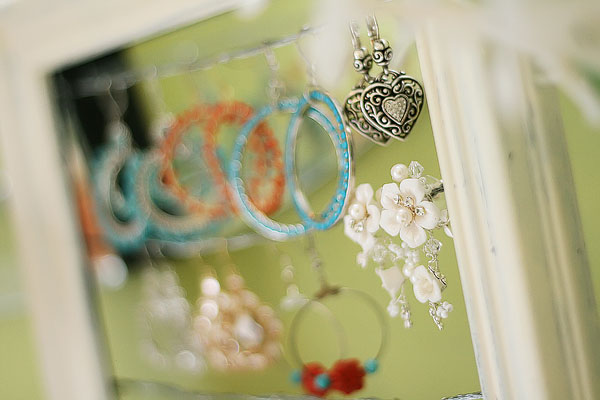
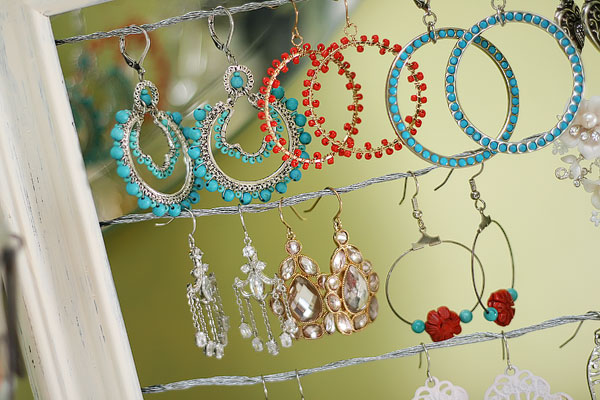
1st Row: Ann Taylor Loft, Francesca’s Collections, Turkoyz, Brighton
2nd Row: Turkoyz, Ann Taylor Loft, Turkoyz, Charming Charlie
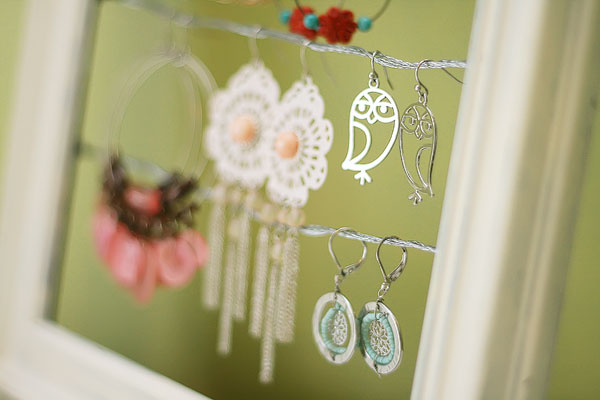
3rd Row: Charming Charlie, Therapy, Wrapsody (owls)
4th Row: Ann Taylor Loft
I’m so excited that you wrote back so quickly AND were willing and able to share where you purchased all your earrings! Thank you so so much. Can you believe that we only have two of those stores here in NJ? Francesca’s just opened up about 20 miles from here; I’m going to go on a earring expedition very soon! I really wish we had a Charming Charlie – it looks like a great store (I looked everything up online to try and find them). Thanks again and thanks for your wonderful blog. I am addicted!
Great idea! You could also use this idea to hang pictures off the wires with painted clothes pins.
That’s the cutest idea I’ve seen in a while. Love it!
What a beautiful earring holder. I love altering frames but never thought of making what you did. Your photos are all gorgeous and your earrings are very pretty too. TFS.
Mary
Amanda…this is GENIUS! SOOOOOOOOOOOOOO cute!!!!! I am totally wowed…definitely picking up the stuff to make this tomorrow :) thanks for the fabulous idea!!!!
Totally LOVE this!
I LOVE this idea. You could also hang it with a pretty black ribbon, like a picture on the wall. Where do you like to buy your earrings? I LOVE the white, dangly flower earrings on posts.
Just adorable. I’m heading out for supplies tonight!!
This turned out beautifully!
Thanks for the tutorial! I don’t wear very much jewelry but this gave me a great idea to display photos. I think I’ll try this concept on a much larger scale (poster frame) and then use little clips to hang the pictures from the wires.
Love. it. Absolutely cute (and so are the earrings!)
Great idea.
I used a shadow box to hang all my necklaces in, but didn’t know of anything so cute for the earrings!
Oh Amanda I *love* this! And we are going tomorrow to pick up some antique bedroom furniture from Craigslist and this would be so perfect in that room.
Thank you so much for the tutorial!
I LOVE Love LOVE your owl earrings! Super cute. I will definitely have to try this soon. Thanks for sharing!
Thanks for the great idea — I have been searching for an inexpensive but organized solution for mine too. I love this idea and will adapt it for my closet, where I intend to put my jewelry. If it’s pretty enough it may not stay there! :-)
Thanks Amanda! I’ll get started on this tomorrow! It’s the perfect answer for an all-too-common jewelry problem.
LOVE this idea! and definately going to try it.
I like the idea of painting those cheap frames shabby as well, seems a whole lot cheaper than buying the already made shabby frames and it givesme an exuse to paint something. :)
What a FANTASTIC idea! Where did you get that from?
I actually did this with my dangly earrings and bracelets. Check it out!
http://finewire.blogspot.com/2010/06/thrifty-shopping-organization-at-its.html
Thanks for sharing and have a FABULOUS weekend!
What a great idea! I’ll suggest this to my teenage daughter who has a gazillion earrings! :)
this is an awesome idea!! What a great way to display the dangly earings….I’m going to try this project. thanks for sharing
hugz ♥
I’m totally copying this!
Amanda, I love this idea and am saving it for future. What I liked best, though, is what you did with the bud vases on the right of the frame. I bought a 7-vase setup from Coldwater Creek – each sits in a hole in a wire frame, but it can be too long or oversized in most places I put it. I love it, but am having problems placing it. I see you have similar glass bud vases, and you have “wired” them together. Would also look cute with ribbon that matches the room’s decor, or raffia, or even just string. Thanks a bunch for that great idea!
How cute is that! I am going to have to try and make my own!
This is such a cute idea, I love it! It looks great and it’s easy- what could be better? :-)
I’m thinking of inexpensive Christmas gifts already…..AH HA!
THAT is simply FAN.TAS.TIC!!!
This is a perfect solution for my earrings and an empty space on the wall near my bathroom sink that has been screaming for something.
thanks for the idea and inspiration. =)
When I get mine done I’ll send you pictures.
Amanda that little shabby chic earring hanger is FABULOUS!
Truly it is!
And you make it looks so lovely on your dresser!
I love how you display your accessories!
Makes me consider all the lovely tangling earrings that I have!
They are all just laying in a jewelry box waiting…hoping…dreaming of being worn one day!
ANd let me just say…
those owl earrings…are too cute!
Just like you!
Great tutorial! xo
Happy Weekend!
I love this! Currently my earrings are scattered all over my dresser, lol. This is perfect and really cute. Thanks for sharing!
I love this! I’ve been looking all over for a cute way to store my dangly earrings and this is perfect!
ABSOLUTELY GORGEOUS!!!! You just get cooler by the hour, ma’am! :)
Last year, one of my students (a bubbly 8 year old doll :)) ran up and gave me the biggest hug, which also caused my earring to get stuck on her hair. Needless to say, it pulled my ear and now (sadly) I can only wear studs. Any neat ideas on how to display or store stud earrings?
I keep mine in one of those bead organizer boxes from Michael’s or Hobby Lobby. It fits just right in the jewelry drawer of my dresser. Or if you wanted to display them like above, you could use screen (like from a window) instead of wire.
You can do the same thing with a frame and piece of screen with any size frame to make a holder for post earrings.
Very crafty and creative…and cute! Nice work :)
just wanted to let you know i am bragging about you here:
yahttp://sandilousmusingstoo.blogspot.com/2010/07/try-thiswhy-dontcha.html
i love this idea…thinking..now…why…didn’t I think of that??????
too bad i don’t wear chandies…well..i have a couple…
this project is oh…so….appropo!!!
Amanda, I love this project. You are so creative. And I get that comment a lot from people myself, but you beat me for ideas! I’m totally going to make this. I even think I have everything required without have to shop **blush** – in the garage of course! One added tip from a former Cramer at Michael’s (back when I was still a teen) – at the hardware store you can get plastic coated wire which could be used the same way, but will save you hands when putting up those post earrings! Love it, love it, love it! Thanks, Amy
another great way to decorate the wall also with all the colorful earrings. thanks for sharing your idea.
Very Girly girl….Great idea and so dainty.
I have to try this, I love the antique look to the frame!! You are too creative! I love it, great idea!
I did this same sort of thing for my daughters hair bows. Only I just hot glued ribbon and then just clipped the hair bows to the ribbon. Never thought about doing it for my earrings though!!! Really good idea!!! Thanks!!!!
You could easily change up the themes and colors on this project. I think I will make one for my daughter’s room in her sorority house, using the colors and theme that match her room! I could set it on an easel that sits on top of her dresser. Thanks!
Way too cute!!!!! I have to try this!! Thanks for sharing!!!
And P.S… the next thing you need to share is where you get all your FABULOUS earrings! Love them ALL! I’m sad I didn’t have some like your post white ones for my wedding — they’re exquisite!
I asked about how you hang your earrings and you answered! Love it! Thanks so much — I will be making this ASAP! I have already showed all the girls in my office, too. Talk about being productive at work! :) Soooo cute!
LOVE this! I’m definitely going to have to try it soon… as PP said, maybe even today! :)
I love the idea…I will have to make one for each of my girls ~ what a pretty way to display the earrings, plus they will be much easier to find than the pile they are in right now! Thanks for sharing…
Great idea. Love the pictures. You are an inspiration. Thanks for the all the ideas. Keep up the good work.
I’ll definitely try this!!! ^__^
Love it!! Thanks for sharing
You are so creative, Amanda. Thank you for sharing!
Amanda ~ This is so creative & sensational! I am always wanting to do cute stuff w/ my jewelry because I have so much. This is an adorable idea!! Thanks for sharing!
Super Cute! It would make a great gift for someone, too.
I have another idea for my earrings, but this would be GREAT for all my “dress up” earrings that I’ve been collecting for my daughter. I’m trying to buy clip on earrings, so they would be easy to clip on to the wires and would be spaced far enough apart for little hands to grab. Love the idea! :) For my earrings, I’m doing the screen wire (1/4″ squares) or a radiator cover stapled to my big 16×20″ frame I bought YEARS ago! Thanks for the inspiration!
do you have a photo of your idea? thanks cathy
I LOVE this! Can we make some when you come to CA? It really is perfectly adorable!!
I LOVE this…I had tried to sell a frame at my recent garage sale and it didn’t go so now I’m gonna make this and either use it myself or sell at a craft booth!!
This is lovely piece of display of earrings. Would make one for my daughter who have bunches of earrings in the box. Another idea…it would be cool to add ribbon instead of wire to attach the frame to make looks prettier.
Love this idea! Going to Walmart today so my daughter and I can both make one this weekend. Awesome tutorial too:)
This is an AWESOME project! I desparately need one for my earrings! :) Thanks! ;)
LOVE this idea. I plan to make 3-one for me, and for each of my daughters. Thanks for sharing and I love your web site.
Awesome! I so want to do this. I just Stumbled this as well. Your photography is beautiful too.
I am SO going to do this! This is the COOLEST project!!! Thanks Amanda, you rock! :)
This is the COOLEST project!!! I am SO going to do this! Thanks Amanda, you rock! :)
Both functional and decorative. I love it! TKS for sharing Amanda.
That is just TOO stinkin’ cute and what a super smart idea!! You inspire me Amanda, you have no idea!! Thanks so much!!!
I LOVE this and never have enough earring storage. Definitely going to give this one a try.
Thanks for sharing,
Donna
I love this! Im so glad you helped us lost sheep who asked you about this in your “five things” post! thanks!
Wonderful idea. Just one question though – how do you make it stand up on a dresser?
I was wondering that too!
Mine’s just leaning up against the mirror. You could use candles or something to help hold it in place. :)
Another idea to have this stand is to get a tabletop plate holder.
Love it! I tried displaying my jewelry on a cork board with pins – disaster! I will definitely try my hand at this when I get some free time! Yay!
I love this! I have some old frames that I’ve been meaning to make into necklace holders, but wasn’t sure what to do with my earings ~ now I know! Thanks! Have a great weekend!
How would you make these to hang necklaces? I hate how I have them now and have been searching for a new way to keep them nice.
Look at the big frame here!
Necklaces
Love it!! i actually don’t wear earrings (I don’t even have my ears pierced) but I love them! I’m thinking about getting them pierced along with my daughter when she’s a year or so older. Anyways I love the earring display! My friend sells Lia Sophia jewlery and is always looking for new ways to display her jewelry. Thanks so much for the idea!
looks so cute! i was only wondering today what i could do with all my cute dangling earrings!! now i know, thanks!!
love it! i’ve seen other frames repurposed for earring hanging, but i love your simple explanation! i’m thinking colored craft wire (which i happen to have lots of!) would also work well…the kind they sell for craft projects that has a (i think) plastic coating. thanks for the tute!
I adored this idea,I will do it asap.. thank you very much!
You earrings make me want to re-pierce my ears! After having earrings for 17 years, I let my holes close up just enough to make it painful to put another earring through. Now I am starting to think about how much I miss having pretty things hanging from my ears.
I am SO going to do this. Like, maybe even TODAY!! :) Thanks, Amanda!
Hannah
Neat idea!!!
That is SUPER neat Amanda. You’ve given me a great idea. I never could find the right picture frames for Addy’s Room…I really didn’t think about painting my own. Thanks!