Hi friends! I’m running around San Francisco this weekend, trying to keep up with Jenny at Picky Palate at the BlogHer food event! :) While I’m away, my other friend Jenny is taking over my blog for a fun fall tutorial. Take it away, Jenny!
I am so excited that Amanda is trusting me to take over her blog today. I was the lucky winner of the L.A. trip contest and was taken on a whirlwind vacation with Amanda. We had such a great time in L.A. together; I don’t think words can describe it. Our trip started our friendship, and it continues to grow daily. A couple of weekends ago we had another adventure together in Atlanta. We hit up all the eatery hot spots, shopped, got pampered and ended the day with a fun double date with our hubbies.
During our countless conversations, I was telling Amanda how I enjoy recreating items I see in magazines or stores for less. When I was telling her this, I could see the wheels turning in her head… then she asked if I would do a tutorial for her blog. At first I was tempted to say, “Are you crazy? NO!” but then, how can you say no to someone as sweet as Amanda. So here I am, my very first blog post ever and I’m nervous… so bear with me!
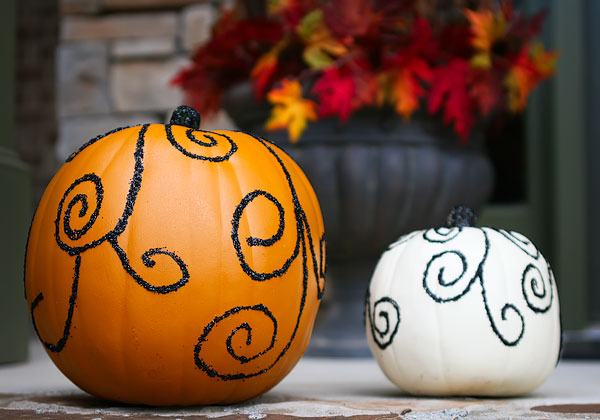
Fall is my absolute FAVORITE season. How could it not be? Pumpkins, leaves changing color, cool crisp air, being outdoors… what’s not to love? I normally make pumpkins that are completely glittered in different colors, but this year I thought it would be fun to make a design on the pumpkins. I got this idea from a magazine, but they wanted over $100 for these pumpkins! I don’t think so! With my frugal mind I figured I could make them for a lot less and just as cute.
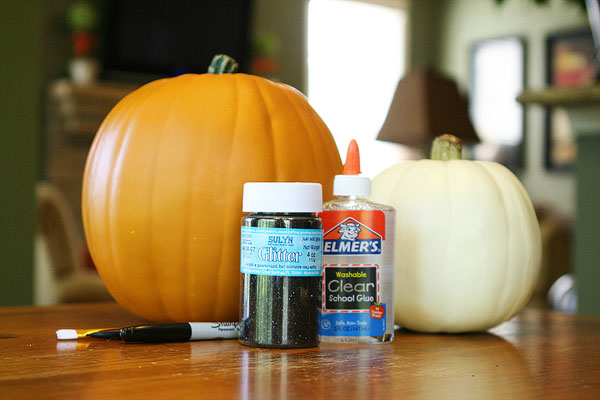
For my pumpkins I used:
- Elmer’s Glue
- Black Glitter
- Plastic Pumpkin (found at Michaels)
- Paint Brush
- Sharpie Pen
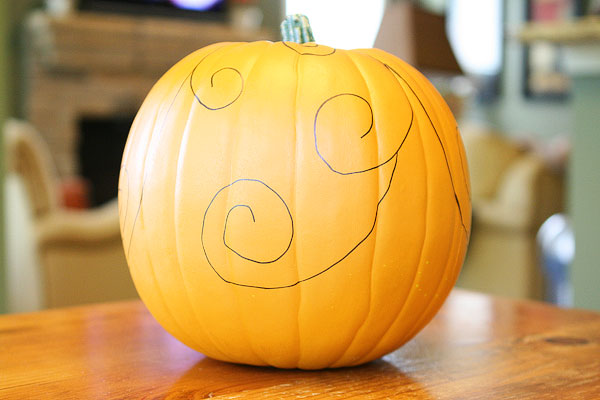
The first thing I did was draw swirls on my pumpkin with a sharpie pen.
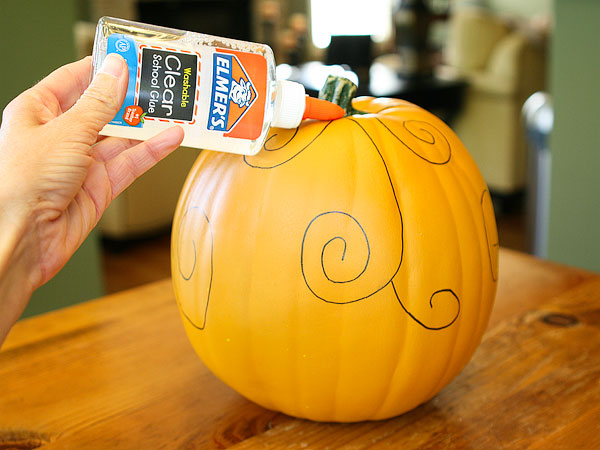
Then I went back over the sharpie with Elmer’s Glue.
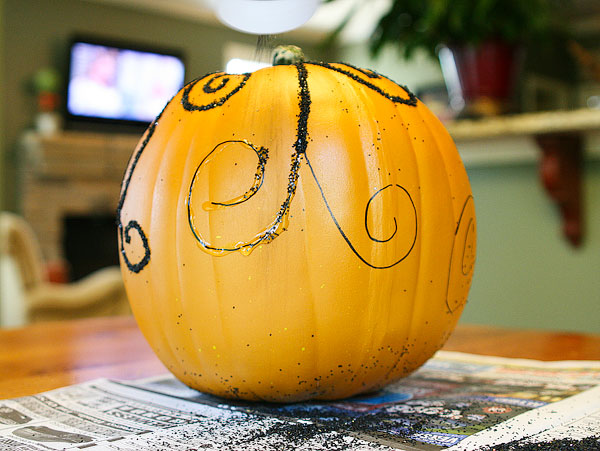
Be warned… it starts to drip so you better work fast!
Take your glitter and pour it all over the glue. (I only did one swirl at a time.)
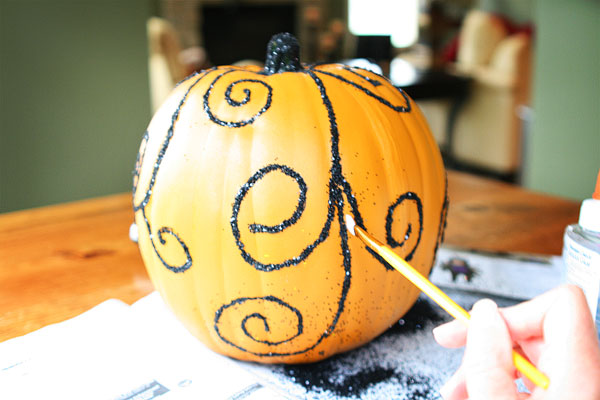
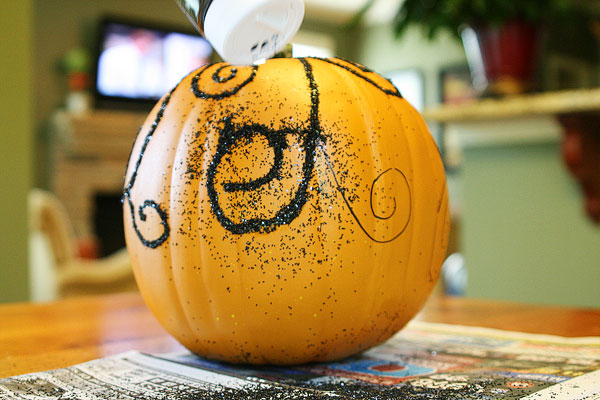
Since my swirls didn’t come out perfect at first, I used a paintbrush to brush away glue and glitter, and clean up the lines.
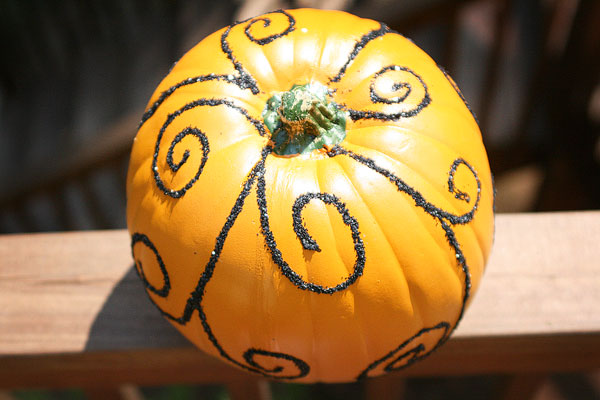
I think the top of the pumpkin looks really cool with the glitter design.
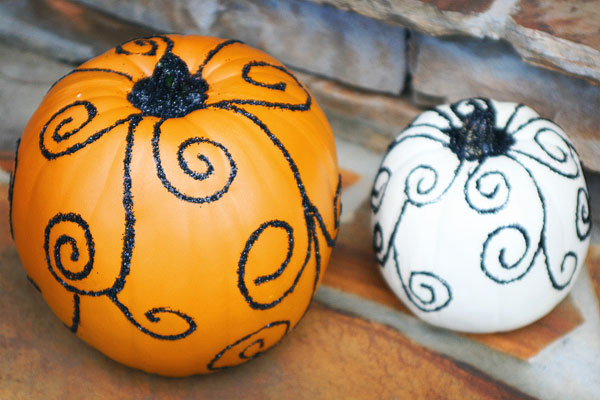
Once all the swirls are dried, I put glue all over the stem and glittered.
I probably spent a total of $15 on both of these pumpkins. That’s a lot better than $100 for the ones I saw in the magazine, that’s for sure!
I hope everyone enjoys making these pumpkins as much as I did!
Jenny has a brand new blog at The Box and the B where she blogs about her love of decorating and DIY projects, as well as cooking, traveling, and hiking with her boston terrier Bella. Thanks for sharing this darling fall project, Jenny!
_____________________________________________
Keep up with me while I’m in San Francisco on Twitter and Facebook – I’m posting live updates along the way. Have a great weekend! :)


So simple, and would be great so the pumpkins don’t spoil like when they are carved. Thanks for sharing :)
found you through rachel’s graspingforobjectivity…and I totally plan on doing this craft with my girls! It seems easy enough for kids, but tasteful enough to decorate with! A unique win-win!
So chic! I love it. I have always used a brush like you did to brush away the excess glitter but I was just reading about doing glitter painting on Martha Stewart’s site and it suggested using canned air to blow away the stray glitter. I thought that was a great idea and this project immediately came to mind and wanted to pass the tip along.
These are too cute! I’m having a pumpkin carving party this weekend…but maybe I will have to change it to “pumpkin glittering” Thanks!
My daughter used this as a project at a community fair and it was a huge success -Thanks
OMG These are amazing! Wait until I show my 11-year old! We love decorating pumpkins!
Darling idea! Can’t wait to make my own!
Super cute!! Thanks for sharing!! :)
I love love love these! I am heading to Michaels today for paint…and will be picking up some pumpkins! :) (And great job on your first blog post)!
OMG!!! I loooove these!! great idea!
I love this project and may just have to give this a go! Thanks for sharing :)
~~~~~
Amanda, when you get back, would you tell us more about BlogHer and how to get involved with that?
I love this. Especially the white pumpkin. White pumpkins are my favorite! I’m reposting this and linking you in my blog. Thank you for posting this adorable project.
so cute! i will have a pumpkin decorating night with the girls!
Absolutely LOVE these pumpkins….now I just have to talk my husband into letting me make them. lol :D
I love these! My mom and I made glitter pumpkins last year for the golf course she works at and we glittered the golf course logo!
So adorable! I love the black glitter!
You are so darn cute and fancy!
Love it!
Jenny, you did a great job in Amanda’s absence. You shouldn’t be nervous at all. I saved your site in my fave’s and will be checking you out as well.
Thanks for the great tips.
very elegant! love the idea and think i’ll give it a try. you could eliminate the drip problem by painting on the glue. i think it would be really pretty to spay paint one in gold first and add the glitter for a formal centerpiece or even cut some swirls into it too to add and additional effect with light! can’t wait to get started!
So beautiful! I really like it!!
Very cute idea! Easy too! Thanks for sharing this creative alternative to carving the pumpkin!!
this is very creative and pretty. I love it!
What a wonderful and do-able project to do with my granddaughter. Thanks so much!
SO so SO so VERY CUTE!!! I’m gonna copy ;) Thanks for posting such a cute and frugal idea! GO FALL!!!!
This looks like a project even I could do. :)
Thanks for making it so simple. You’re doing a good job!
Awesome!!! My kiddos are very excited to try this…and they will last for years :) Great job with pics too….
This is perfect for fall! Thanks so much for a creative idea! We’re sharing this on our Facebook page!
Super cute pumpkins!! I think I may have to try this as it so easy and cost so much less than what you can purchase out of the catalogs. That leaves me more $$ to buy more things…tee-hee!! Thanks!!
Love love them .. very high fashion.
Great job, Jenny! The tutorial looks awesome.
That’s a fantastic idea! It’s perfect for those of us want the seasonal festivity but can’t be bothered to carve a pumpkin. Well done!
What a cute & fun idea. I was just thinking, has anyone tried this on real pumpkins? It probably wouldn’t come out quite so perfect, but the sizes would be limitless & maybe cheaper. If I decide to try glittering the real ones, I’ll post it on my blog, but all the credit goes to you, Jenny, for the great idea!
That is exactly what I wonder… Can you do it on real ones? Have you tried?
Great job Jenny! Thanks Amanda, I am sure you’re having a great time!!
My friends and I have a pumpkin carving party planned with our kids. Now my friends and I will be doing our own grown-up project along side them!!
Thanks.
Lurve it!!
So cute Jenny! I love how they turned out! I’m really diggy all the chic pumpkins this year :)
I LOVE these!!!! :) Thanks for sharing.
Love it! I am definitely trying the swirls and a personalized one for my son. Good job…I’ll be keeping up with your blog, Jenny!
Awesome Job Jenny, I just love those. I am going to make them this weekend…. Thanks for the idea….
Neat idea, want to try it!!!
WHAT A GREAT IDEA FOR YOUR PUMPKIN. THAT WOULD MAKE IT LAST A LOT LONGER.
Finally an idea to do with those plastic pumpkins I’m seeing everywhere! I love this and I’m a big fan of swirls so I’m totally doing this! What other things have you seen with those plastic pumpkins to do? Carving (scares me!)?
LOVE LOVE LOVE IT!
Darling pumpkins and what a fun project!!!!
How cute!!!!!!!!!!! I’m gonna try it!
I absolutely love this idea and will be doing it very soon!
I love this look…….and SO simple to do!! Thanks for sharing!!
Thanks Jenny! I’ll be having a go at this cute project..
Your pumpkins came out beautiful! Thanks for sharing your steps.
I also saw something like this in a magazine last year and wondered how they did it! Thank you so much for for sharing! I guess I will be at Michael’s again tonight:) I so have to do this project.
Ohh! I love swirls, and I love pumpkins . . . this is just perfect! I can’t wait to try this!! Thanks for sharing!
Very pretty and great idea!! I will have to try it next year.
This is a super fun project. I plan to copy it!! You did a great job on the blog posting too! Thanks for this great idea.
Those are so neat! I’m going to try it–I saw some of those plastic pumpkins at the dollar store and glitter abounds at my daycare!!!
Awesome idea. I love doing the same thing- taking a $100 item and making it for much less in a way that I love instead of a generic from the catalog :) TFS!
I love this idea, so creative! Thanks for sharing!
This is SUCH a cute idea! I am definitely going to be doing this!
Beautiful and so simple! Thanks for sharing!